551&$1 167$//$7,21*8
Zzzghoofrp
Page
KHQ8VLQJRXU&RPSXWHU6\VWHP
Uhpryhg
UJRQRPLF&RPSXWLQJ+DELWV
$51,1*,PSURSHURUSURORQJHGNH\ERDUGXVHPD\UHVXOWLQLQMXU\
KHQRUNLQJ,QVLGHRXU&RPSXWHU
IROORZLQVWDOODWLRQDQGVHUYLFHLQVWUXFWLRQVFORVHO\
7XUQRII\RXUFRPSXWHUDQGDQ\SHULSKHUDOV
Doing so reduces the potential for personal injury or shock
$51,1
Lqvwuxfwlrqvdwwkhiurqwriwklvjxlgh
3UHIDFH
$ERXW7KLV*XLGH
2WKHURFXPHQWVRX0D\1HHG
DUUDQW\DQG5HWXUQ3ROLF\,QIRUPDWLRQ
DUQLQJV&DXWLRQV1RWHV
1RWDWLRQDO&RQYHQWLRQV
\SRJUDSKLFDO&RQYHQWLRQV
1RERRWGHYLFHDYDLODEOH
Kdswhu
PXE
Xiv
NIC
Video Controller
MS-DOS NIC
$SSHQGL$
RUNLQJ,QVLGHRXU&RPSXWHU
ICU Error Messages Configuration Manager Messages
$SSHQGL%
$SSHQGL
QGH Ljxuhv
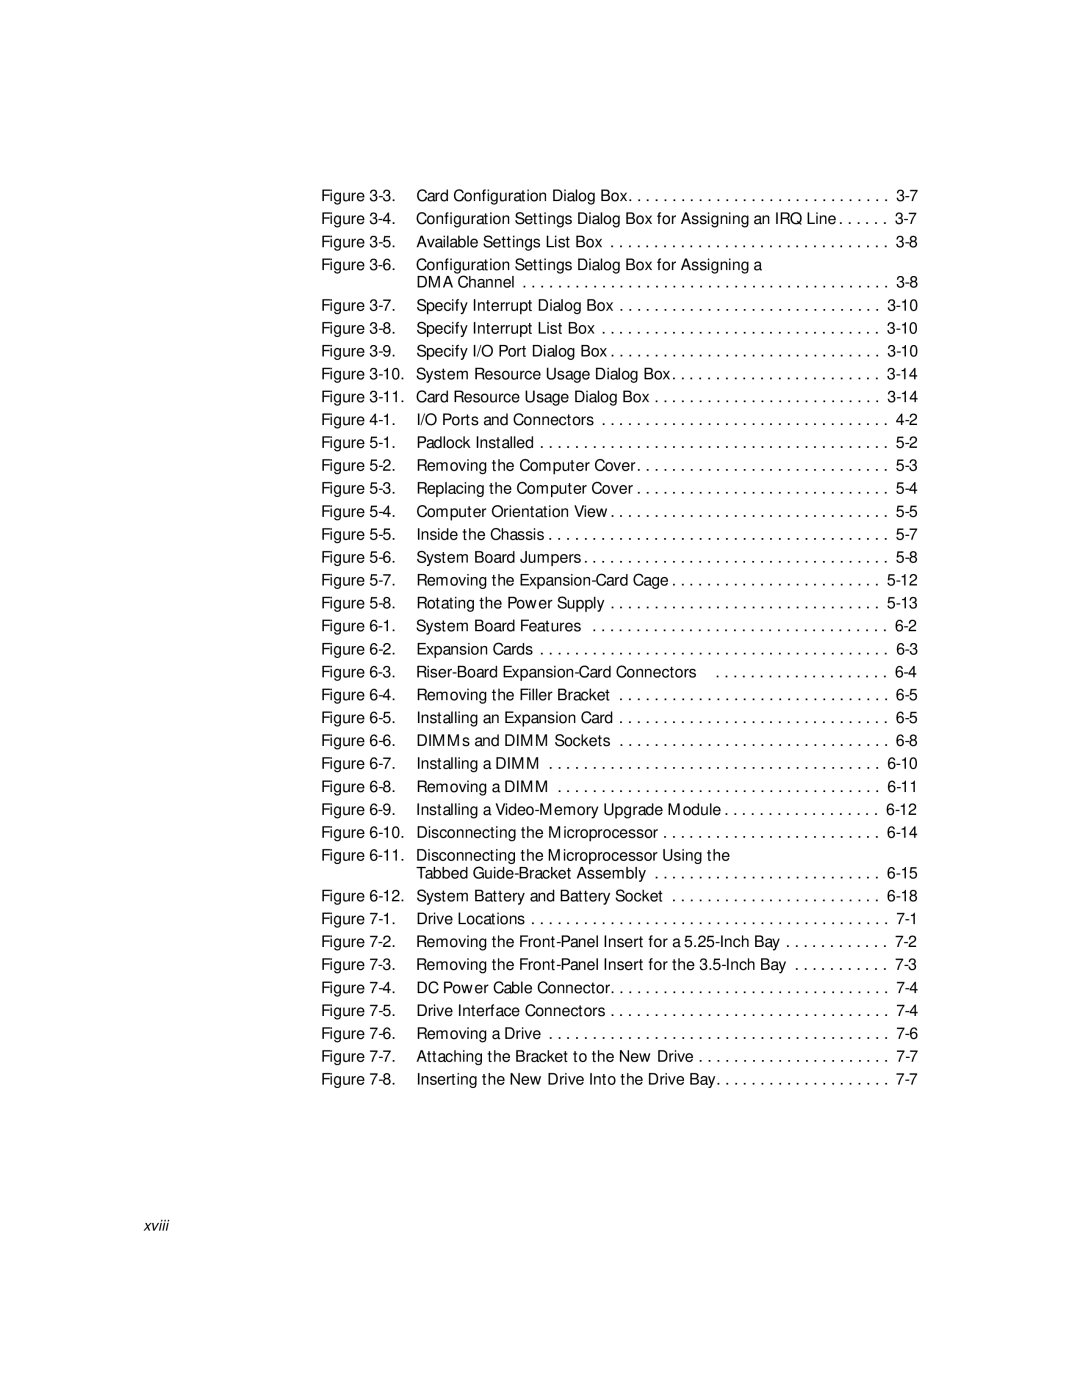
Card Configuration Dialog Box
7DEOHV
Page
Qwurgxfwlrq
\VWHPHDWXUHV
+DUGZDUHHDWXUHV
7DEOH9LGHR0HPRU\5HTXLUHPHQWV
6RIWZDUHHDWXUHV
0DQDJHDELOLW\HDWXUHV
Wakeup On LAN Auto Power On Security Features
HOO2SHQ0DQDJH3URJUDP
LJXUHHOO2SHQ0DQDJH3URJUDP
DXOW0DQDJHPHQW
Security Management features of the Dell OpenManage include
RQILJXUDWLRQ0DQDJHPHQW
$VVHW0DQDJHPHQW
6HFXULW\0DQDJHPHQW
6HFXULW\HDWXUHV
$XWR3RZHU2Q
KDVVLV,QWUXVLRQ
6HFXULW\&DEOH6ORWDQG3DGORFN5LQJ
3DVVZRUGV
8VLQJWKH3RZHU6ZLWFK
LJXUH6HFXULW\&DEOH6ORWDQG3DGORFN5LQJ
2ULHQWDWLRQ
Erwwrp Lwwkhvwdqgrqwrzkdwzdvwkhohiwvlghriwkhfrpsxwhu
QHUJ\6WDU&RPSOLDQFH
LJXUHQHUJ\6WDUPEOHP
PSRUWDQW1RWHIRULQGRZV8VHUV
QWHO3,,H,18SGDWH,QVWDOOHUIRU Lqgrzv
$FFHVVLQJ2QOLQHRFXPHQWDWLRQ
Olfnhvwrfrqwlqxh
OLFN1HWWRFRQWLQXH
Olfnlqlvkwrfrqwlqxh
HWWLQJ+HOS
QWHULQJWKH6\VWHP6HWXS3URJUDP
Enter the System Setup program as follows
7XUQRQ\RXUV\VWHP
\VWHP6HWXS6FUHHQ
8VLQJWKH6\VWHP6HWXS3URJUDP
Moves to the next field
7DEOH6\VWHP6HWXS1DYLJDWLRQ.H\V
Moves to the previous field
\VWHP6HWXS&DWHJRULHV
LJXUH6\VWHP6HWXS6FUHHQ
LVNHWWHULYH$DQGLVNHWWHULYH%
\VWHP7LPH
3ULPDU\ULYHQDQG6HFRQGDU\ULYHQ
IRX+DYHD3UREOHP
IRX.QRZWKHULYH7\SH1XPEHU
RRW6HTXHQFH
+DUGLVNULYH6HTXHQFH
IRXR1RW.QRZWKHULYH7\SH1XPEHU
9LGHR0HPRU\
\VWHP0HPRU\
5HVHUYHG0HPRU\
Qwhjudwhghylfhv
1HWZRUN,QWHUIDFH&RQWUROOHU
0RXVH3RUW
6HULDO3RUWDQG6HULDO3RUW
3DUDOOHO3RUW0RGH
3DUDOOHO3RUW
ULYH,QWHUIDFH
\VWHP6HFXULW\
LVNHWWH,QWHUIDFH
6SHDNHU
9LGHR$&6QRRS
3DVVZRUG6WDWXV
6HWXS3DVVZRUG
\ERDUG1XP/RFN
5HSRUW.H\ERDUGUURUV
$XWR3RZHU2Q
3RZHU0DQDJHPHQW
6DYLQJ,+DUGLVNULYH3RZHU
6DYLQJ0RQLWRU3RZHU
Ulvngdpdjlqjwkhprqlwru
Disabled Never Maximum Minutes Hour Regular Minimum
8VLQJWKH6\VWHP3DVVZRUGHDWXUH
$VVHW7DJ
\VWHPDWD&DWHJRULHV
$VVLJQLQJD6\VWHP3DVVZRUG
\SH\RXUQHZV\VWHPSDVVZRUG
8VLQJRXU6\VWHP3DVVZRUGWR6HFXUHRXU6\VWHP
\SHLQWKHSDVVZRUGDQG
\SHWKHSDVVZRUGDQGSUHVVQWHU
Qfruuhfwsdvvzrug Qwhusdvvzrug
HOHWLQJRU&KDQJLQJDQLVWLQJ6\VWHP3DVVZRUG
KHQSURPSWHGW\SHWKHV\VWHPSDVVZRUG
$VVLJQLQJD6HWXS3DVVZRUG
8VLQJWKH6HWXS3DVVZRUGHDWXUH
2SHUDWLQJLWKD6HWXS3DVVZRUGQDEOHG
LVDEOLQJDRUJRWWHQ3DVVZRUG
HOHWLQJRU&KDQJLQJDQLVWLQJ6HWXS3DVVZRUG
QWHUWKH6\VWHP6HWXSSURJUDP
Zrugihdwxuh
Lqvwuxfwlrqvdwwkhiurqwriwklvjxlgh 5HSODFHWKH36MXPSHUSOXJ
5HVSRQGLQJWRUURU0HVVDJHV
$VVLJQDQHZV\VWHPDQGRUVHWXSSDVVZRUG
Page
8VLQJWKH,6$&RQILJXUDWLRQ8WLOLW\
4XLFN6WDUW
HWHUPLQHZKHWKHU\RXQHHGWRUXQWKH,&8
6WDUWWKHV\VWHPXVLQJ\RXU,&8GLVNHWWH
Ghylfh
$ERXWWKH,&8
8DWDEDVH
3UHSDULQJWR8VHWKH,&8
DFNLQJ8SWKH,&8 Lvnhwwh
$FFHVVLQJ+HOS
6WDUWLQJWKH,&8
0DNLQJ6HOHFWLRQVLQWKH,&8
$GGLQJD/LVWHG&DUG
LJXUH$GG1HWZRUN&DUGLDORJ%R
To add a listed card with the ICU, follow these steps
Fkdswhu
7RVHOHFWWKHUHVRXUFHV\RXUVHOIFOLFN$GYDQFHG
LJXUH&DUG&RQILJXUDWLRQLDORJ%R
VHWWLQJDQGWKHQFOLFN6HWWLQJV
LJXUH$YDLODEOH6HWWLQJV/LVW%R
$GGLQJDQ8QOLVWHG&DUG
Lvkhgvhohfwlqjuhvrxufhviruwkhixqfwlrq
LJXUH6SHFLI\,QWHUUXSWLDORJ%R
LJXUH6SHFLI\,QWHUUXSW/LVW%R
0RGLI\LQJD&DUG
Zlqgrz
You have completed this procedure do not proceed to step
UHVSHFWLYHO\
Rshudwlrq
9LHZLQJ5HVRXUFHV
ICU returns to the ICU window
6DYLQJWKH6\VWHP&RQILJXUDWLRQ
LWLQJURPWKH,&8
LJXUH6\VWHP5HVRXUFH8VDJHLDORJ%R
LJXUH&DUG5HVRXUFH8VDJHLDORJ%R
RFNLQJDQG8QORFNLQJ&DUGV
RFNLQJDQG8QORFNLQJ$OO5HVRXUFHV
RFNLQJDQG8QORFNLQJ&RQILJXUDWLRQ5HVRXUFHV
OLFN0RGLI\RUVHOHFW0RGLI\&DUGIURPWKH&RQILJXUHPHQX
OLFN6HWWLQJV
6HOHFW/RFN5HVRXUFHV
8VLQJ,QWHJUDWHGHYLFHV
9LGHR&RQWUROOHU
1HWZRUN&DEOH5HTXLUHPHQWV
Udwhvkhdwkv
RQILJXULQJWKH1
MS-DOS
Gulyh RQQHFWWKHQHWZRUNFDEOHWRWKHEDFNRI\RXUFRPSXWHU
9HULI\WKDWWKH1,&LVHQDEOHGLQWKH6\VWHP6HWXSSURJUDP
OLFN+DYHLVN
QVHUWGLVNHWWHLQWRGULYH$W\SH D?DQGWKHQFOLFN2
KHQSURPSWHGIRUGLVNHWWHFOLFN2
$GPLQLVWUDWRUSULYLOHJHV
OLFNHVLQWKH1HWZRUN6HWWLQJVGLDORJER
Gulyh
Dqgfrqqhfwhgwrlwvqhwzrun
Zrundffhvv
LQGRZVIRURUNJURXSV1
06261
5XQWKH1HWZRUN,QWHUIDFH7HVW*URXS Ffijhhorfdwhgrq Glvnhwwh
6DIHW\LUVW³RURXDQGRXU&RPSXWHU
HIRUHRX%HJLQ
Wkhvhtxhqfhlqglfdwhg 7XUQRII\RXUFRPSXWHUDQGDOOSHULSKHUDOV
5HPRYLQJWKH&RPSXWHU&RYHU
8QSDFNLQJRXU+DUGZDUH2SWLRQ
LJXUH3DGORFN,QVWDOOHG
To remove the computer cover, follow these steps
5HSODFLQJWKH&RPSXWHU&RYHU
LJXUH5HPRYLQJWKH&RPSXWHU&RYHU
5HPRYHWKHIORRUVWDQGLIRQHLVDWWDFKHG
5HPRYHWKHFRYHU
LJXUH5HSODFLQJWKH&RPSXWHU&RYHU
QVLGHRXU&RPSXWHU
\RXDUHXVLQJWKHRSWLRQDOIORRUVWDQGUHDWWDFKLW
Xpshuv
LJXUH&RPSXWHU2ULHQWDWLRQ9LHZ
6ZLWFKHV
Rffxu
LJXUH,QVLGHWKH&KDVVLV
LJXUH6\VWHP%RDUG-XPSHUV
Bios
7DEOH6\VWHP%RDUG-XPSHU6HWWLQJV
Pswd
BUS66M
\VWHP%RDUGDQG5LVHU%RDUG/DEHOV
7DEOH6\VWHP%RDUGDQG5LVHU%RDUG&RQQHFWRUV DQG6RFNHWV
5HPRYLQJWKHSDQVLRQ&DUG&DJH
LJXUH5HPRYLQJWKHSDQVLRQ&DUG&DJH
5HSODFLQJWKHSDQVLRQ&DUG&DJH
To replace the expansion-card cage, follow these steps
5RWDWLQJWKH3RZHU6XSSO\$ZD\URPWKH 6\VWHP%RDUG
LJXUH5RWDWLQJWKH3RZHU6XSSO\
Page
QVWDOOLQJ6\VWHP%RDUG2SWLRQV
SDQVLRQ&DUGV
MOUSE/KYBD
SDQVLRQ6ORWV
LJXUHSDQVLRQ&DUGV
To install an expansion card, follow these steps
See , Using the ISA Configuration Utility, for instructions
QVWDOOLQJDQSDQVLRQ&DUG
LJXUH5LVHU%RDUGSDQVLRQ&DUG&RQQHFWRUV
LJXUH,QVWDOOLQJDQSDQVLRQ&DUG
LJXUH5HPRYLQJWKHLOOHU%UDFNHW
Qvwdoowkhhsdqvlrqfdug
See , Using the System Setup Program, for instructions
5HPRYLQJDQSDQVLRQ&DUG
RQQHFWDQ\FDEOHVWKDWVKRXOGEHDWWDFKHGWRWKHFDUG
$/57&RYHUZDVSUHYLRXVO\UHPRYHG
$GGLQJ0HPRU\
To perform a memory upgrade, follow these steps
3HUIRUPLQJD0HPRU\8SJUDGH
7DEOH6DPSOH,00&RQILJXUDWLRQ2SWLRQV
32 MB 64 MB 128 MB 160 MB 192 MB 256 MB
See -1 and Table
Wrwdo
5RWDWHWKHSRZHUVXSSO\EDFNLQWRWKHFRPSXWHUFKDVVLV
7KHDPRXQWRIV\VWHPPHPRU\KDVFKDQJHG
To install a DIMM, follow these steps
QVWDOOLQJD,00
5HPRYLQJD,00
Hgjhfrqqhfwruzlwkwkhfurvveduvlqwkhvrfnhw
$GGLQJ9LGHR0HPRU\
8SJUDGLQJWKH0LFURSURFHVVRU
LJXUH,QVWDOOLQJD9LGHR0HPRU\8SJUDGH0RGXOH
Irxqghduolhulqwklvfkdswhuirupruhlqirupdwlrq
Srvlwlrq
LJXUHLVFRQQHFWLQJWKH0LFURSURFHVVRU
Suhyhqwgdpdjhwrwkhplfursurfhvvrurufrqqhfwru
Volghwkhkhdwvlqnfolsvedfnlqwrsrvlwlrq
See , Using the System Setup Program
5HSODFLQJWKH6\VWHP%DWWHU\
5RWDWHWKHSRZHUVXSSO\EDFNLQWRSRVLWLRQ
SURFHVVRULVFRUUHFWO\LGHQWLILHG
RFDWHWKHEDWWHU\DQGUHPRYHLW
QVWDOOWKHQHZEDWWHU\
LJXUH6\VWHP%DWWHU\DQG%DWWHU\6RFNHW
Qvwdoolqjulyhv
LJXUHULYH/RFDWLRQV
5HPRYLQJDQG5HSODFLQJURQW3DQHO ,QVHUWV
Lqvhuw
Rqqhfwlqjulyhv
Wkhsodvwlflqvhuwrxwrilwvrshqlqj
LJXUH&3RZHU&DEOH&RQQHFWRU
LJXUHULYH,QWHUIDFH&RQQHFWRUV
QVWDOOLQJDULYHLQD,QFKULYH%D\
8QSDFNWKHGULYHDQGSUHSDUHLWIRULQVWDOODWLRQ
5HPRYHWKHGULYHEUDFNHWIURPWKHED\\RXZDQWWRXVH
LJXUH5HPRYLQJDULYH
$WWDFKWKHEUDFNHWWRWKHQHZGULYH
See Installing an Expansion Card in Chapter
LJXUH$WWDFKLQJWKH%UDFNHWWRWKH1HZULYH
LJXUH,QVHUWLQJWKH1HZULYH,QWRWKHULYH%D\
Frqwuroohufduglqdqhsdqvlrqvorw
Erdug
Sdqholqvhuwiurpwkhfrpsxwhufryhu
8SGDWH\RXUV\VWHPFRQILJXUDWLRQLQIRUPDWLRQ
QVWDOOLQJDQ,+DUGLVNULYH
9HULI\WKDW\RXUV\VWHPZRUNVFRUUHFWO\
ULYH$GGUHVVLQJ
Surfhgxuh 3UHSDUHWKHGULYHIRULQVWDOODWLRQ
LJXUH5HPRYLQJWKH+DUGLVNULYH%UDFNHW
LJXUH,QVHUWLQJWKH+DUGLVNULYHLQWKH%UDFNHW
5HLQVWDOOWKHKDUGGLVNGULYHEUDFNHWLQWKHFKDVVLV
To locate the IDE1 connector, see Figure
LJXUH$WWDFKLQJ+DUGLVNULYH&DEOHV
3DUWLWLRQLQJDQG/RJLFDOO\RUPDWWLQJRXU, +DUGLVNULYH
7HFKQLFDO6SHFLILFDWLRQV
7DEOH$7HFKQLFDO6SHFLILFDWLRQV
Pins Bits
7DEOH$7HFKQLFDO6SHFLILFDWLRQVFRQWLQXHG
Disables the system password at start-up
Green LED Yellow LED
Qylurqphqwdo
Page
7DEOH%&RQILJXUDWLRQ8WLOLW\0HVVDJHV
8UURU0HVVDJHV
Idlohg
7DEOH%&RQILJXUDWLRQ8WLOLW\0HVVDJHVFRQWLQXHG
ILOH7KLVILOH
Lvuhtxluhgiru
1R&RQILJXUDWLRQ
7KLVGHYLFHLV Xqfrqiljxudeoh Ehfdxvhrid
Frqiolfwlqj
7KHORDGHGFDUG
Surfhhg
Uhvrxufh
7KH,&8GHWHFWVD
Frqiolfwlqjbfdug 7KHFRQIOLFWLQJ Uhvrxufhzdv
Frqiolfwlqjbfdug
7KHFRQILJXUDWLRQ
Fijilohxvhg
Lqydolgrugrhv
Iloh
RQILJXUDWLRQ0DQDJHU0HVVDJHV
7DEOH%&RQILJXUDWLRQ0DQDJHU0HVVDJHV
Wlqjvgliihuhqw IURPIDFWRU\ GHIDXOW5HFRQ
This message appears at
7DEOH%&RQILJXUDWLRQ0DQDJHU0HVVDJHVFRQWLQXHG
2QHRUPRUHDFWLYH
196UURU ,QWHUQDO
UURU&RGH
6HOHFW1XPEHU
Dfwlydwhg
$51,1*&RXOGQRW FRQILJXUH3OXJDQG 3OD\&DUG1DPH
$51,1*&RXOGQRW FRQILJXUH3&,GHYLFH , Hylfh
5HSHDWVWHSXQWLO\RXKDYH
See Modifying a Card in for instructions
FRQILJXUH3&,GHYLFH
Dlohgwrfrqiljxuh
GHYLFHV8VH\RXUV\V
Whpvfrqiljxudwlrq XWLOLW\WRUHVROYH
5HJXODWRU\1RWLFHV
ODVV$
ODVV%
1RWLFH&DQDGD2QO\
RPSOLDQFH&HFK5HSXEOLF 2QO\
1RWLFH
Uhtxluhgwrwdnhdghtxdwhphdvxuhv
ODVV$HYLFH
RUHDQ5HJXODWRU\1RWLFH
ODVV%HYLFH
8ZNBHBOJB1PMTLJFHP$FOUSVN#BEBËJ $FSUZGJLBDKJ
1PPTUBFJOTUSVLDKFCFQJFDFËTUXB
3ROLVK&HQWHUIRU7HVWLQJDQG&HUWLILFDWLRQ 1RWLFH
Obefquzxbàmvcqpuzlbàtjäpojf
Fmfnfouíxxfxoäusozdi
Round Rock, TX
Importer Dell Computer de México De C.V
Col. Cuauhtemoc
Importador Dell Computer de México De C.V
DUUDQWLHVDQG5HWXUQ3ROLF\
RYHUDJHXULQJHDU2QH
RYHUDJHXULQJHDUV7ZRDQG7KUHH
Hqhudo
´7RWDO6DWLVIDFWLRQµ5HWXUQ3ROLF\86DQG &DQDGD2QO\
Page
Basic input/output system. See Bios
Configuration ManagerB-6
Diagnosing problems1-14
DMI
Help3-5 ICU configuration files3-3
Installing7-9
Eide hard-disk drives Addressing7-10
IDE Drive Interface category2-10 Indicators
Manageability features1-5 Manufacturing Test Report2-1
Quick start3-2
Industry-Standard Architecture. See ISA
Memory
Time-out periods2-15 Power Management category2-13
Security1-82-122-15 See also setup password system password
Service1-14 Service Tag category2-15
Video-memory upgrade6-2 SpecificationsA-1
Password2-17
Changing or deleting an existing password2-18
System Time category2-5 System. See computer
Video memory adding6-11 requirements1-3 upgrade socket6-2