INSTALLATION

Continued

INSTALLING HEATER BASE ASSEMBLY

WARNING: You must secure this heater to fireplace floor. If not, heater will move when you adjust controls. Moving heater may cause a gas leak or log misplacement.

WARNING: If installing in a sunken fireplace, special care is needed. You must raise the fireplace floor to allow access to heater control panel. This will insure adequate air flow and guard against sooting and controls being damaged. Raise fireplace floor with noncombus- tible material. Make sure material is secure.

CAUTION: Do not pick up heater base assembly by burn- ers. This could damage heater. Only handle base assembly by grates.

IMPORTANT: Make sure the heater burners are level. If heater is not level, heater will not work properly. For thermostat models, avoid damage to thermostat bulb. Avoid nicks or sharp bends in thermostat bulb wire. Keep thermostat bulb in mounting bracket until ready to mount base to floor. See Optional Positioning Of Thermostat Sensing Bulb, page 25.

Installation Items Needed

hardware package (provided with heater)

approved flexible gas hose and fittings (not provided) (if allowed by local codes)

sealant (resistant to propane/LP gas, not provided)

electric drill with 3/16" drill bit (metal or ma- sonry as applicable)

flathead screwdriver

pipe wrench

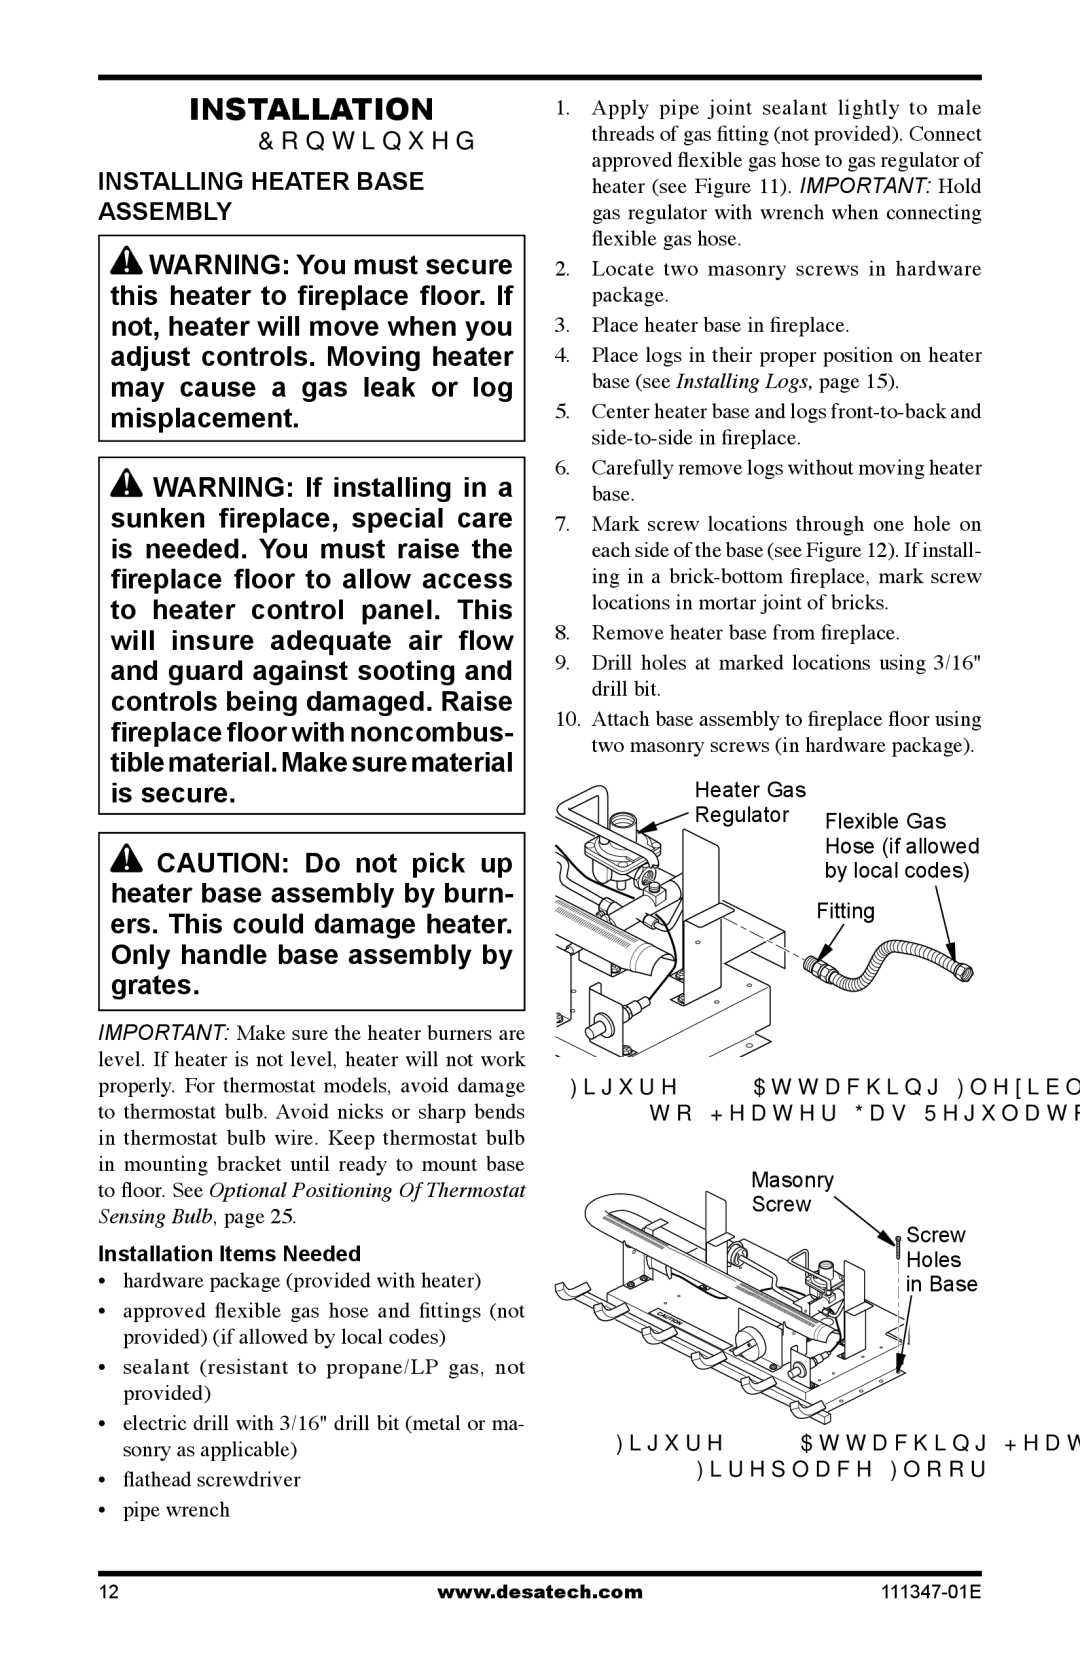
1.Apply pipe joint sealant lightly to male threads of gas fitting (not provided). Connect approved flexible gas hose to gas regulator of heater (see Figure 11). IMPORTANT: Hold gas regulator with wrench when connecting flexible gas hose.

2.Locate two masonry screws in hardware package.

3.Place heater base in fireplace.

4.Place logs in their proper position on heater base (see Installing Logs, page 15).

5.Center heater base and logs front-to-back and side-to-side in fireplace.

6.Carefully remove logs without moving heater base.

7.Mark screw locations through one hole on each side of the base (see Figure 12). If install- ing in a brick-bottom fireplace, mark screw locations in mortar joint of bricks.

8.Remove heater base from fireplace.

9.Drill holes at marked locations using 3/16" drill bit.

10.Attach base assembly to fireplace floor using two masonry screws (in hardware package).

Heater Gas

Regulator Flexible Gas

Hose (if allowed

by local codes)

Fitting

Figure 11 - Attaching Flexible Gas Hose to Heater Gas Regulator

Masonry

Screw

Screw

Holes

in Base

Figure 12 - Attaching Heater to

Fireplace Floor

12

www.desatech.com

111347-01E

Page 12
Image 12
Desa CDL3924NT, CDL3924PT, LSL3124P installation manual Installing Heater Base Assembly, Installation Items Needed

LSL3124P, CDL3924PT, CDL3924NT specifications

Desa CDL3924NT, LSL3124P, and CDL3924PT are notable choices in the realm of heating appliances, demonstrating advanced engineering and an array of user-friendly features. Each model has unique characteristics, making them suitable for diverse heating needs.

The Desa CDL3924NT is particularly distinguished by its dual-fuel capability, allowing users to switch between natural gas and propane. This flexibility ensures that homeowners can choose the energy source that best suits their preferences and availability. Moreover, the model boasts a heating capacity of up to 39,000 BTUs, providing substantial warmth for large spaces. Its compact design makes it ideal for installations in rooms with limited space, while an aesthetically pleasing finish ensures that it blends seamlessly with various home decors.

Meanwhile, the LSL3124P shines with its sleek design and powerful performance. This direct vent gas stove focuses on efficiency, delivering up to 26,000 BTUs of heating output. One of its standout features is the advanced airflow system, which ensures even heat distribution, reducing cold spots and providing consistent warmth. The LSL3124P is equipped with a straightforward digital thermostat that allows for precision temperature adjustments, enhancing user convenience. Additionally, the model is designed for quiet operation, making it an excellent choice for relaxation areas like living rooms or bedrooms.

The CDL3924PT, on the other hand, emphasizes versatility and efficiency. Equipped with a programmable timer, this appliance allows users to pre-set heating schedules according to their daily routines, ultimately conserving energy and reducing utility costs. With a maximum output of 39,000 BTUs, the CDL3924PT is capable of heating larger areas effectively. The unit boasts a built-in safety shut-off feature, ensuring peace of mind in household environments. Its stylish design complements modern interiors, and its easy installation process caters to both new and seasoned homeowners.

In summary, the Desa CDL3924NT, LSL3124P, and CDL3924PT models stand out for their innovative technologies and feature sets. Each unit addresses unique heating needs with efficiency and style, making them valuable additions to any home. Whether you prioritize flexibility in fuel options, quiet operation, or programmable settings, Desa's offerings cater to various lifestyles and heating requirements. Their robust heating capabilities, coupled with user-friendly designs, ensure that every homeowner can find a suitable option for comfort during colder months.