INSTALLATION

Continued

Test Pressures Equal To or Less Than 1/2 PSIG (3.5 kPa)

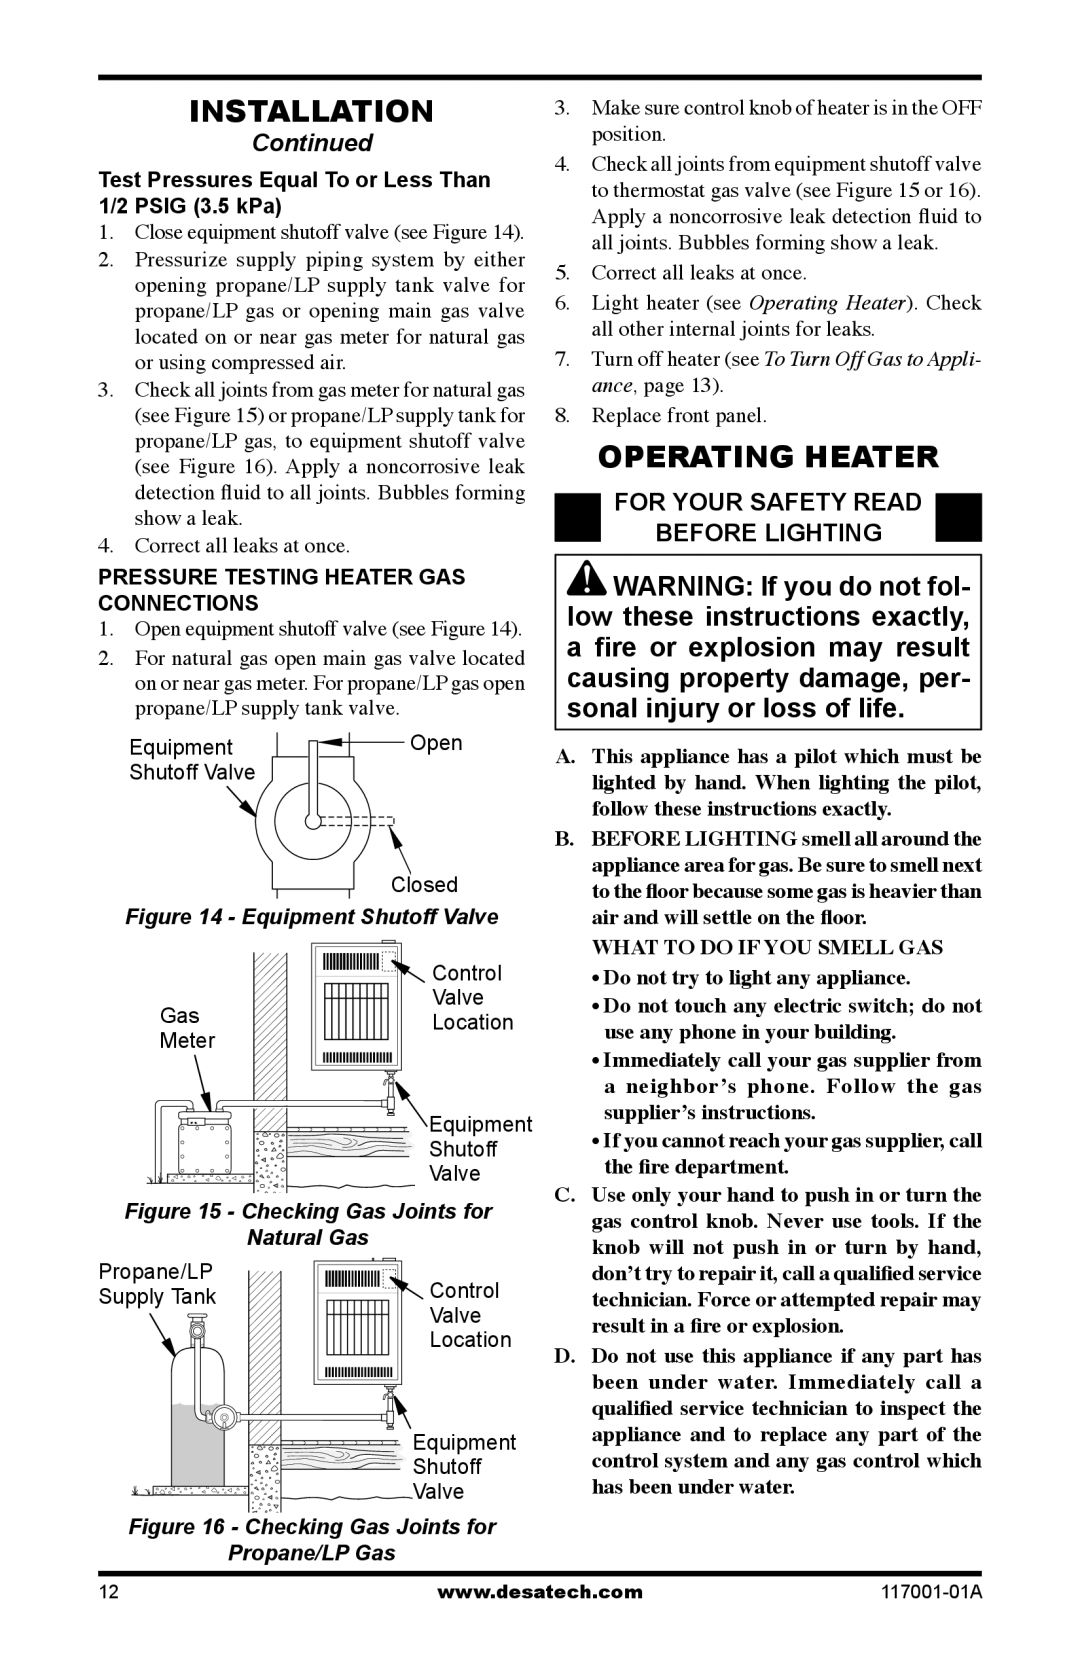
1.Close equipment shutoff valve (see Figure 14).

2.Pressurize supply piping system by either opening propane/LP supply tank valve for propane/LP gas or opening main gas valve located on or near gas meter for natural gas or using compressed air.

3.Check all joints from gas meter for natural gas (see Figure 15) or propane/LP supply tank for propane/LP gas, to equipment shutoff valve (see Figure 16). Apply a noncorrosive leak detection fluid to all joints. Bubbles forming show a leak.

4.Correct all leaks at once.

PRESSURE TESTING HEATER GAS CONNECTIONS

1.Open equipment shutoff valve (see Figure 14).

2.For natural gas open main gas valve located on or near gas meter. For propane/LP gas open propane/LP supply tank valve.

Equipment

Open

Shutoff Valve


Closed

Figure 14 - Equipment Shutoff Valve

3.Make sure control knob of heater is in the OFF position.

4.Check all joints from equipment shutoff valve to thermostat gas valve (see Figure 15 or 16). Apply a noncorrosive leak detection fluid to all joints. Bubbles forming show a leak.

5.Correct all leaks at once.

6.Light heater (see Operating Heater). Check all other internal joints for leaks.

7.Turn off heater (see To Turn Off Gas to Appli- ance, page 13).

8.Replace front panel.

OPERATING HEATER

FOR YOUR SAFETY READ

BEFORE LIGHTING

WARNING: If you do not fol- low these instructions exactly, a fire or explosion may result causing property damage, per- sonal injury or loss of life.

A.This appliance has a pilot which must be lighted by hand. When lighting the pilot, follow these instructions exactly.

B.BEFORE LIGHTING smell all around the appliance area for gas. Be sure to smell next to the floor because some gas is heavier than air and will settle on the floor.


Control


WHAT TO DO IF YOU SMELL GAS


• Do not try to light any appliance.

Gas

Valve


• Do not touch any electric switch; do not

Location


use any phone in your building.

Meter


• Immediately call your gas supplier from


a neighborʼs phone. Follow the gas


Equipment


supplierʼs instructions.


• If you cannot reach your gas supplier, call


Shutoff


the fire department.


Valve

C.


Use only your hand to push in or turn the

Figure 15 - Checking Gas Joints for


gas control knob. Never use tools. If the


Natural Gas


knob will not push in or turn by hand,


Propane/LP

Control


donʼt try to repair it, call a qualified service

Supply Tank


technician. Force or attempted repair may

Valve


result in a fire or explosion.


Location


D. Do not use this appliance if any part has


been under water. Immediately call a


qualified service technician to inspect the


Equipment


appliance and to replace any part of the


control system and any gas control which


Shutoff


has been under water.


Valve


Figure 16 - Checking Gas Joints for

Propane/LP Gas

12

www.desatech.com

117001-01A

Page 12
Image 12
Desa GWP10 GWN10T installation manual Operating Heater, For Your Safety Read Before Lighting

GWP10 GWN10T specifications

The Desa GWP10 and GWN10T are innovative heating solutions designed for both residential and commercial applications. These models stand out in the market due to their modern features, advanced technologies, and exceptional performance characteristics.

One of the main features of the Desa GWP10 is its high efficiency. With an impressive energy efficiency rating, this model utilizes a state-of-the-art combustion system that maximizes heat output while minimizing fuel consumption. This not only reduces the cost of operation but also makes it an environmentally friendly choice, lowering carbon emissions significantly.

The GWN10T model complements the GWP10 with its advanced technology. It incorporates a sophisticated control system that allows for precise temperature regulation. Users can easily adjust the settings via a user-friendly interface, ensuring optimal comfort throughout the space it heats. The control system can also include smart functionalities, enabling remote access and monitoring through mobile applications. This level of connectivity gives users unparalleled control over their heating solutions.

Another characteristic that sets both models apart is their build quality. Designed to endure harsh conditions, the Desa GWP10 and GWN10T feature durable materials and robust construction. This ensures longevity and reliability, making them suitable for long-term use in various environments. Additionally, both models come with enhanced safety features, including automatic shut-off mechanisms and overheat protection, providing peace of mind to users.

Moreover, ease of installation is a key aspect of the Desa heating solutions. The GWP10 and GWN10T are designed to be easily integrated into existing heating systems or as standalone units. The compact designs allow for versatile placement, making them ideal for different room layouts and building configurations.

In summary, the Desa GWP10 and GWN10T are sophisticated heating systems that combine efficiency, advanced technologies, and robust design. With high energy efficiency ratings, smart control options, and a focus on safety and reliability, these models cater to the modern consumer's needs for comfort and convenience in heating solutions. Whether for residential or commercial use, the Desa GWP10 and GWN10T are excellent choices for anyone seeking effective and innovative heating technology.