7 3/4" (14.7 cm)

INSTALLATION

Continued

Thin or Thick Wall (thick wall

JOINING WALL

8 7/8" (22.5 cm)

Minimum To Maintain 6" (15.3 cm)

Clearance

From Wall Mounting Screw

Locations

20

1

/4"


(51.4 cm)

Minimum To

Maintain 3"

(7.7 cm)

Clearance

From Floor

shown)

1/16"

(1.6 mm)

Space

Solid Wall

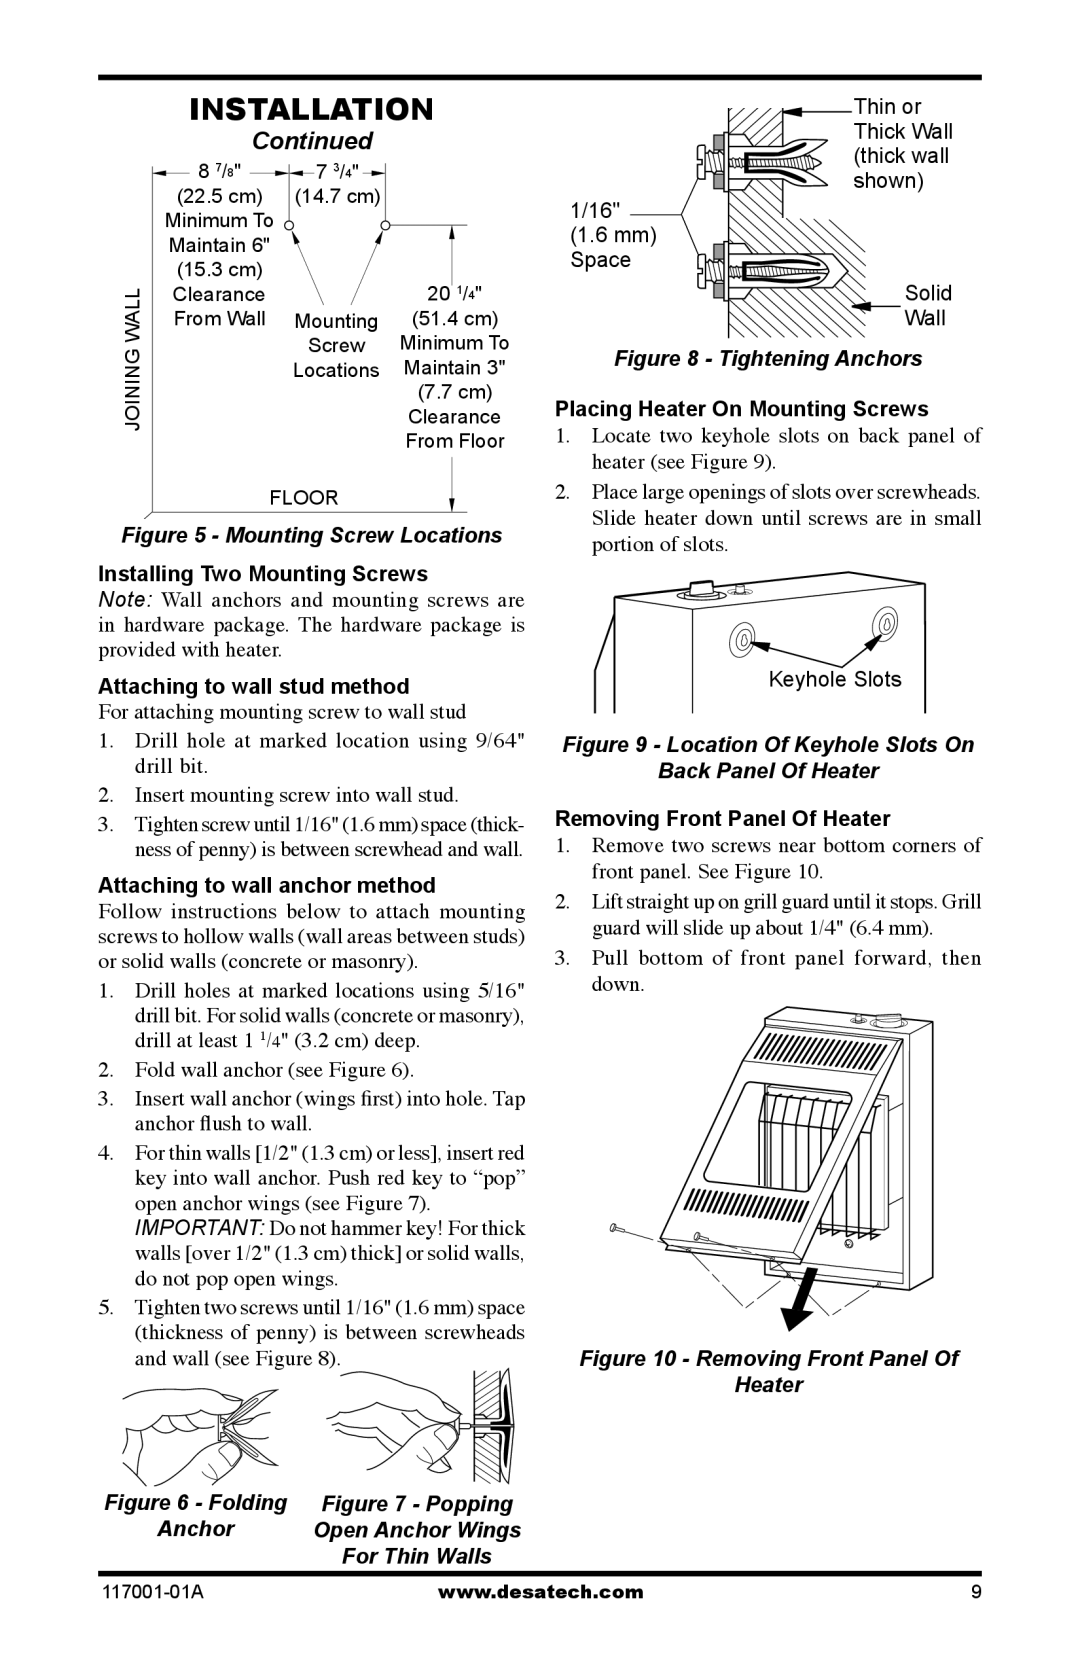
Figure 8 - Tightening Anchors

Placing Heater On Mounting Screws

1.

Locate two keyhole slots on back panel of


heater (see Figure 9).

FLOOR

Figure 5 - Mounting Screw Locations

Installing Two Mounting Screws

Note: Wall anchors and mounting screws are in hardware package. The hardware package is provided with heater.

Attaching to wall stud method

For attaching mounting screw to wall stud

1.Drill hole at marked location using 9/64" drill bit.

2.Insert mounting screw into wall stud.

3.Tighten screw until 1/16" (1.6 mm) space (thick- ness of penny) is between screwhead and wall.

Attaching to wall anchor method

Follow instructions below to attach mounting screws to hollow walls (wall areas between studs) or solid walls (concrete or masonry).

1.Drill holes at marked locations using 5/16" drill bit. For solid walls (concrete or masonry), drill at least 1 1/4" (3.2 cm) deep.

2.Fold wall anchor (see Figure 6).

3.Insert wall anchor (wings first) into hole. Tap anchor flush to wall.

4.For thin walls [1/2" (1.3 cm) or less], insert red key into wall anchor. Push red key to “pop” open anchor wings (see Figure 7).

IMPORTANT: Do not hammer key! For thick walls [over 1/2" (1.3 cm) thick] or solid walls, do not pop open wings.

5.Tighten two screws until 1/16" (1.6 mm) space (thickness of penny) is between screwheads and wall (see Figure 8).

2.

Place large openings of slots over screwheads.


Slide heater down until screws are in small


portion of slots.

Keyhole Slots

Figure 9 - Location Of Keyhole Slots On

Back Panel Of Heater

Removing Front Panel Of Heater

1.Remove two screws near bottom corners of front panel. See Figure 10.

2.Lift straight up on grill guard until it stops. Grill guard will slide up about 1/4" (6.4 mm).

3.Pull bottom of front panel forward, then

down.

Figure 10 - Removing Front Panel Of Heater

Figure 6 - Folding

Figure 7 - Popping

Anchor

Open Anchor Wings


For Thin Walls

117001-01A

www.desatech.com

9

Page 9
Image 9
Desa GWP10 GWN10T Placing Heater On Mounting Screws, Attaching to wall anchor method, Removing Front Panel Of Heater

GWP10 GWN10T specifications

The Desa GWP10 and GWN10T are innovative heating solutions designed for both residential and commercial applications. These models stand out in the market due to their modern features, advanced technologies, and exceptional performance characteristics.

One of the main features of the Desa GWP10 is its high efficiency. With an impressive energy efficiency rating, this model utilizes a state-of-the-art combustion system that maximizes heat output while minimizing fuel consumption. This not only reduces the cost of operation but also makes it an environmentally friendly choice, lowering carbon emissions significantly.

The GWN10T model complements the GWP10 with its advanced technology. It incorporates a sophisticated control system that allows for precise temperature regulation. Users can easily adjust the settings via a user-friendly interface, ensuring optimal comfort throughout the space it heats. The control system can also include smart functionalities, enabling remote access and monitoring through mobile applications. This level of connectivity gives users unparalleled control over their heating solutions.

Another characteristic that sets both models apart is their build quality. Designed to endure harsh conditions, the Desa GWP10 and GWN10T feature durable materials and robust construction. This ensures longevity and reliability, making them suitable for long-term use in various environments. Additionally, both models come with enhanced safety features, including automatic shut-off mechanisms and overheat protection, providing peace of mind to users.

Moreover, ease of installation is a key aspect of the Desa heating solutions. The GWP10 and GWN10T are designed to be easily integrated into existing heating systems or as standalone units. The compact designs allow for versatile placement, making them ideal for different room layouts and building configurations.

In summary, the Desa GWP10 and GWN10T are sophisticated heating systems that combine efficiency, advanced technologies, and robust design. With high energy efficiency ratings, smart control options, and a focus on safety and reliability, these models cater to the modern consumer's needs for comfort and convenience in heating solutions. Whether for residential or commercial use, the Desa GWP10 and GWN10T are excellent choices for anyone seeking effective and innovative heating technology.