INSTALLATION

Continued

8.Place cardboard or other protective material on top of hearth base. Carefully set fireplace on protective material, with back of fireplace inside mantel opening.

9.Attach flexible gas line to fireplace gas regula- tor. See Connecting Fireplace to Gas Supply, page 14.

10.Route electrical cord(s) through access holes in either side of fireplace with bushing. Plug electrical cord(s) into electrical outlet.

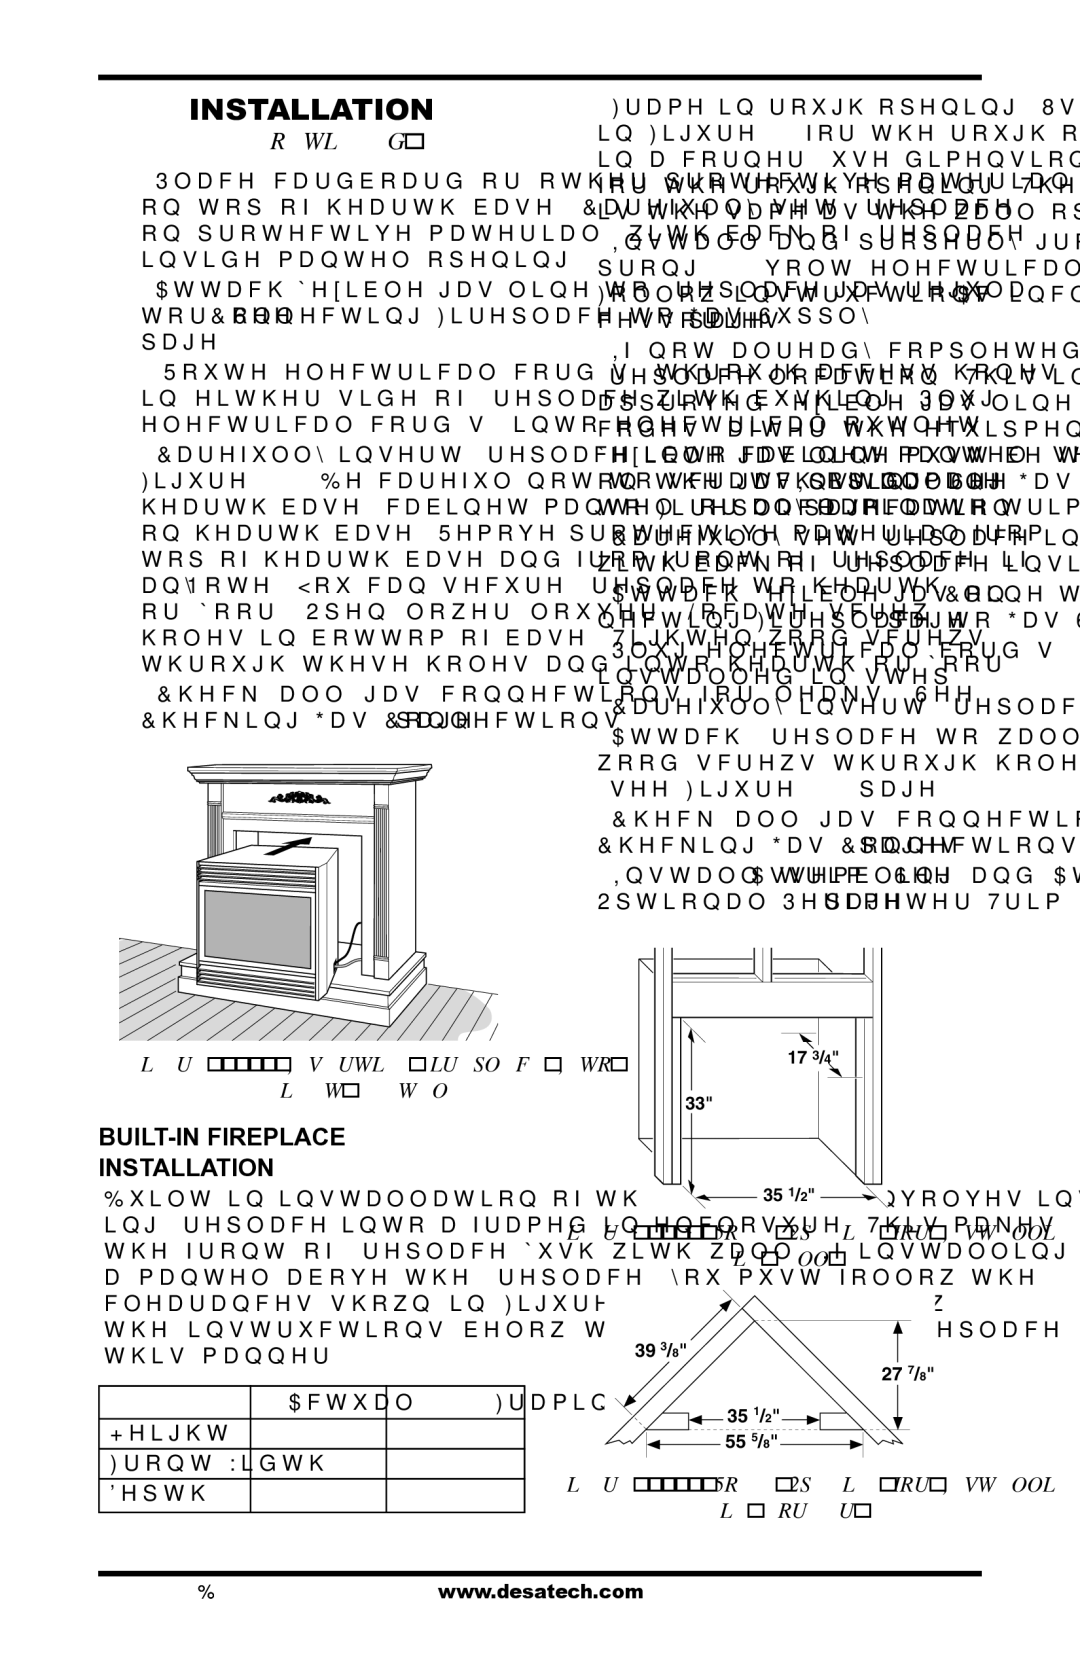
11.Carefully insert fireplace into cabinet mantel (see Figure 23). Be careful not to scratch or damage hearth base, cabinet mantel, or any laminate trim on hearth base. Remove protective material from top of hearth base and from front of fireplace (if any). Note: You can secure fireplace to hearth or floor. Open lower louver. Locate screw holes in bottom of base. Tighten wood screws through these holes and into hearth or floor.

12.Check all gas connections for leaks. See Checking Gas Connections, page 15.

Figure 23 - Inserting Fireplace Into

Cabinet Mantel

BUILT-IN FIREPLACE

INSTALLATION

Built-in installation of this fireplace involves install- ing fireplace into a framed-in enclosure. This makes the front of fireplace flush with wall. If installing a mantel above the fireplace, you must follow the clearances shown in Figure 27, page 18. Follow the instructions below to install the fireplace in this manner.


Actual

Framing

Height

32 3/8"

33"

Front Width

34 5/16"

35 1/2"

Depth

16 11/16"

17 3/4"

1.Frame in rough opening. Use dimensions shown in Figure 24 for the rough opening. If installing in a corner, use dimensions shown in Figure 25 for the rough opening. The height is 33" which is the same as the wall opening above.

2.Install and properly ground GA3555, three- prong 120 volt electrical outlet, in fireplace. Follow instructions included in kit (see Ac- cessories, page 36).

3.If not already completed, install gas piping to fireplace location. This installation includes an approved flexible gas line (if allowed by local codes) after the equipment shutoff valve. The flexible gas line must be the last item installed on the gas piping. See Installing Gas Piping to Fireplace Location, page 13.

4.Carefully set fireplace in front of rough opening with back of fireplace inside wall opening.

5.Attach flexible gas line to gas supply. See Con- necting Fireplace to Gas Supply, page 14.

6.Plug electrical cord(s) into electrical outlet installed in step 2.

7.Carefully insert fireplace into rough opening.

8.Attach fireplace to wall studs using nails or wood screws through holes in nailing flange (see Figure 26, page 18).

9.Check all gas connections for leaks. See Checking Gas Connections, pages 15.

10.Install trim. See Assembling and Attaching Optional Perimeter Trim, page 19.

17 3/4"

33"

35 1/2"

Figure 24 - Rough Opening for Installing

in Wall

393/8"

27 7/8"

35 1/2" 55 5/8"

Figure 25 - Rough Opening for Installing

in Corner

113134-01B

www.desatech.com

17

Page 17
Image 17
Desa VTGF33NRB, VTGF33PRB installation manual BUILT-IN Fireplace Installation, Inserting Fireplace Into Cabinet Mantel

VTGF33NRB, VTGF33PRB specifications

Desa VTGF33PRB and VTGF33NRB are advanced heating solutions that combine innovative technology and design for optimal performance and user convenience. These models are well-suited for residential and commercial applications, providing efficient heating while enhancing the overall aesthetic of any space.

One of the main features of the VTGF33PRB and VTGF33NRB is their high-efficiency ratings, which allow them to deliver effective heating with minimal energy consumption. This efficiency not only helps users save on energy bills, but it also makes these models environmentally friendly, aligning with modern sustainability goals.

Both models utilize advanced infrared heating technology, which generates heat by directly warming objects and people in the room rather than heating the air. This results in a more comfortable and even distribution of warmth, providing immediate relief from cold temperatures. The infrared heating method is particularly beneficial in large or drafty spaces, as it can significantly reduce heating times and energy usage.

In terms of design, the VTGF33PRB features a sleek, modern appearance that can easily complement any décor. Its robust construction ensures durability, making it suitable for long-term usage. The VTGF33NRB, on the other hand, offers a more traditional aesthetic, perfect for those who prefer classic designs. Both models are user-friendly, designed with intuitive controls that allow for easy operation and temperature adjustments.

Another noteworthy characteristic of the Desa VTGF33 series is their safety features. Each unit is equipped with advanced safety mechanisms, including tip-over protection, overheat shut-off, and a sturdy base to prevent accidents. These safety features provide peace of mind for users, especially in households with children or pets.

The VTGF33PRB and VTGF33NRB also incorporate quiet operation technology, ensuring that heating is achieved without disruptive noise. This makes them ideal for use in bedrooms, offices, or any space where tranquility is desired.

Overall, the Desa VTGF33PRB and VTGF33NRB are exemplary models that showcase the harmonious blend of efficiency, safety, and design. Their advanced features and technologies make them reliable choices for anyone looking to enhance their heating solutions while maintaining comfort and style. With their commitment to quality and innovation, Desa continues to lead the way in the heating industry.