Fireplace

Installation

Continued

4.Remount the new frame at the hinge with five new screws before closing door. This will ensure seating of the gasket.

5.Close glass door frame. Lock latches by placing the bar under the tab on door and pushing down and back on latch (see Figure 41, page 25).

6.Replace screen/rod assembly by reversing step 1.

7.Replace louvers by reversing procedure under Removing Louver Panels, page 25.

Cleaning Glass Door

See Cleaning and Maintenance on page 31.

Installing lava rock and glowing embers

It is very important to keep logs exactly as installed. Do not modify logs. Only use log set designed for this fireplace. Logs under log/grate assembly are attached to burner. Do not attempt to move these logs as this will damage logs.

WARNING: Logs are unitized and attached to the grate. Do not handle log/grate assembly by logs. Always pick up by grate.

Open louvers, remove screen, unlock door latches and open glass door. See Removing Glass Door, steps 1 and 2, page 25.

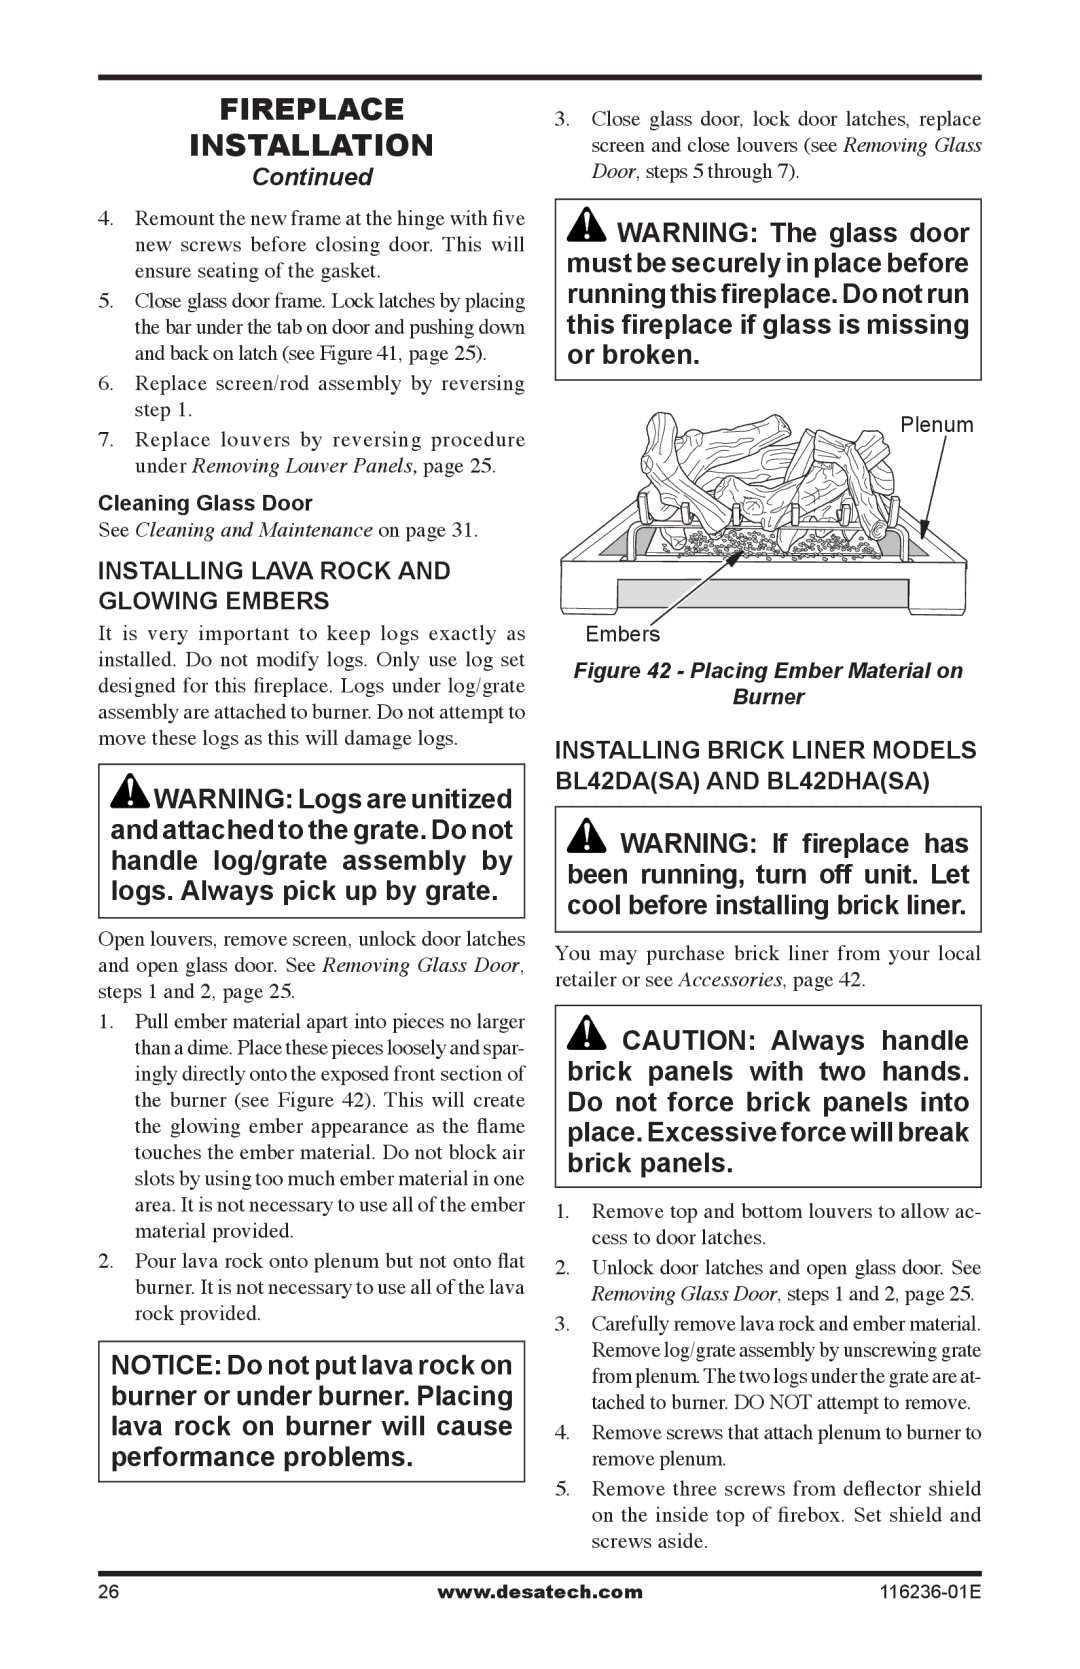
1.Pull ember material apart into pieces no larger than a dime. Place these pieces loosely and spar- ingly directly onto the exposed front section of the burner (see Figure 42). This will create the glowing ember appearance as the flame touches the ember material. Do not block air slots by using too much ember material in one area. It is not necessary to use all of the ember material provided.

2.Pour lava rock onto plenum but not onto flat burner. It is not necessary to use all of the lava rock provided.

NOTICE: Do not put lava rock on burner or under burner. Placing lava rock on burner will cause performance problems.

3.Close glass door, lock door latches, replace screen and close louvers (see Removing Glass Door, steps 5 through 7).

WARNING: The glass door must be securely in place before running this fireplace. Do not run this fireplace if glass is missing or broken.

Plenum

Embers

Figure 42 - Placing Ember Material on

Burner

Installing Brick liner Models BL42DA(SA) and BL42DHA(SA)

WARNING: If fireplace has been running, turn off unit. Let cool before installing brick liner.

You may purchase brick liner from your local retailer or see Accessories, page 42.

CAUTION: Always handle brick panels with two hands. Do not force brick panels into place. Excessive force will break brick panels.

1.Remove top and bottom louvers to allow ac- cess to door latches.

2.Unlock door latches and open glass door. See Removing Glass Door, steps 1 and 2, page 25.

3.Carefully remove lava rock and ember material. Remove log/grate assembly by unscrewing grate from plenum. The two logs under the grate are at- tached to burner. DO NOT attempt to remove.

4.Remove screws that attach plenum to burner to remove plenum.

5.Remove three screws from deflector shield on the inside top of firebox. Set shield and screws aside.

26

www.desatech.com

116236-01E

Page 26
Image 26
Desa (V)VC42P, CGCDV42PR Installing lava rock and glowing embers, Installing Brick liner Models BL42DASA and BL42DHASA

(V)VC42P, CGCDV42PR, VC42N, CGCDV42NR, VC42P, CGCDV42PR specifications

Desa (V)VC42P, CGCDV42PR, VC42N, CGCDV42NR, VC42P, and CGCDV42PR are a range of sophisticated heating solutions that exemplify modern design and efficiency. Designed for residential comfort, these models offer advanced features and technologies that set them apart in the market.

One of the most notable characteristics of these units is their innovative heating technology. They utilize advanced vented and vent-free systems, allowing for flexible installation options based on the needs of the home. These systems efficiently convert fuel into heat, ensuring a high level of warmth with minimal energy consumption. The models cater to various fuel types, including natural gas and propane, allowing consumers to choose the most economical option for their heating needs.

The Desa models are engineered with user-friendly controls, featuring modern thermostats that provide precise temperature regulation. This allows for enhanced comfort and energy efficiency, as users can program the units to operate only when needed. Many of the models come equipped with remote control functionality, offering added convenience for adjusting settings from the comfort of one's sofa.

In terms of safety, these heaters are built with robust safety features such as automatic shut-off systems and oxygen depletion sensors, ensuring that air quality remains safe and that the units operate without risk. This attention to safety is crucial for consumer peace of mind, particularly in homes with children or pets.

Aesthetically, the Desa models shine with an attractive design that complements various interior styles. They are available in multiple finishes and sizes, allowing homeowners to choose a heater that best fits their space and decor. Whether placed in a living room, bedroom, or hallway, these heaters not only provide warmth but also add to the overall ambiance of the home.

Durability is another key characteristic of the Desa series. Constructed with high-quality materials, these heaters promise longevity and reliability. They are designed to withstand the rigors of daily use while maintaining efficiency and effectiveness.

In conclusion, the Desa (V)VC42P, CGCDV42PR, VC42N, CGCDV42NR, VC42P, and CGCDV42PR offer a comprehensive heating solution that combines efficiency, safety, design, and technology. Ideal for modern households, these units represent a smart choice for anyone looking to enhance their home’s comfort and warmth.