Amplifier
Contents
Introduction
Pass, or HPF high pass crossover
Over Frequency Control Flat / All Pass output- adjusts
Speakers Right channel
Low bass frequencies below the range of human hearing, that
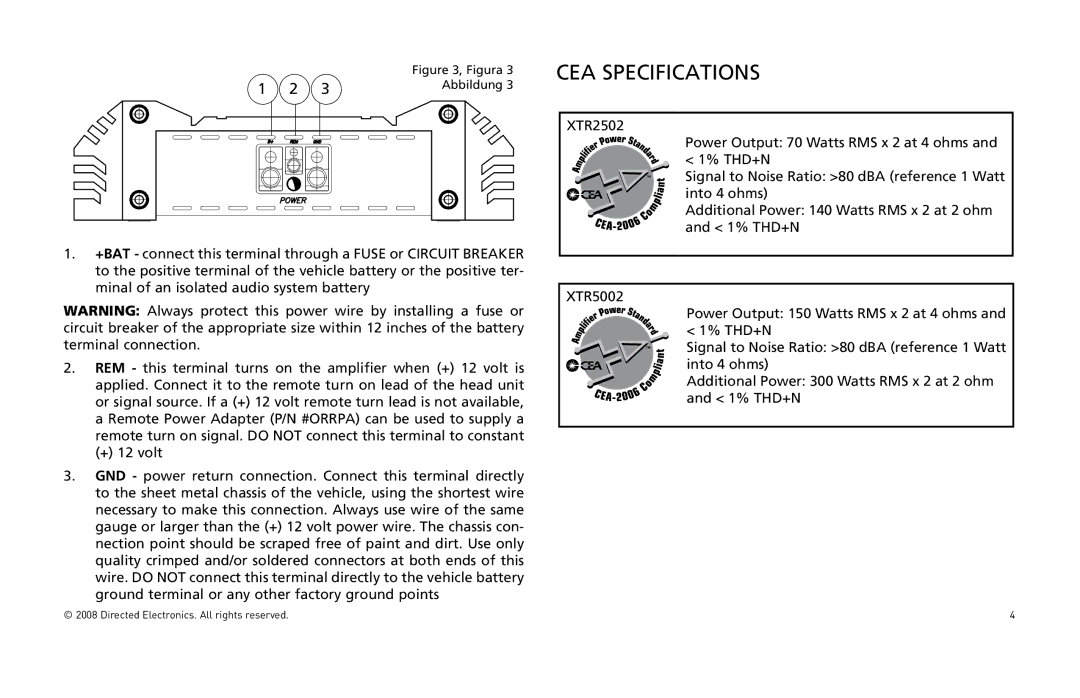
CEA Specifications
Specifications
Line Output Configurations
Signal Input and Output Configurations
Internal Crossover Configurations, Flat full range
Crossover Switch
Infinite Baffle Subsonic is set at 20Hz
Adjusting Bass Boost XTR 5002 only
High-Pass Crossover
Sealed Example High-Pass Set at 30Hz
Sealed Example High-Pass Set at 20Hz
Speaker Connections XTR2502 and XTR5002
Power Connections
Bridge Configuration
Choosing Mounting Locations
General Precautions and Installation Tips
Passenger Compartment
Trunk Compartment
Tools of the Trade
Step By Step Installation
Adjusting the Sound of the System
Testing the System
Amplifier Visual Troubleshooting
Amplifier Top Plate
Symptom Probable Cause Action To Take
Troubleshooting Tips
Symptom Probable Cause
Réglage de fréquence X-OVER sortie passe-tout / neutre
Disposition DES Panneaux Latéraux
CEA Specifications
Caractéristiques Techniques
Réglages DE L’AMPLIFICATEUR
Filtre passe-haut
Filtre passe-bas
Réglage du renforcement des graves XTR 5002 uniquement
Réglage passe-haut à 20 Hz dans le cas d’un cais- son clos
Raccordement de l’alimentation
Raccordement DE L’AMPLIFICATEUR
Réglage passe-haut à 30 Hz dans le cas d’un cais- son clos
Raccordement des haut-parleurs pour XTR 2502 et XTR
Configuration un canal/deux canaux
Pontage
Trois canaux canal 1, canal 2, pontés
Choix des emplacements de montage
Installation DE L’AMPLIFICATEUR
Précautions générales et conseils d’installation
Habitacle
Outillage requis
Installation pas à pas
Réglage du son du système
Réglage ET Résolution DES Problèmes
Essai du système
Résolution visuelle des problèmes de l’amplificateur
Plaque supérieure de l’amplificateur
Symptôme Cause probable Intervention
Conseils de dépannage
Français
Symptôme Cause probable
Disposiciones DEL Panel DE Extremo
Español
THD+N
Especificaciones DE LA CEA
Especificaciones
Configuraciones DEL Amplificador
Crossover de pasaaltas
Crossover de pasabajas
Ajuste del refuerzo de bajos sólo XTR5002
Bafle infinito, filtro subsónico en 20 Hz
Configuración en puente
Configuración de un canal y dos canales
Cableado DEL Amplificador
Conexiones de altavoces del XTR2502 y del XTR5002
Español
Selección de ubicaciones de montaje
Instalación DEL Amplificador
Compartimiento de pasajeros
Maletero
Herramientas DEL Oficio
Instalación paso a paso
Prueba del sistema
Configuración Y Detección Y Reparación DE Averías
Detección y reparación visual de averías del ampli- ficador
Placa superior del amplificador
Síntoma Causa probable Medidas a tomar
Sugerencias de detección y reparación de averías
Español
Síntoma Causa probable
Layout DER Endplatten
Deutsch
CEA-DATEN
Technische Daten
Verstärkereinstellungen
Hochpass-Crossover
Tiefpass-Crossover
Einstellung des Bass-Boost nur beim XTR5002
Unendliche Schallwand, Subsonic auf 20 Hz einges- tellt
Beispiel Geschlossenes Gehäuse, Hochpassfilter bei 30 Hz
Verstärkerverkabelung
Allgemeine Vorsichts- und Installationshinweise
Verstärkerinstallation
Wahl der Einbaustelle
Fahrgastraum
Werkzeuge
Schrittweise Installation
Systemsound einstellen
Einstellung UND Problemlösung
Systemtest
Visuelle Anzeige von Problemen mit dem Verstärker
Obere Platte des Verstärkers
Symptom Mögliche Ursache Lösung
Problemlösungen
Lösung
Symptom Mögliche Ursache
Directed Electronics. Alle Rechte vorbehalten
Layout DEI Pannelli Terminali
Italiano
Specifiche CEA
Dati Tecnici
Configurazioni delle uscite di linea
Configurazione dei segnali d’ingresso e di uscita
Impostazioni DELL’AMPLIFICATORE
Guadagno d’ingresso
Regolazione dell’amplificazione dei bassi solo per l’XTR
Crossover passa-basso
Crossover passa-alto
Connessioni per l’alimentazione
Cablaggio DELL’AMPLIFICATORE
Configurazione a cablaggio in parallelo
Configurazione a uno o a due canali
Connessioni degli altoparlanti XTR2502 e XTR5002
Tre canali canale 1, canale 2, cablaggio in paral- lelo
Precauzioni generali e suggerimenti per l’installazione
Scelta del punto di installazione
Nstallazione DELL’AMPLIFICATORE
Abitacolo
Corredo per l’installazione
Procedura di installazione
Regolazione dell’audio dell’impianto
Impostazione E Soluzione DEI Problemi
Prova dell’impianto
Spie dell’amplificatore
Piastra superiore dell’amplificatore
Sintomo Causa probabile Intervento necessario
Soluzione dei problemi
Italiano
Sintomo Causa probabile
Layouts DOS Painéis
Português
Especificações DA CEA
Especificações
Ajustes do Amplificador
Ajuste da intensificação de graves apenas XTR5002
Crossover passa-alta
Sonoflector subsônico infinito é ajustado a 20 Hz
Exemplo de caixa selada com passa-alta ajustado a 20 Hz
Conexões elétricas
Conexão DOS Cabos do Amplificador
Configuração em ponte
Configuração de um canal/dois canais
Conexões dos alto-falantes XTR2502 e XTR5002
Três canais canal 1, canal 2, em ponte
Escolha de locais de instalação
Instalação do Amplificador
Cabine de passageiros
Porta-malas
Ferramentas
Instalação passo a passo
Como ajustar o som do sistema
Ajuste E Resolução DE Problemas
Como testar o sistema
Identificação visual de problemas com o amplifi- cador
Placa superior do amplificador
Problema Provável causa Medida a ser tomada
Sugestões para resolução de problemas
Interno deste manual
Problema Provável causa Medida a ser tomada
Warranty