DX-E201
Dynex DX-E201 Network PC Card Contents
Page
Page
General description
Package contents
Introduction Product components
AUTO-NEGOTIATION
Features
Networking basics
Fast Ethernet
To name your computer and workgroup
Setting up the network card
Naming your computer
Click OK
Double-click Network. The Network window opens
Installing TCP/IP
To install TCP/IP on your computer
Setting up the network card
Click Start, then Run. The Run dialog box opens
To check the TCP/IP configuration
Checking TCP/IP
Configuring a dynamic IP address
To assign a static IP address
Assigning a static IP address
Setting up the network card
Click Use the following IP address, then type values for
Windows 2000/XP network component configuration
Component configuration
Component configuration
Complete the File and print sharing configuration on
Windows 98SE/ME network component configuration
TCP/IP
To map a drive or folder
File and print sharing configuration
File and Printer Sharing
To enable file and printer sharing
Enabling File Sharing
Click OK When asked to restart your computer, click Yes
To allow others to access your files
Enabling Printer Sharing
To allow others to access your printers
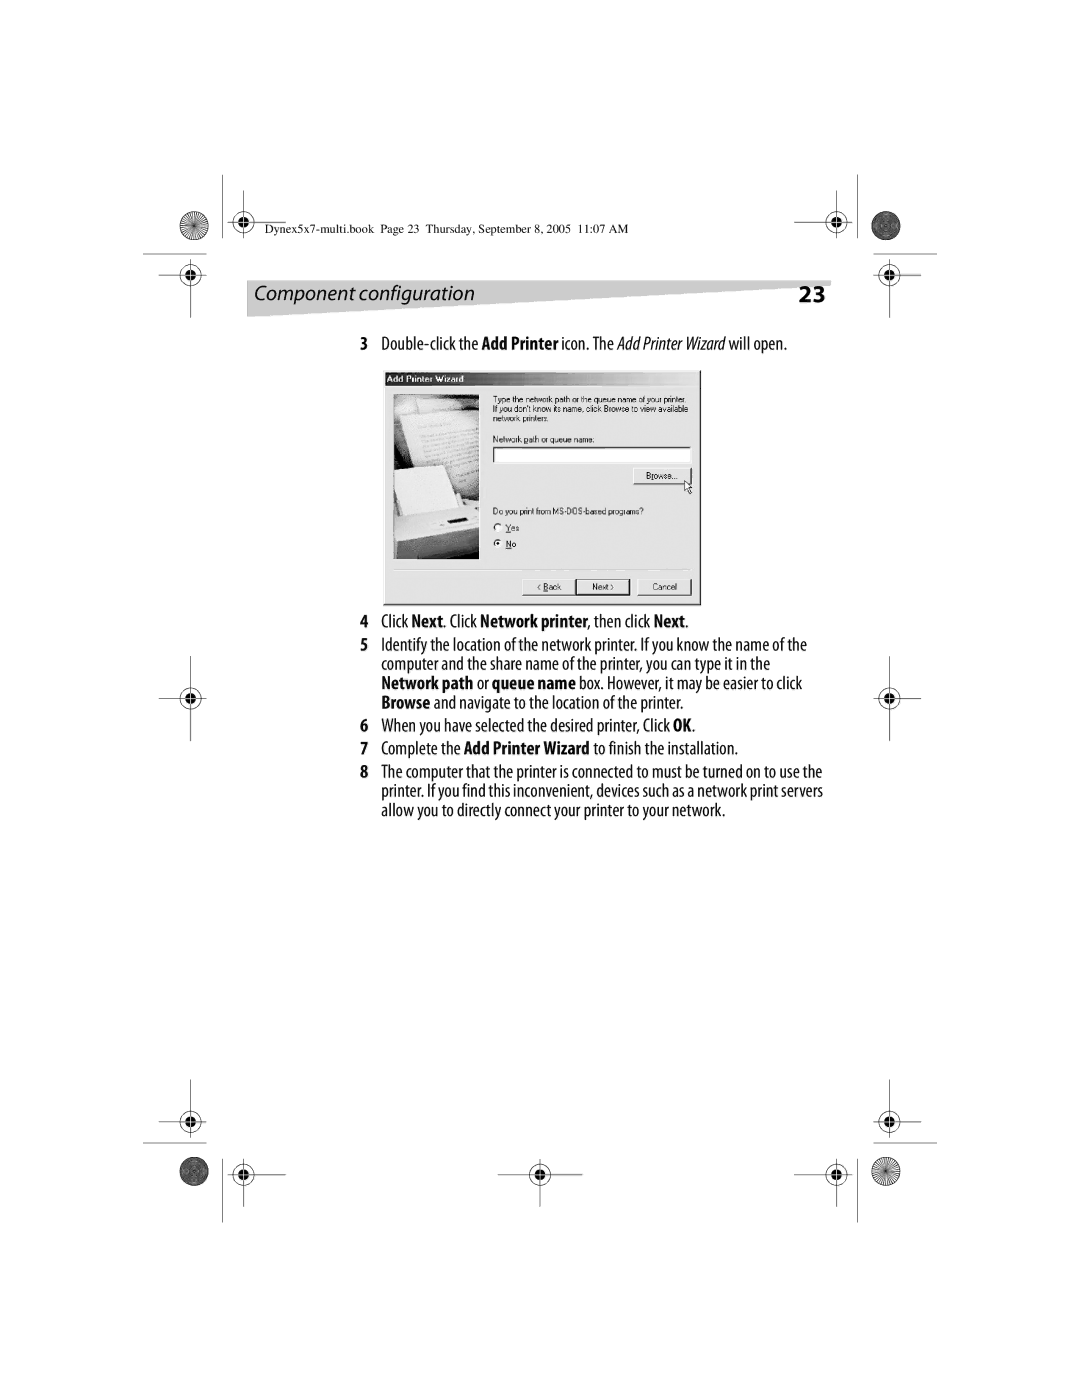
To set up a new printers
Click Next. Click Network printer, then click Next
Verify Cable Connections
Troubleshooting
To verify that your card is correctly installed
Verify Network Card Installation
Diagnostics and Checking Communications
Computers on the network in MS-DOS Mode
To run the diagnostics, do the following
Verify Indicators
Pinging Your Network Card
Click Start, then click Run. The Run dialog box opens
To ping the network card
Standards
Specifications
Support number 800
Legal notices
Copyright and disclaimer
Carte réseau pour PC DX-E201 de Dynex Table des matières
Page
Description générale
Introduction
Description du produit
Contenu de l’emballage
Ethernet Rapide
Caractéristiques
Informations de base sur les réseaux
Pour donner un nom à l’ordinateur et au groupe de travail
Installation de la carte réseau
Nom de l’ordinateur
Cliquez sur l’onglet Identification
Cliquez sur OK
Installation du protocole TCP/IP
Pour installer le protocole TCP/IP sur l’ordinateur
Page
Vérification du protocole TCP/IP
Pour vérifier la configuration TCP/IP
Configuration d’une adresse IP dynamique
Page
Attribution d’une adresse IP statique
Attribution d’une adresse IP statique
Page
Cliquez sur OK
Configuration du composant réseau Windows 2000/XP
Configuration des composants
Page
Page
Configuration du composant réseau Windows 98SE/ME
TCP/IP
Pour mapper un lecteur ou un dossier
Configuration du partage de fichiers et d’imprimantes
Partage DE Fichiers ET Dimprimantes
Pour activer le partage de fichiers et d’imprimantes
Activation DU Partage DE Fichiers
Pour permettre un accès extérieur aux fichiers
Page
Activation DU Partage D’IMPRIMANTES
Pour permettre un accès extérieur aux imprimantes
Pour définir une nouvelle imprimante ou plusieurs
En cas de problèmes avec le réseau, vérifiez ce qui suit
Problèmes et solutions
Pour vérifier que la carte est correctement installée
Vérifiez LES Témoins
Pour lancer les diagnostics, procédez comme suit
Diagnostics ET Vérification DES Communications
Test DE Requête Ping DE LA Carte Réseau
Pour faire un test de requête ping de la carte de réseau
Tapez exit quitter à l’invite pour revenir dans Windows
Spécifications techniques
Caractéristiques
Assistance technique 800
Avis juridiques
Déclaration de la FCC
Droits d’auteur et déni de responsabilité
Tarjeta PC Card de Red Dynex DX-E201 Contenido
Page
Descripción general
Introducción
Componentes del producto
Contenido de la caja
Negociación Automática
Características
Conceptos básicos de redes
Ethernet Rápida
Haga clic en OK aceptar
Configuración de la tarjeta de red
Nombrando su computadora
Pulsar la pestaña Identification identificación
Para instalar TCP/IP en su computadora
Instalación de TCP/IP
Page
Comprobación de TCP/IP
Para comprobar la configuración TCP/IP
Configuración de una dirección IP dinámica
Page
Para asignar una dirección IP estática
Asignación de una dirección IP estática
Page
Enrutador
Configuración de componente de red en Windows 2000/XP
Configuración de componente
Page
Page
Configuración de componente de red en Windows 98SE/ME
Page
Para asignar una unidad de disco o carpeta
Configuración del uso compartido de archivos e impresoras
USO Compartido DE Archivos E Impresoras
Para habilitar el uso compartido de archivos e impresoras
Habilitación DEL USO Compartido DE Archivos
Para permitir que otros tengan acceso a sus archivos
Habilitación DEL USO Compartido DE Impresoras
Par permitir que otros tengan acceso a sus impresoras
Para configurar unas nuevas impresoras
Compruebe LA Identificación DE Cada Computadora
Solución de problemas
Si encuentra problemas con su red, compruebe lo siguiente
Verifique LAS Conexiones DE LOS Cables
Diagnósticos Y Comprobación DE LA Comunicación
Para comprobar que su tarjeta esta instalada correctamente
Compruebe LA Instalación DE LA Tarjeta DE RED
Verifique LOS Indicadores
Sondear CON Ping SU Tarjeta DE RED
Para ejecutar el diagnostico, haga lo siguiente
Para sondear con ping la tarjeta de red
Page
Especificaciones técnicas
Especificaciones
Número de asistencia 800
Avisos legales
Derecho de reproducción y descargo de responsabilidad