OPTIONAL BLOWER INSTALLATION INSTRUCTIONS

SRB-18T and SRB-30T

for Unvented Room Heaters SR-18T and SR-30T

INSTALLING OPTIONAL BLOWER SRB-18T OR SRB-30T

If heateris installed onto the wall, in orderto install the optional blower, the heater must be removed from the wall. If heater is installed on optional floor stand there is adequate access area available to install the optional blower.

1.Turn “OFF” gas supply to the heater.

2.Remove lower louver from casing assembly (2 screws).

3.Remove reflector from casing assembly (2 screws).

4.Remove upper louver from casing assembly (2 screws).

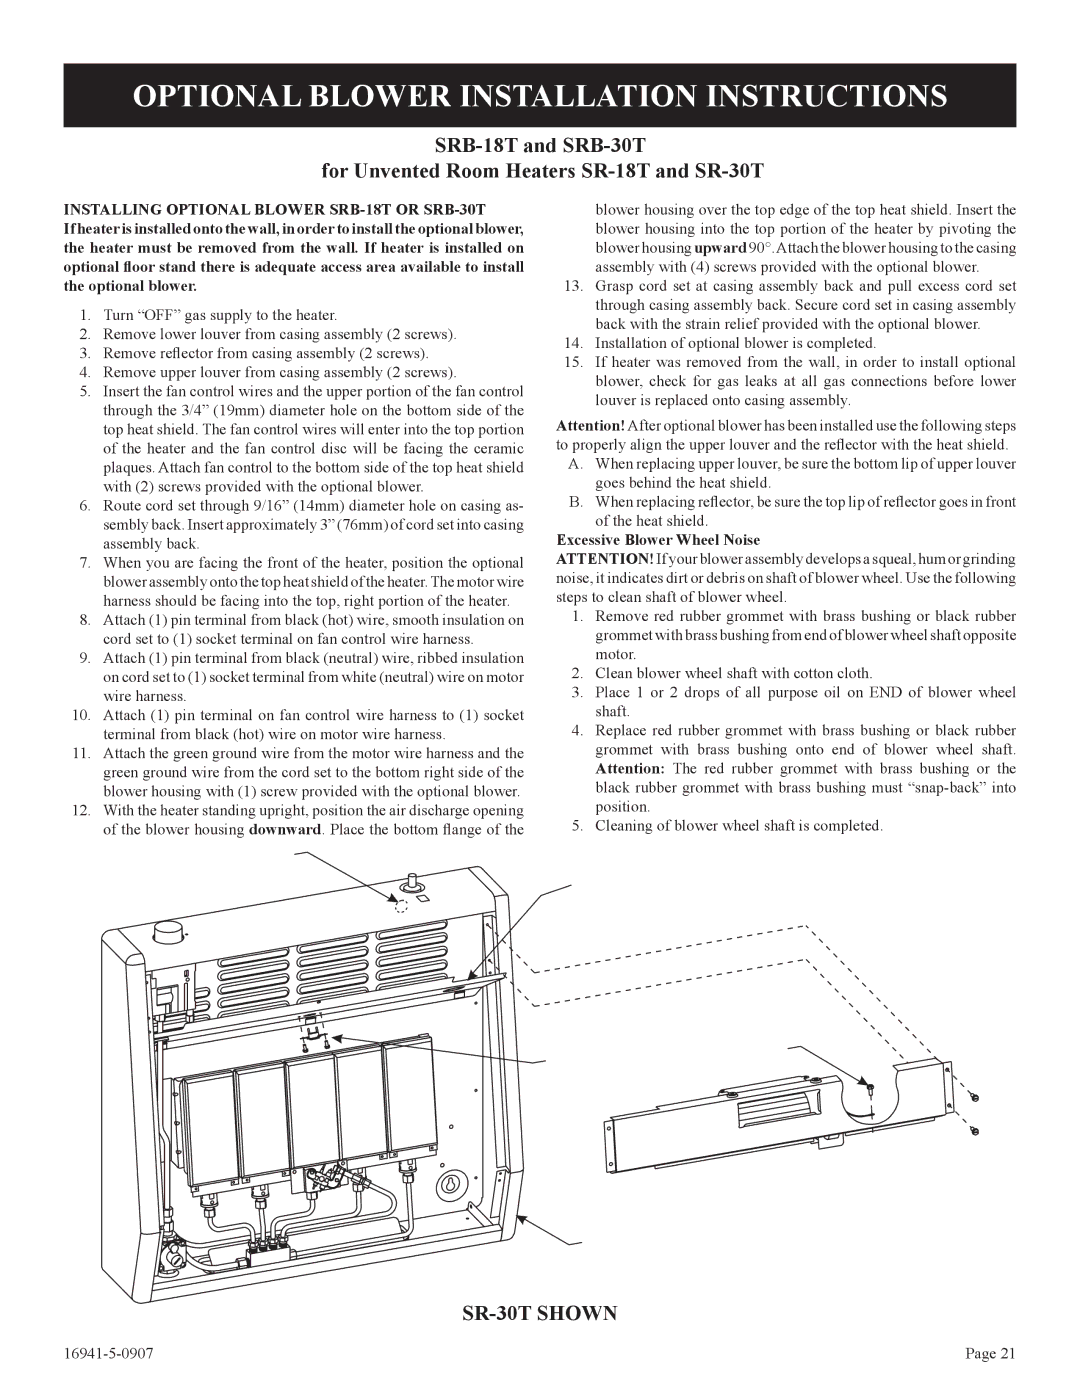
5.Insert the fan control wires and the upper portion of the fan control through the 3/4” (19mm) diameter hole on the bottom side of the top heat shield. The fan control wires will enter into the top portion of the heater and the fan control disc will be facing the ceramic plaques. Attach fan control to the bottom side of the top heat shield with (2) screws provided with the optional blower.

6.Route cord set through 9/16” (14mm) diameter hole on casing as- sembly back. Insert approximately 3” (76mm) of cord set into casing assembly back.

7.When you are facing the front of the heater, position the optional blower assembly onto the top heat shield of the heater.The motor wire harness should be facing into the top, right portion of the heater.

8.Attach (1) pin terminal from black (hot) wire, smooth insulation on cord set to (1) socket terminal on fan control wire harness.

9.Attach (1) pin terminal from black (neutral) wire, ribbed insulation on cord set to (1) socket terminal from white (neutral) wire on motor wire harness.

10.Attach (1) pin terminal on fan control wire harness to (1) socket terminal from black (hot) wire on motor wire harness.

11.Attach the green ground wire from the motor wire harness and the green ground wire from the cord set to the bottom right side of the blower housing with (1) screw provided with the optional blower.

12.With the heater standing upright, position the air discharge opening of the blower housing downward. Place the bottom flange of the

CORD

SET

HOLE

IN

K


CASING

BAC


blower housing over the top edge of the top heat shield. Insert the blower housing into the top portion of the heater by pivoting the blower housing upward 90°.Attach the blower housing to the casing assembly with (4) screws provided with the optional blower.

13.Grasp cord set at casing assembly back and pull excess cord set through casing assembly back. Secure cord set in casing assembly back with the strain relief provided with the optional blower.

14.Installation of optional blower is completed.

15.If heater was removed from the wall, in order to install optional blower, check for gas leaks at all gas connections before lower louver is replaced onto casing assembly.

Attention! After optional blower has been installed use the following steps to properly align the upper louver and the reflector with the heat shield.

A.When replacing upper louver, be sure the bottom lip of upper louver goes behind the heat shield.

B.When replacing reflector, be sure the top lip of reflector goes in front of the heat shield.

Excessive Blower Wheel Noise

ATTENTION! If your blower assembly develops a squeal, hum or grinding noise, it indicates dirt or debris on shaft of blower wheel. Use the following steps to clean shaft of blower wheel.

1.Remove red rubber grommet with brass bushing or black rubber grommet with brass bushing from end of blower wheel shaft opposite motor.

2.Clean blower wheel shaft with cotton cloth.

3.Place 1 or 2 drops of all purpose oil on END of blower wheel shaft.

4.Replace red rubber grommet with brass bushing or black rubber grommet with brass bushing onto end of blower wheel shaft. Attention: The red rubber grommet with brass bushing or the black rubber grommet with brass bushing must “snap-back” into position.

5.Cleaning of blower wheel shaft is completed.

HEATSHIELD

FANCONTROL


W

GROUND

WIRE

SCRE


SARE

Y

RAND

LOUVER


ASSEMBL

TO


CASING


REFLEC

FROM


REMOVED


SR-30T SHOWN

16941-5-0907

Page 21

Page 21
Image 21
Empire Comfort Systems SR-10T-3 Optional Blower Installation Instructions, Installing Optional Blower SRB-18T or SRB-30T

SR-10T-3 specifications

The Empire Comfort Systems SR-10T-3 is a highly efficient, innovative heating solution designed to meet the demands of modern living. This product exemplifies a commitment to quality, reliability, and user-friendly operation, making it an ideal choice for both residential and commercial spaces.

One of the standout features of the SR-10T-3 is its advanced infrared heating technology. This innovation allows the heater to warm objects and people directly rather than just heating the surrounding air, resulting in quick and efficient heat distribution. This means users can enjoy a comfortable environment almost immediately after turning the unit on, reducing wait times that are typically associated with conventional heating methods.

The design of the SR-10T-3 is another highlight. It boasts a compact and sleek profile that can seamlessly integrate into various settings without taking up excessive space. Moreover, this model is available in multiple finishes to complement any décor, ensuring it not only functions effectively but also enhances the aesthetic of the room.

The SR-10T-3 is equipped with an adjustable thermostat, allowing users to customize their heating experience according to their specific needs. This feature promotes energy efficiency, as it helps prevent unnecessary energy consumption by automatically regulating the temperature. In addition, the heater is designed with convenience in mind, incorporating a safety shut-off feature that activates if the unit overheats or tips over, ensuring peace of mind during use.

Durability is another defining characteristic of the Empire Comfort Systems SR-10T-3. Made with high-quality materials, this heater is built to withstand the rigors of daily use while maintaining optimal performance. Its user-friendly controls and straightforward installation process also contribute to its appeal, making it accessible for anyone looking to enhance their heating solutions.

In conclusion, the Empire Comfort Systems SR-10T-3 is an exceptional choice for those seeking an efficient and stylish heating solution. With its infrared heating technology, adjustable thermostat, and durable construction, it stands out in its category, promising reliability and comfort for years to come. Its thoughtful design and commitment to efficiency make it a noteworthy investment for any heating needs.