OPTIONAL BLOWER INSTALLATION INSTRUCTIONS

EEB-1 for Unvented Room HeaterModel EE-25-(1, 2)

INSTALLING OPTIONAL BLOWER EEB-1. If heater is installed on wall, in order to install optional blower, the heater must be removed from wall.

1.Remove casing front assembly.

2.Align (2) clearance holes on motor mounting bracket with

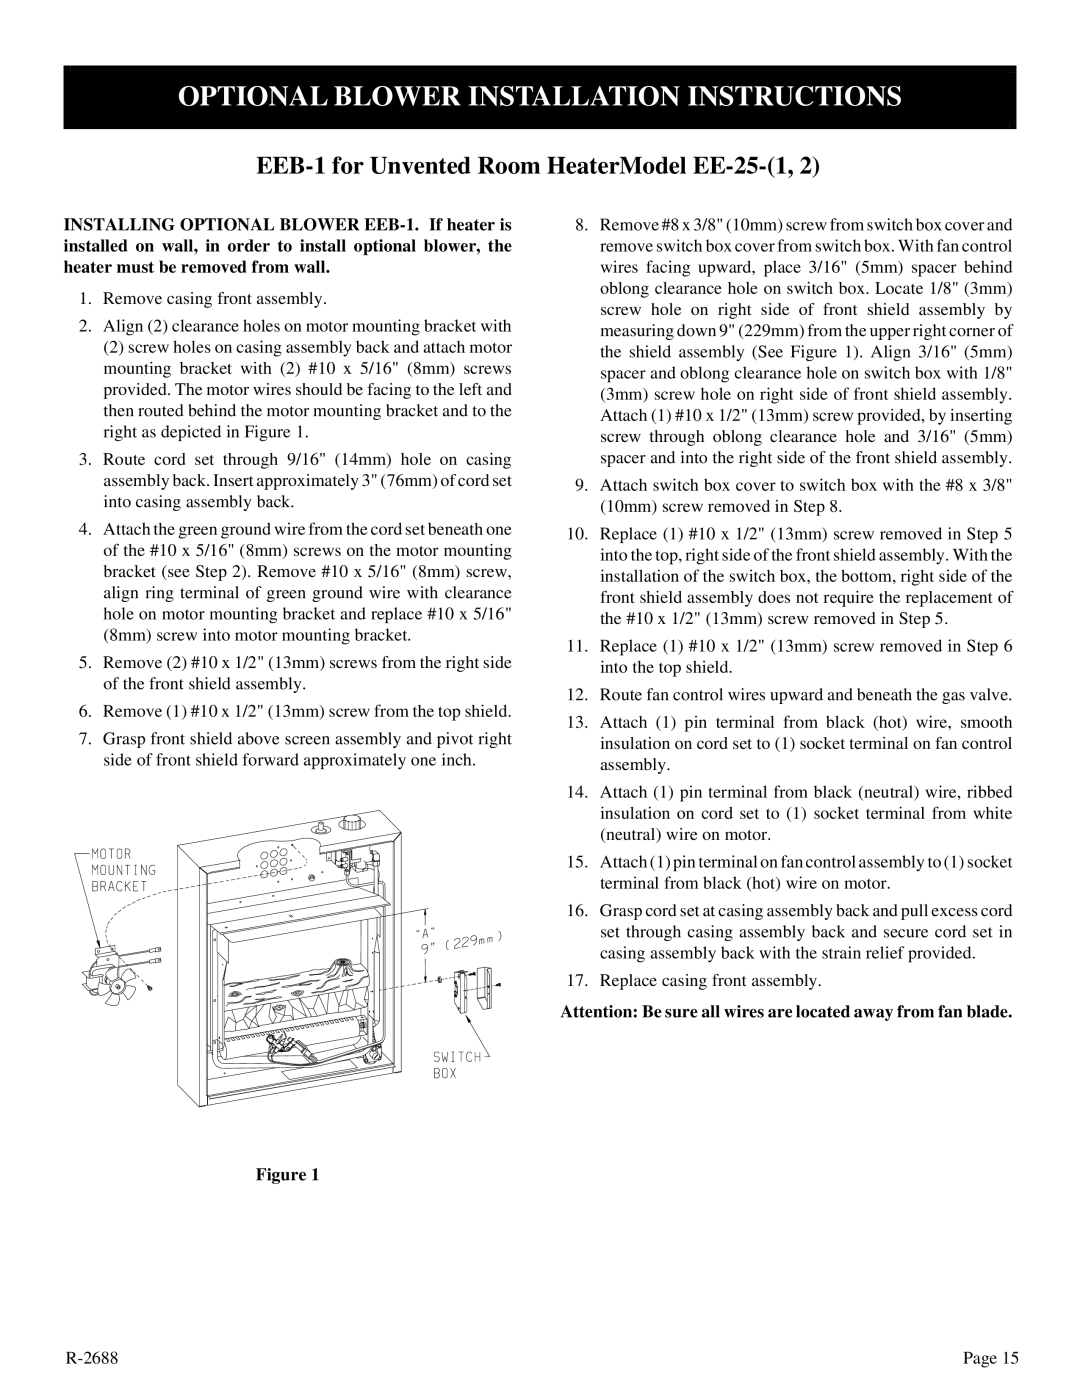
(2) screw holes on casing assembly back and attach motor mounting bracket with (2) #10 x 5/16" (8mm) screws provided. The motor wires should be facing to the left and then routed behind the motor mounting bracket and to the right as depicted in Figure 1.

3.Route cord set through 9/16" (14mm) hole on casing assembly back. Insert approximately 3" (76mm) of cord set into casing assembly back.

4.Attach the green ground wire from the cord set beneath one of the #10 x 5/16" (8mm) screws on the motor mounting bracket (see Step 2). Remove #10 x 5/16" (8mm) screw, align ring terminal of green ground wire with clearance hole on motor mounting bracket and replace #10 x 5/16" (8mm) screw into motor mounting bracket.

5.Remove (2) #10 x 1/2" (13mm) screws from the right side of the front shield assembly.

6.Remove (1) #10 x 1/2" (13mm) screw from the top shield.

7.Grasp front shield above screen assembly and pivot right side of front shield forward approximately one inch.

8.Remove #8 x 3/8" (10mm) screw from switch box cover and remove switch box cover from switch box. With fan control wires facing upward, place 3/16" (5mm) spacer behind oblong clearance hole on switch box. Locate 1/8" (3mm) screw hole on right side of front shield assembly by measuring down 9" (229mm) from the upper right corner of the shield assembly (See Figure 1). Align 3/16" (5mm) spacer and oblong clearance hole on switch box with 1/8" (3mm) screw hole on right side of front shield assembly. Attach (1) #10 x 1/2" (13mm) screw provided, by inserting screw through oblong clearance hole and 3/16" (5mm) spacer and into the right side of the front shield assembly.

9.Attach switch box cover to switch box with the #8 x 3/8" (10mm) screw removed in Step 8.

10.Replace (1) #10 x 1/2" (13mm) screw removed in Step 5 into the top, right side of the front shield assembly. With the installation of the switch box, the bottom, right side of the front shield assembly does not require the replacement of the #10 x 1/2" (13mm) screw removed in Step 5.

11.Replace (1) #10 x 1/2" (13mm) screw removed in Step 6 into the top shield.

12.Route fan control wires upward and beneath the gas valve.

13.Attach (1) pin terminal from black (hot) wire, smooth insulation on cord set to (1) socket terminal on fan control assembly.

14.Attach (1) pin terminal from black (neutral) wire, ribbed insulation on cord set to (1) socket terminal from white (neutral) wire on motor.

15.Attach (1) pin terminal on fan control assembly to (1) socket terminal from black (hot) wire on motor.

16.Grasp cord set at casing assembly back and pull excess cord set through casing assembly back and secure cord set in casing assembly back with the strain relief provided.

17.Replace casing front assembly.

Attention: Be sure all wires are located away from fan blade.

Figure 1

R-2688

Page 15

Page 15
Image 15
Empire Products EE-25-2 installation instructions Optional Blower Installation Instructions

EE-25-2 specifications

The Empire Products EE-25-2 is a versatile and robust piece of equipment designed for a variety of applications in industrial and commercial settings. Notable for its efficiency and performance, this model stands out in the marketplace due to its array of features and cutting-edge technologies that cater to the needs of modern industries.

One of the primary characteristics of the EE-25-2 is its powerful operational capacity. With a significant output capability, it is engineered to handle demanding workloads while maintaining high standards of performance. This makes it suitable for diverse operations, from manufacturing processes to large-scale assembly tasks.

The EE-25-2 is equipped with advanced control systems that enhance user experience and operational efficiency. Its intuitive interface allows for easy programming and monitoring, enabling operators to adjust settings and access critical data in real-time. This feature significantly reduces downtime and improves overall productivity, ensuring that businesses can meet their targets with ease.

Another key feature of the Empire Products EE-25-2 is its energy-efficient design. The equipment incorporates state-of-the-art technologies that minimize energy consumption without compromising on performance. This not only leads to cost savings for users but also aligns with environmentally friendly practices, making it an attractive option for businesses looking to reduce their carbon footprint.

The durability and reliability of the EE-25-2 are evident in its robust construction. Built with high-quality materials, it is designed to withstand the rigors of daily operations in challenging environments. Its resilience ensures that maintenance costs are kept to a minimum, and the longevity of the equipment is maximized.

Additionally, the EE-25-2 features an array of safety mechanisms that protect both the operator and the equipment. These include emergency stop functions, overload protection, and safety guards, which comply with industry standards and promote a secure working environment.

One of the standout characteristics of the EE-25-2 is its versatility. It can be customized with various attachments and tools, making it adaptable to different tasks and applications. This flexibility means that it can seamlessly integrate into existing workflows, providing businesses with the ability to pivot and adjust to changing demands.

In conclusion, the Empire Products EE-25-2 is a powerful and efficient piece of equipment with a host of features designed for modern industrial applications. With its advanced technologies, energy efficiency, durability, and safety mechanisms, it is a reliable choice for businesses looking to enhance productivity while maintaining a commitment to safety and sustainability.