Initial Installation | ||
QUALIFIED INSTALLERS ONLY | ||
the termination and the wall. The arrow on the vent termination |
| |
should be pointing up, insure that the proper clearances to | 10" | |
combustible materials are maintained. | (254mm) | |
| ||
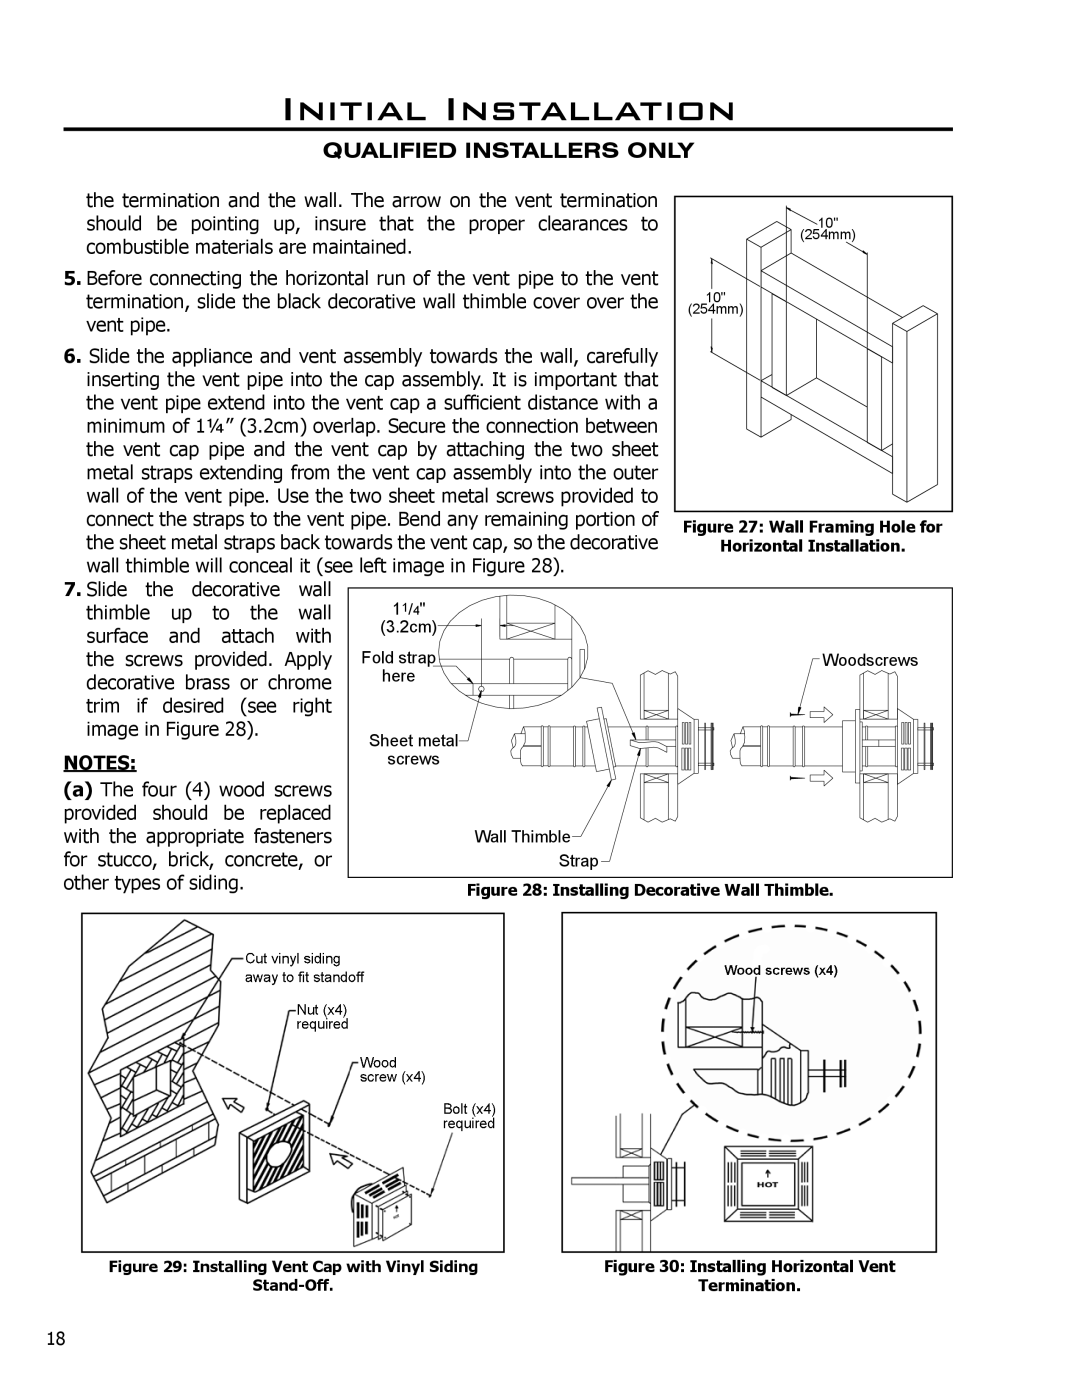
5. Before connecting the horizontal run of the vent pipe to the vent |
| |
termination, slide the black decorative wall thimble cover over the | 10" | |
vent pipe. | (254mm) | |
| ||
6. Slide the appliance and vent assembly towards the wall, carefully |
| |
inserting the vent pipe into the cap assembly. It is important that |
| |
the vent pipe extend into the vent cap a sufficient distance with a |
| |
minimum of 1¼” (3.2cm) overlap. Secure the connection between |
| |
the vent cap pipe and the vent cap by attaching the two sheet |
| |
metal straps extending from the vent cap assembly into the outer |
| |
wall of the vent pipe. Use the two sheet metal screws provided to |
| |
connect the straps to the vent pipe. Bend any remaining portion of | Figure 27: Wall Framing Hole for | |
the sheet metal straps back towards the vent cap, so the decorative | ||
Horizontal Installation. | ||
wall thimble will conceal it (see left image in Figure 28). |
| |
7.Slide the decorative wall
thimble | up | to | the | wall | 11/4" |
| ||
surface | and | attach | with | (3.2cm) |
| |||
|
| |||||||
the screws | provided. Apply | Fold strap | Woodscrews | |||||
decorative | brass | or | chrome | here |
| |||
trim if desired (see right |
|
| ||||||
image in Figure 28). |
|
| Sheet metal |
| ||||
|
|
|
|
|
|
|
| |
NOTES: |
|
|
|
|
|
| screws |
|
(a) The four (4) wood screws |
|
| ||||||
provided | should | be | replaced |
|
| |||
with the appropriate fasteners |
| Wall Thimble | ||||||
for stucco, brick, concrete, or |
| Strap | ||||||
other types of siding. |
|
|
| Figure 28: Installing Decorative Wall Thimble. | ||||
|
|
|
|
|
|
|
| |
Figure 29: Installing Vent Cap with Vinyl Siding | Figure 30: Installing Horizontal Vent |
Termination. |
18
