ations in cell temperatures greater than 5°F (2.78°C) in the series string at a given time, due to environmental condi- tions or module arrangement, can cause low cells.
14.1 Equalizing Frequency
An equalizing charge should be given when any of the fol- lowing conditions exist:
A. The float voltage of any cell is less than 2.18 VPC.
B. A recharge of the battery is required in a minimum time period following an emergency discharge.
C. Individual cell(s) float is more than +/- 0.05 volts from average.
D. Accurate periodic records (See Section 15) of individ- ual cell voltages show an increase in spread since the previous
An annual equalize charge is recommended to help ensure uniform cell performance.
14.2 Equalizing Charge Method
Constant voltage charging is the method for giving an equalizing charge. Determine the maximum voltage that may be applied to the system equipment. This voltage, divided by the number of cells connected in series, will establish the
NOTE: Charge volts listed in Table E are for 77°F. For other temperatures a compensation factor of .003 V/°F (.0055 V/°C) per cell is recommended. The minimum voltage is 2.20 VPC. The maximum voltage is 2.35 VPC. Temperature correction does not apply outside of this range.
V corrected = V25°C - ((T
corrected = V77°F - ((T
STEP 1
A. Set constant voltage charger to maximum setting without exceeding 2.35 VPC.
Example: For a target charge of 2.35 VPC on a
B. Record time and current at regular intervals – every hour as a minimum.
C. Continue charging the battery until there is no further drop in charge current over 3 consecutive hours.
D. When the current has stabilized, proceed to step 2.
|
|
|
| STEP 2 |
|
|
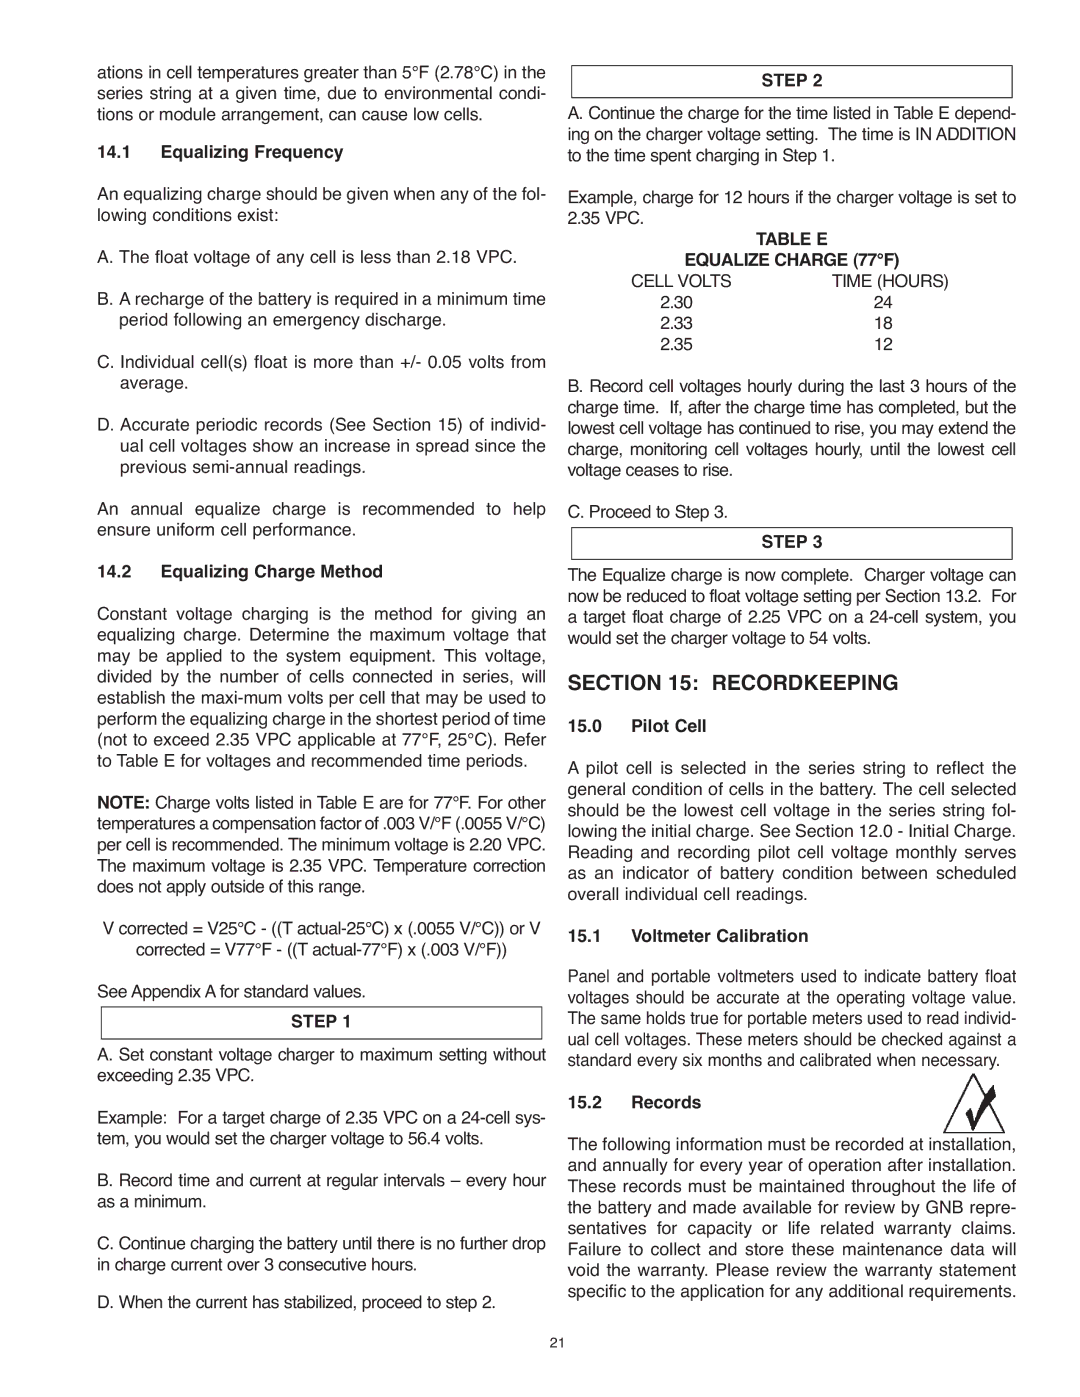
| A. Continue the charge for the time listed in Table E depend | - | ||||
ing on the charger voltage setting. The time is IN ADDITION | ||||||
to the time spent charging in Step 1. | ||||||
Example, charge for 12 hours if the charger voltage is set to | ||||||
2.35 VPC. | TABLE E | |||||
|
|
| EQUALIZE CHARGE (77°F) | |||
|
|
| CELL VOLTS | TIME (HOURS) | ||
|
|
| 2.30 | 24 |
|
|
|
|
| 2.33 | 18 |
|
|
|
|
| 2.35 | 12 |
|
|
B. Record cell voltages hourly during the last 3 hours of the | ||||||
charge time. If, after the charge time has completed, but the | ||||||
lowest cell voltage has continued to rise, you may extend the | ||||||
charge, monitoring cell voltages hourly, until the lowest cell | ||||||
voltage ceases to rise. |
|
|
| |||
C. Proceed to Step 3. | STEP 3 |
|
| |||
|
|
|
|
|
| |
|
| The Equalize charge is now complete. Charger voltage can |
|
| ||
|
| |||||
now be reduced to float voltage setting per Section 13.2. For | ||||||
a target float charge of 2.25 VPC on a | ||||||
would set the charger voltage to 54 volts. | ||||||
SECTION 15: RECORDKEEPING | ||||||
15.0 | Pilot Cell |
|
|
| ||
A pilot cell is selected in the series string to reflect the | ||||||
general condition of cells in the battery. The cell selected | ||||||
should be the lowest cell voltage in the series string fol- | ||||||
lowing the initial charge. See Section 12.0 - Initial Charge. | ||||||
Reading and recording pilot cell voltage monthly serves | ||||||
as an indicator of battery condition between scheduled | ||||||
overall individual cell readings. | ||||||
15.1 | Voltmeter Calibration | |||||
Panel and portable voltmeters used to indicate battery float | ||||||
voltages should be accurate at the operating voltage value. | ||||||
The same holds true for portable meters used to read individ- | ||||||
ual cell voltages. These meters should be checked against a | ||||||
standard every six months and calibrated when necessary. | ||||||
15.2 | Records |
|
|
| ||
The following information must be recorded at installation, and annually for every year of operation after installation. These records must be maintained throughout the life of the battery and made available for review by GNB repre- sentatives for capacity or life related warranty claims. Failure to collect and store these maintenance data will void the warranty. Please review the warranty statement specific to the application for any additional requirements.
21