Installation and Operation, cont’d

HDMI 201 A D Rx Front Panel

OUTPUT

HDMI

9


AUDIO-R


RS-232


12


PASS THRU

AUDIO-L


10

Rx


Tx


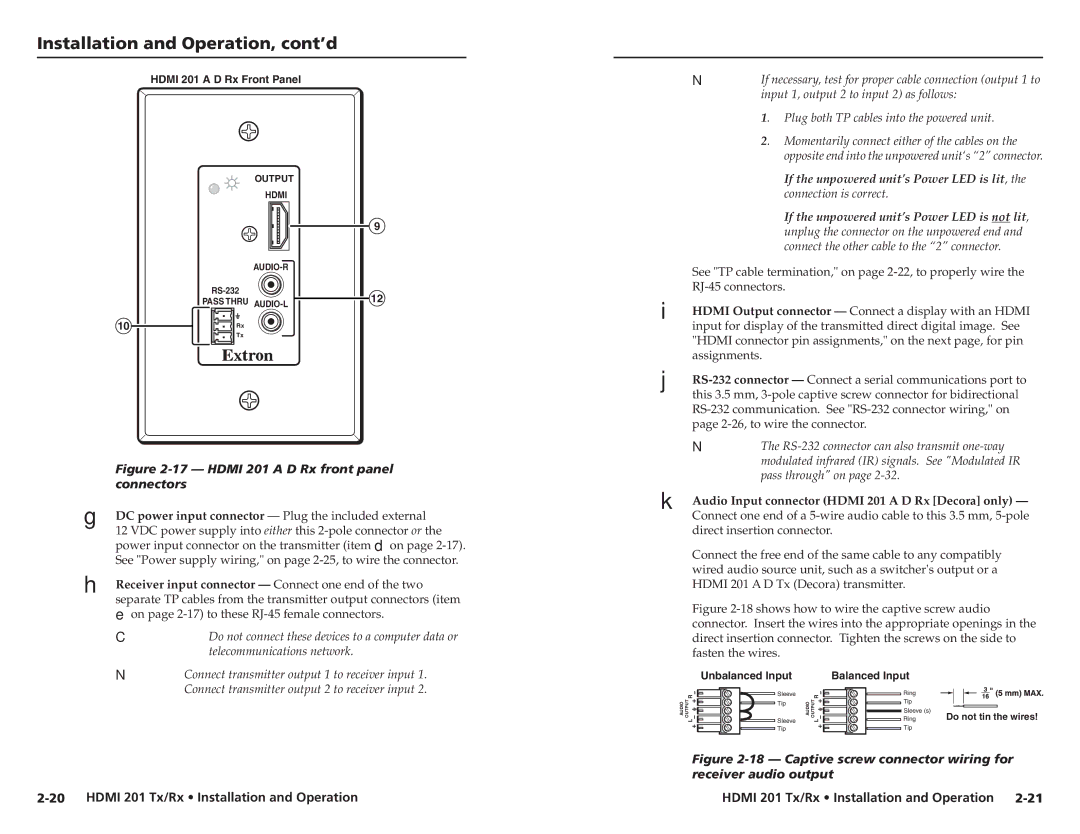
Figure 2-17 — HDMI 201 A D Rx front panel


connectors

G

DC power input connector — Plug the included external


12 VDC power supply into either this 2-pole connector or the


power input connector on the transmitter (item Don page 2-17).


See "Power supply wiring," on page 2-25, to wire the connector.

H

Receiver input connector — Connect one end of the two


separate TP cables from the transmitter output connectors (item


Eon page 2-17) to these RJ-45 female connectors.


C Do not connect these devices to a computer data or


telecommunications network.


N Connect transmitter output 1 to receiver input 1.


Connect transmitter output 2 to receiver input 2.

2-20 HDMI 201 Tx/Rx • Installation and Operation

NIf necessary, test for proper cable connection (output 1 to input 1, output 2 to input 2) as follows:

1. Plug both TP cables into the powered unit.

2. Momentarily connect either of the cables on the opposite end into the unpowered unit‘s “2” connector.

If the unpowered unit’s Power LED is lit, the connection is correct.

If the unpowered unit’s Power LED is not lit, unplug the connector on the unpowered end and connect the other cable to the “2” connector.

See "TP cable termination," on page 2-22, to properly wire the RJ-45 connectors.

I

HDMI Output connector — Connect a display with an HDMI


input for display of the transmitted direct digital image. See


"HDMI connector pin assignments," on the next page, for pin


assignments.

J

RS-232 connector — Connect a serial communications port to


this 3.5 mm, 3-pole captive screw connector for bidirectional


RS-232 communication. See "RS-232 connector wiring," on


page 2-26, to wire the connector.

NThe RS-232 connector can also transmit one-way modulated infrared (IR) signals. See "Modulated IR pass through" on page 2-32.

K

Audio Input connector (HDMI 201 A D Rx [Decora] only) —


Connect one end of a 5-wire audio cable to this 3.5 mm, 5-pole


direct insertion connector.

Connect the free end of the same cable to any compatibly wired audio source unit, such as a switcher's output or a HDMI 201 A D Tx (Decora) transmitter.

Figure 2-18 shows how to wire the captive screw audio connector. Insert the wires into the appropriate openings in the direct insertion connector. Tighten the screws on the side to fasten the wires.

Unbalanced Input

Balanced Input


R

Sleeve


R

Ring


AUDIO

OUTPUT

Tip

AUDIO

OUTPUT

Tip


L


L

Ring

Do not tin the wires!


Sleeve (s)


Sleeve


Tip


Tip


Figure 2-18 — Captive screw connector wiring for receiver audio output

HDMI 201 Tx/Rx • Installation and Operation 2-21

Page 18
Image 18
Extron electronic HDMI 201 Tx/Rx user manual Hdmi 201 a D Rx front panel

HDMI 201 Tx/Rx specifications

Extron Electronics has consistently been at the forefront of providing high-quality professional AV solutions, and their HDMI 201 Tx/Rx model stands as a testament to this legacy. Designed for superior performance in distributing HDMI signals, the HDMI 201 Tx/Rx offers a reliable solution for any professional installation environment, such as classrooms, conference rooms, and commercial spaces.

One of the standout features of the HDMI 201 Tx/Rx is its ability to extend HDMI signals beyond typical limitations. With support for high-definition video up to 1080p and audio formats, it ensures that users experience pristine image quality without degradation. This model can extend signals up to 200 feet (60 meters) over a standard category cable, allowing for flexible installations without compromising quality.

The HDMI 201 Tx/Rx utilizes advanced technologies including Extron's unique engineering that incorporates built-in EDID management. This feature simplifies configuration by allowing the transmission of data between display devices and source components, ensuring compatibility and optimal performance. Additionally, the device supports a wide range of video resolutions and audio formats, making it adaptable for various applications and user needs.

Another remarkable characteristic is the HDMI 201's compact and robust design. The unit is housed in a sturdy enclosure, making it suitable for rack mounting or placement in tight spaces without sacrificing performance. Furthermore, the Transmitter and Receiver are powered via a single power supply, facilitating easier installation and reducing clutter.

The Extron HDMI 201 Tx/Rx also features a user-friendly interface, with LED indicators that provide clear status information at a glance. This allows AV managers and technicians to quickly troubleshoot connection issues and monitor the system's performance, enhancing reliability and ease of use.

In conclusion, the Extron HDMI 201 Tx/Rx is a powerful solution for the transmission and extension of HDMI signals in professional settings. With its exceptional video and audio support, advanced features like EDID management, compact design, and user-centric interface, it represents a commitment to quality and innovation in the realm of audio-visual technology. This makes the HDMI 201 Tx/Rx an ideal choice for any AV professional seeking to enhance their installations and deliver superb content quality.