Installation and Operation, cont’d
Do not tin the stripped power supply leads before installing the captive screw connector. Tinned wires are not as secure in the captive screw connectors and could be pulled out.
To verify the polarity before connection, plug in the power supply with no load and check the output with a voltmeter.
The two power cord wires must be kept separate while the power supply is plugged in. Remove power before wiring.
As an alternative, an Extron P/S 123 Universal 12 VDC Power Supply, part
CAUTION Do not daisy chain power to this unit.
Front Panel Features and Operation
|
| OUTPUT 1 |
|
|
| OUTPUT 2 |
| ||||
1 | 2 |
| 3 | 1 | 2 |
| 3 | ||||
|
|
|
|
|
|
|
|
|
|
|
|
|
|
|
|
|
|
|
|
|
|
|
|
MMX 32 VGA A
1 | 2 |
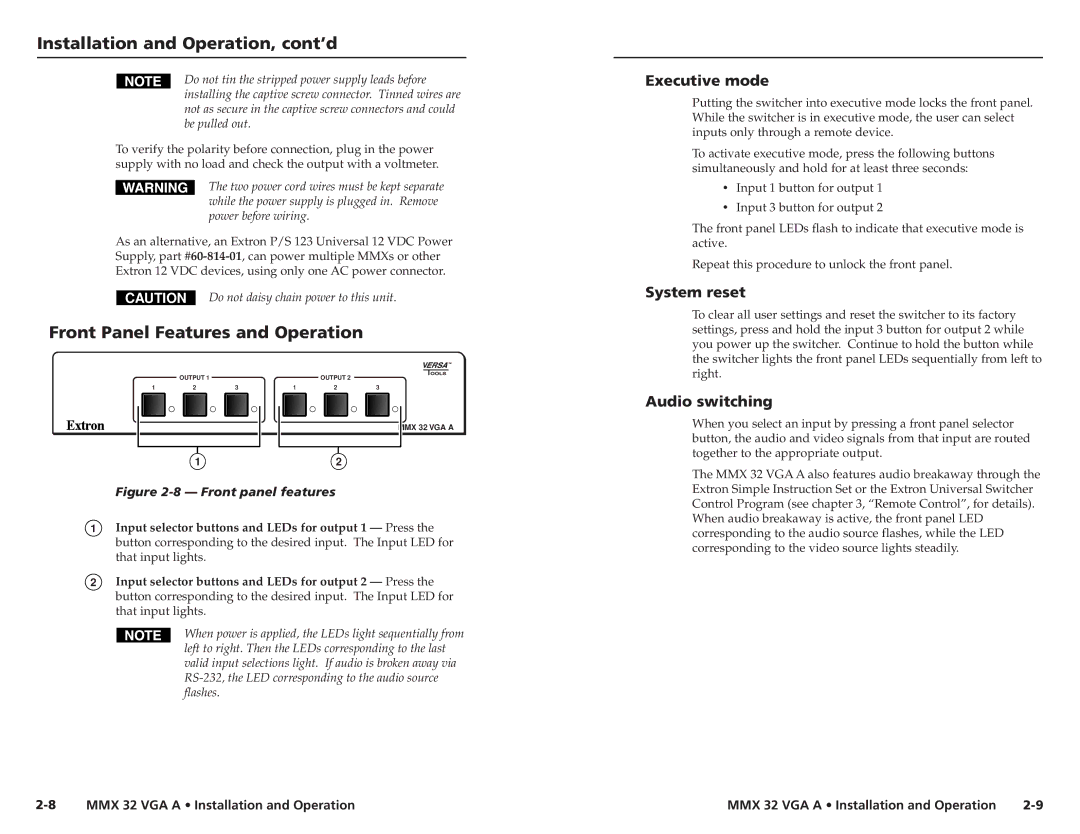
Figure 2-8 — Front panel features
1Input selector buttons and LEDs for output 1 — Press the button corresponding to the desired input. The Input LED for that input lights.
2Input selector buttons and LEDs for output 2 — Press the button corresponding to the desired input. The Input LED for that input lights.
When power is applied, the LEDs light sequentially from left to right. Then the LEDs corresponding to the last valid input selections light. If audio is broken away via
Executive mode
Putting the switcher into executive mode locks the front panel. While the switcher is in executive mode, the user can select inputs only through a remote device.
To activate executive mode, press the following buttons simultaneously and hold for at least three seconds:
•Input 1 button for output 1
•Input 3 button for output 2
The front panel LEDs flash to indicate that executive mode is active.
Repeat this procedure to unlock the front panel.
System reset
To clear all user settings and reset the switcher to its factory settings, press and hold the input 3 button for output 2 while you power up the switcher. Continue to hold the button while the switcher lights the front panel LEDs sequentially from left to right.
Audio switching
When you select an input by pressing a front panel selector button, the audio and video signals from that input are routed together to the appropriate output.
The MMX 32 VGA A also features audio breakaway through the Extron Simple Instruction Set or the Extron Universal Switcher Control Program (see chapter 3, “Remote Control”, for details). When audio breakaway is active, the front panel LED corresponding to the audio source flashes, while the LED corresponding to the video source lights steadily.
MMX 32 VGA A • Installation and Operation | MMX 32 VGA A • Installation and Operation |
