a. If one or more output LEDs are lit AND the +dB LED is lit, press and release the button repeatedly until the highest-numbered lit output LED goes out. Count the button presses. In example 8, assume a value of +8 dB. It will take three presses of the button for the Output 1 LED to go out.

If one or more output LEDs are lit AND the –dB LED is lit, press and release the button repeatedly until the highest-numbered lit output LED goes out. Count the button presses.

If the +dB LED is lit and NO output LEDs are lit, press and release the button repeatedly until the +dB and –dB LED are both lit, indicating 0 dB. Count the button presses.

If the –dB LED is lit and NO output LEDs are lit, press and release the button repeatedly until the +dB and –dB LED are both lit, indicating 0 dB. Count the button presses.

b. Return to the original audio gain setting by pressing and releasing the or button (the opposite of the button you pressed in step a) the same number of steps you pressed the opposite arrow button in step 1. In example 8, this means pressing the button three times.

c. Add the dB value indicated by the highest-numbered lit output LED (no output LEDs lit and both dB LEDs lit = 0 dB) and either of the following:

The number of button presses from 0 dB, or

The number of button presses from when the highest-numbered output LED lit. In example 8:

Output 1 LED:

6 dB

+ 2 presses:

+2 dB


8 dB

d. The lit +dB or –dB LED indicates the gain (+) or attenuation (–).

3.

Press and release the

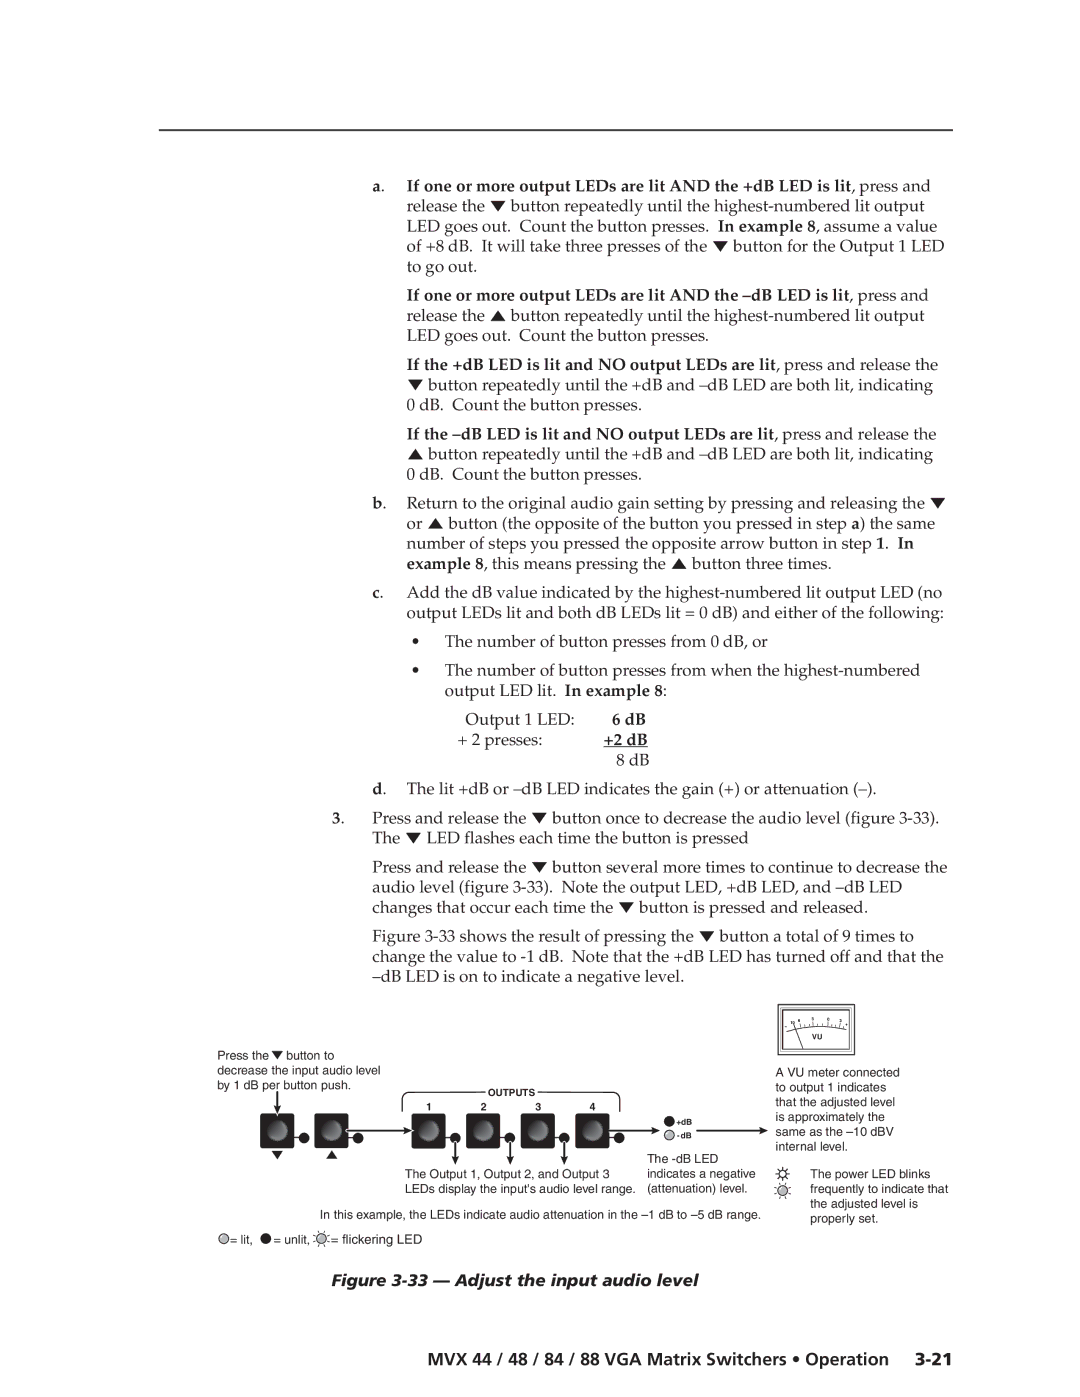
button once to decrease the audio level (figure 3-33).


The

LED flashes each time the button is pressed

Press and release the button several more times to continue to decrease the audio level (figure 3-33). Note the output LED, +dB LED, and –dB LED changes that occur each time the button is pressed and released.

Figure 3-33 shows the result of pressing the button a total of 9 times to change the value to -1 dB. Note that the +dB LED has turned off and that the –dB LED is on to indicate a negative level.


10

6

3

0

3


+


VU


Press the

button to


decrease the input audio level


A VU meter connected

by 1 dB per button push.


OUTPUTS


to output 1 indicates


that the adjusted level


1

2

3

4


is approximately the


+dB


same as the –10 dBV


- dB


internal level.


The -dB LED

The Output 1, Output 2, and Output 3

indicates a negative

LEDs display the input's audio level range.

(attenuation) level.

In this example, the LEDs indicate audio attenuation in the –1 dB to –5 dB range.

= lit, = unlit, = flickering LED

The power LED blinks frequently to indicate that the adjusted level is properly set.

Figure 3-33 — Adjust the input audio level

MVX 44 / 48 / 84 / 88 VGA Matrix Switchers • Operation 3-21

Page 37
Image 37
Extron electronic MVX 44, MVX 88, MVX 48, MVX 84 manual +2 dB, Lit +dB or -dB LED indicates the gain + or attenuation

MVX 48, MVX 84, MVX 44, MVX 88 specifications

Extron Electronics is a prominent leader in high-quality AV technology solutions, renowned for its innovative product lines designed to address diverse connectivity and distribution needs. Among their array of offerings, the MVX series stands out, particularly the MVX 44, MVX 84, and MVX 88 models, which cater to various AV signal routing needs within educational institutions, corporate environments, and large spaces.

The Extron MVX 44 is a 4x4 matrix switcher designed for routing HDMI, VGA, and audio signals. One of its key features is its ability to deliver high-resolution video up to 1080p, making it ideal for modern multimedia presentations. The MVX 44 supports EDID management, ensures compatibility with a range of source devices, and features automatic switching capabilities. It also includes a user-friendly interface for seamless operation, allowing simultaneous switching of multiple input sources to multiple outputs.

Expanding on the capabilities of the MVX 44, the MVX 84 and MVX 88 models provide enhanced functionality with additional inputs and outputs. The MVX 84 offers support for up to 8 input sources and 4 output destinations, while the MVX 88 offers 8x8 routing of signals. Both models maintain superior video quality and high-performance signal processing, accommodating more extensive AV systems. They also share features such as HDCP compliance to secure content protection, ensuring that the highest quality video signals are transmitted without degradation.

Technologically advanced, these switchers incorporate Extron's exclusive technologies, such as the Advanced Color Processing for superior color fidelity and signal reliability. Additionally, the Series comes equipped with optional control and integration capabilities, enabling connection to various AV control systems for centralized management.

The Extron MVX series matrices are built with the robustness expected from Extron products, ensuring long-term reliability in demanding environments. The integration of state-of-the-art support for audio signals allows not only video but also audio distribution, making them versatile for any AV setup. In summary, with their rich feature set, impressive scalability, and superior video processing capabilities, the Extron MVX 44, MVX 84, and MVX 88 present compelling solutions for anyone looking to streamline AV signal management in professional setups.