Installation
Through-desk mounting
Both SW2 models can be mounted through a table or podium, using optional
#70-077-02).
1. | Attach the mounting brackets to the switcher with the |
| screws provided (figure |
2. | Cut the proper sized hole in the mounting surface. |
3. | Hold the switcher with the attached brackets against the |
| underside of the table or other furniture. Mark the location |
| of the screw holes of the bracket on the mounting surface. |
4. | Drill 3/32” (2 mm) diameter pilot holes, 1/4” (6.3 mm) deep |
| in the mounting surface at the marked screw locations. |
5. | Insert four #8 wood screws through the bracket and into the |
| four pilot holes. Tighten all four screws to secure the |
| switcher in place. |
Figure 2-3 — Through-desk mounting
Rear Panel Features and Connections
All connectors are on the rear panel. Figure
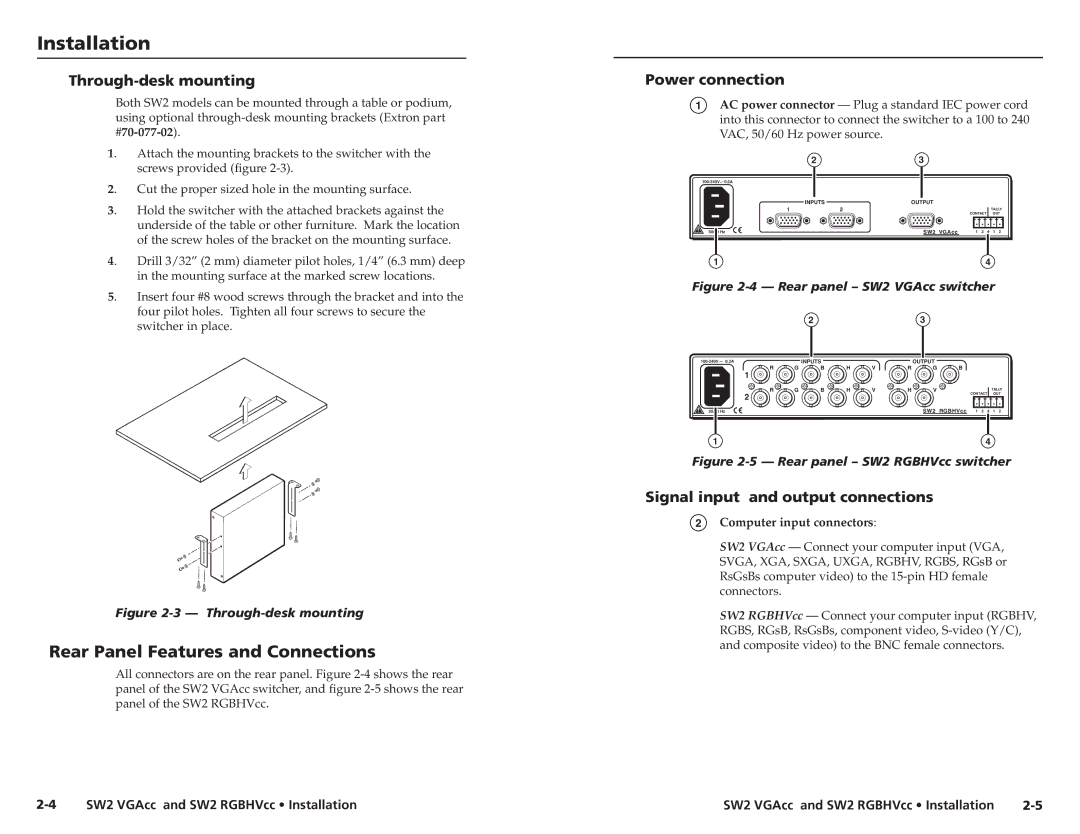
Power connection
1AC power connector — Plug a standard IEC power cord into this connector to connect the switcher to a 100 to 240 VAC, 50/60 Hz power source.
| 2 | 3 |
|
| |
| INPUTS | OUTPUT |
1 | 2 | TALLY |
|
| CONTACT OUT |
50/60 Hz | SW2 VGAcc | 1 | 2 | 1 | 2 |
1 | 4 |
Figure 2-4 — Rear panel – SW2 VGAcc switcher
|
|
| 2 |
|
|
| 3 |
|
|
|
0.2A |
| INPUTS |
|
|
| OUTPUT |
|
|
| |
| R | G | B | H | V | R | G | B |
|
|
| 1 |
|
|
|
|
|
|
|
|
|
| R | G | B | H | V | H | V |
| CONTACT | TALLY |
| 2 |
|
|
|
|
|
|
| OUT | |
|
|
|
|
|
|
|
|
|
| |
50/60 Hz |
|
|
|
|
|
| SW2 RGBHVcc | 1 2 | 1 2 | |
1 | 4 |
Figure 2-5 — Rear panel – SW2 RGBHVcc switcher
Signal input and output connections
2Computer input connectors:
SW2 VGAcc — Connect your computer input (VGA, SVGA, XGA, SXGA, UXGA, RGBHV, RGBS, RGsB or RsGsBs computer video) to the
SW2 RGBHVcc — Connect your computer input (RGBHV, RGBS, RGsB, RsGsBs, component video,
SW2 VGAcc and SW2 RGBHVcc • Installation | SW2 VGAcc and SW2 RGBHVcc • Installation |