Installation
Installation Overview
SW2 VGAcc_RGBHVcc User'sManl.pdf
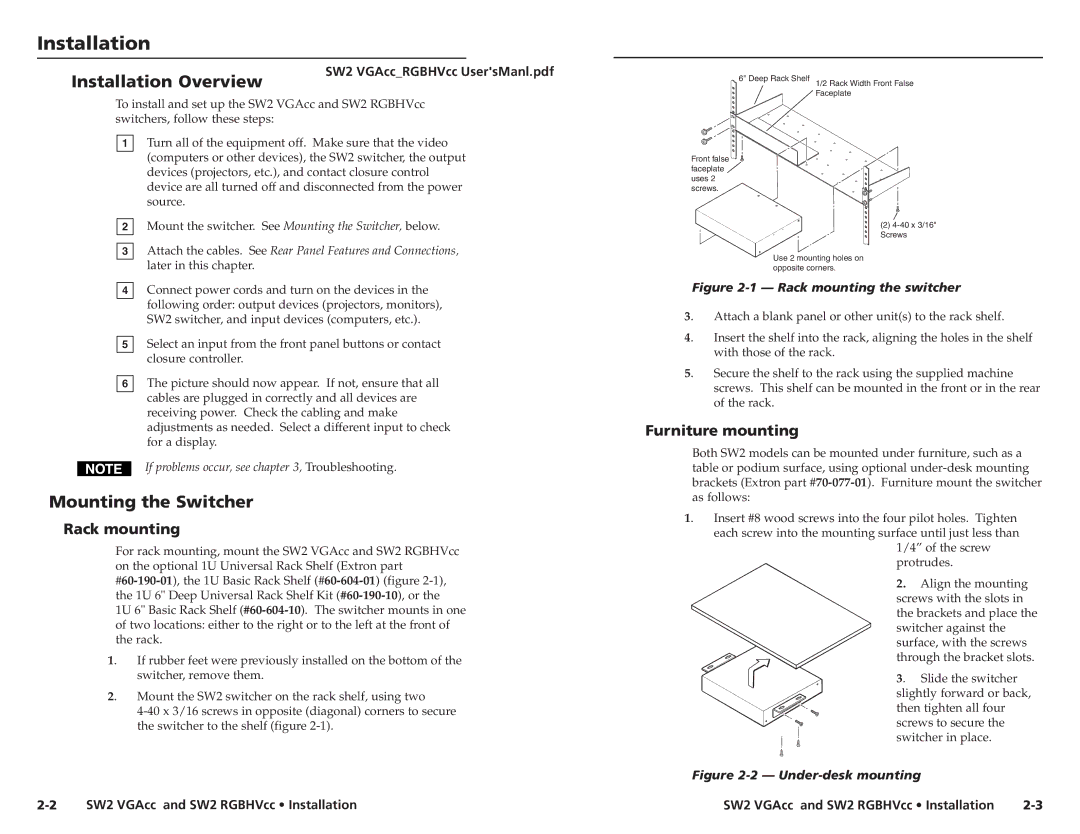
6" Deep Rack Shelf 1/2 Rack Width Front False Faceplate
To install and set up the SW2 VGAcc and SW2 RGBHVcc switchers, follow these steps:
1Turn all of the equipment off. Make sure that the video (computers or other devices), the SW2 switcher, the output devices (projectors, etc.), and contact closure control device are all turned off and disconnected from the power source.
2Mount the switcher. See Mounting the Switcher, below.
3Attach the cables. See Rear Panel Features and Connections, later in this chapter.
4Connect power cords and turn on the devices in the following order: output devices (projectors, monitors), SW2 switcher, and input devices (computers, etc.).
5Select an input from the front panel buttons or contact closure controller.
6The picture should now appear. If not, ensure that all cables are plugged in correctly and all devices are receiving power. Check the cabling and make adjustments as needed. Select a different input to check for a display.
If problems occur, see chapter 3, Troubleshooting.
Mounting the Switcher
Rack mounting
For rack mounting, mount the SW2 VGAcc and SW2 RGBHVcc on the optional 1U Universal Rack Shelf (Extron part
1U 6" Basic Rack Shelf
1. | If rubber feet were previously installed on the bottom of the |
| switcher, remove them. |
2. | Mount the SW2 switcher on the rack shelf, using two |
| |
| the switcher to the shelf (figure |
2-2 SW2 VGAcc and SW2 RGBHVcc • Installation
Front false ![]() faceplate
faceplate ![]() uses 2 screws.
uses 2 screws.
(2)
Use 2 mounting holes on opposite corners.
Figure 2-1 — Rack mounting the switcher
3. | Attach a blank panel or other unit(s) to the rack shelf. |
4. | Insert the shelf into the rack, aligning the holes in the shelf |
| with those of the rack. |
5. | Secure the shelf to the rack using the supplied machine |
| screws. This shelf can be mounted in the front or in the rear |
| of the rack. |
Furniture mounting
Both SW2 models can be mounted under furniture, such as a table or podium surface, using optional
1. | Insert #8 wood screws into the four pilot holes. Tighten |
| each screw into the mounting surface until just less than |
1/4” of the screw protrudes.
2. Align the mounting screws with the slots in the brackets and place the switcher against the surface, with the screws through the bracket slots.
3. Slide the switcher slightly forward or back, then tighten all four screws to secure the switcher in place.
Figure 2-2 — Under-desk mounting
SW2 VGAcc and SW2 RGBHVcc • Installation |
