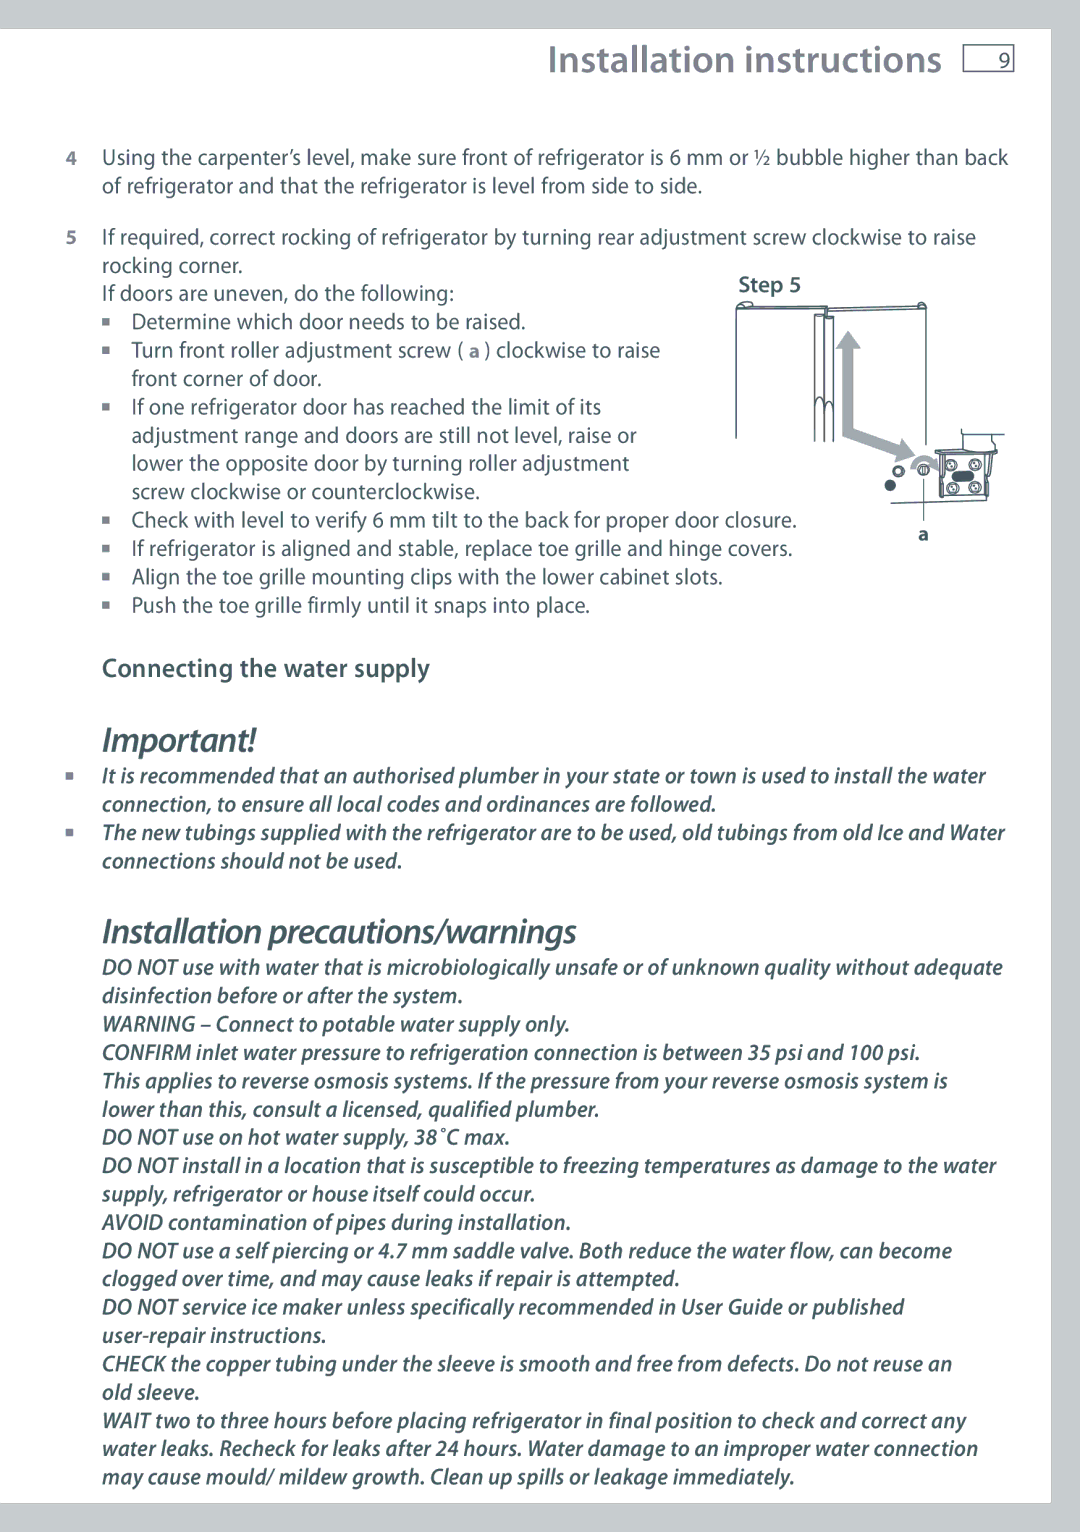
Step 5

Installation instructions

9

4Using the carpenter’s level, make sure front of refrigerator is 6 mm or ½ bubble higher than back of refrigerator and that the refrigerator is level from side to side.

5If required, correct rocking of refrigerator by turning rear adjustment screw clockwise to raise

rocking corner.

If doors are uneven, do the following:

Determine which door needs to be raised.


Turn front roller adjustment screw ( a ) clockwise to raise


front corner of door.


If one refrigerator door has reached the limit of its


adjustment range and doors are still not level, raise or


lower the opposite door by turning roller adjustment


screw clockwise or counterclockwise.


Check with level to verify 6 mm tilt to the back for proper door closure.


a

If refrigerator is aligned and stable, replace toe grille and hinge covers.


Align the toe grille mounting clips with the lower cabinet slots.


Push the toe grille firmly until it snaps into place.


Connecting the water supply

Important!

It is recommended that an authorised plumber in your state or town is used to install the water connection, to ensure all local codes and ordinances are followed.

The new tubings supplied with the refrigerator are to be used, old tubings from old Ice and Water connections should not be used.

Installation precautions/warnings

DO NOT use with water that is microbiologically unsafe or of unknown quality without adequate disinfection before or after the system.

WARNING – Connect to potable water supply only.

CONFIRM inlet water pressure to refrigeration connection is between 35 psi and 100 psi. This applies to reverse osmosis systems. If the pressure from your reverse osmosis system is lower than this, consult a licensed, qualified plumber.

DO NOT use on hot water supply, 38˚C max.

DO NOT install in a location that is susceptible to freezing temperatures as damage to the water supply, refrigerator or house itself could occur.

AVOID contamination of pipes during installation.

DO NOT use a self piercing or 4.7 mm saddle valve. Both reduce the water flow, can become clogged over time, and may cause leaks if repair is attempted.

DO NOT service ice maker unless specifically recommended in User Guide or published userrepair instructions.

CHECK the copper tubing under the sleeve is smooth and free from defects. Do not reuse an old sleeve.

WAIT two to three hours before placing refrigerator in final position to check and correct any water leaks. Recheck for leaks after 24 hours. Water damage to an improper water connection may cause mould/ mildew growth. Clean up spills or leakage immediately.

Page 11
Image 11
Fisher & Paykel RX594, RX693, RX616 installation instructions Installation precautions/warnings, Connecting the water supply

RX594, RX616, RX693 specifications

Fisher & Paykel is renowned for its innovative approach to home appliances, particularly in the realm of refrigeration. Their RX series models, including the RX693, RX616, and RX594, highlight the brand's commitment to quality, functionality, and design, making them standout choices for modern kitchens.

The Fisher & Paykel RX693 is a versatile refrigerator that combines spaciousness with high-end features. With a total capacity of 691 litres, it is ideal for larger households or those who enjoy entertaining. The ActiveSmart technology adjusts the airflow to maintain optimal temperatures, ensuring freshness for longer. Its sophisticated design incorporates a stainless steel finish that not only looks sleek but is also easy to clean. Additionally, the RX693 is equipped with an integrated ice maker, providing a continuous supply of ice right when you need it.

Moving to the RX616, this model offers a more compact solution without compromising on features. With a capacity of 616 litres, it is perfect for smaller spaces while still delivering impressive storage capabilities. This model features the same ActiveSmart technology as its larger counterpart, ensuring efficient cooling and temperature control. The RX616 also includes customizable shelving and bins, allowing users to adapt the storage space to their preferences, maximizing efficiency in organization.

The RX594 is designed for those who prioritize efficiency and convenience. With a total capacity of 594 litres, it is specifically tailored for modern living. The integrated design seamlessly blends into any kitchen décor, maintaining a clean and uncluttered aesthetic. One of the key highlights of the RX594 is its Eco-friendly features, which are aimed at reducing energy consumption while still providing exceptional cooling performance. The refrigerator also boasts dual cooling systems that independently regulate the temperature in the fridge and freezer compartments, contributing to food preservation.

Across all three models, Fisher & Paykel has focused on user-friendly technology. The intuitive touchscreen controls make navigating settings and features straightforward. From adjustable shelving to specialized zones for different food types, these refrigerators are designed to cater to the diverse needs of today’s consumers. Overall, the RX693, RX616, and RX594 embody Fisher & Paykel's commitment to excellence, offering stylish design and advanced technology for the modern kitchen.