ASSEMBLY
NOTE: You may need two people to complete the following steps. One to hold CONSOLE TUBE (16) while attachments are made.
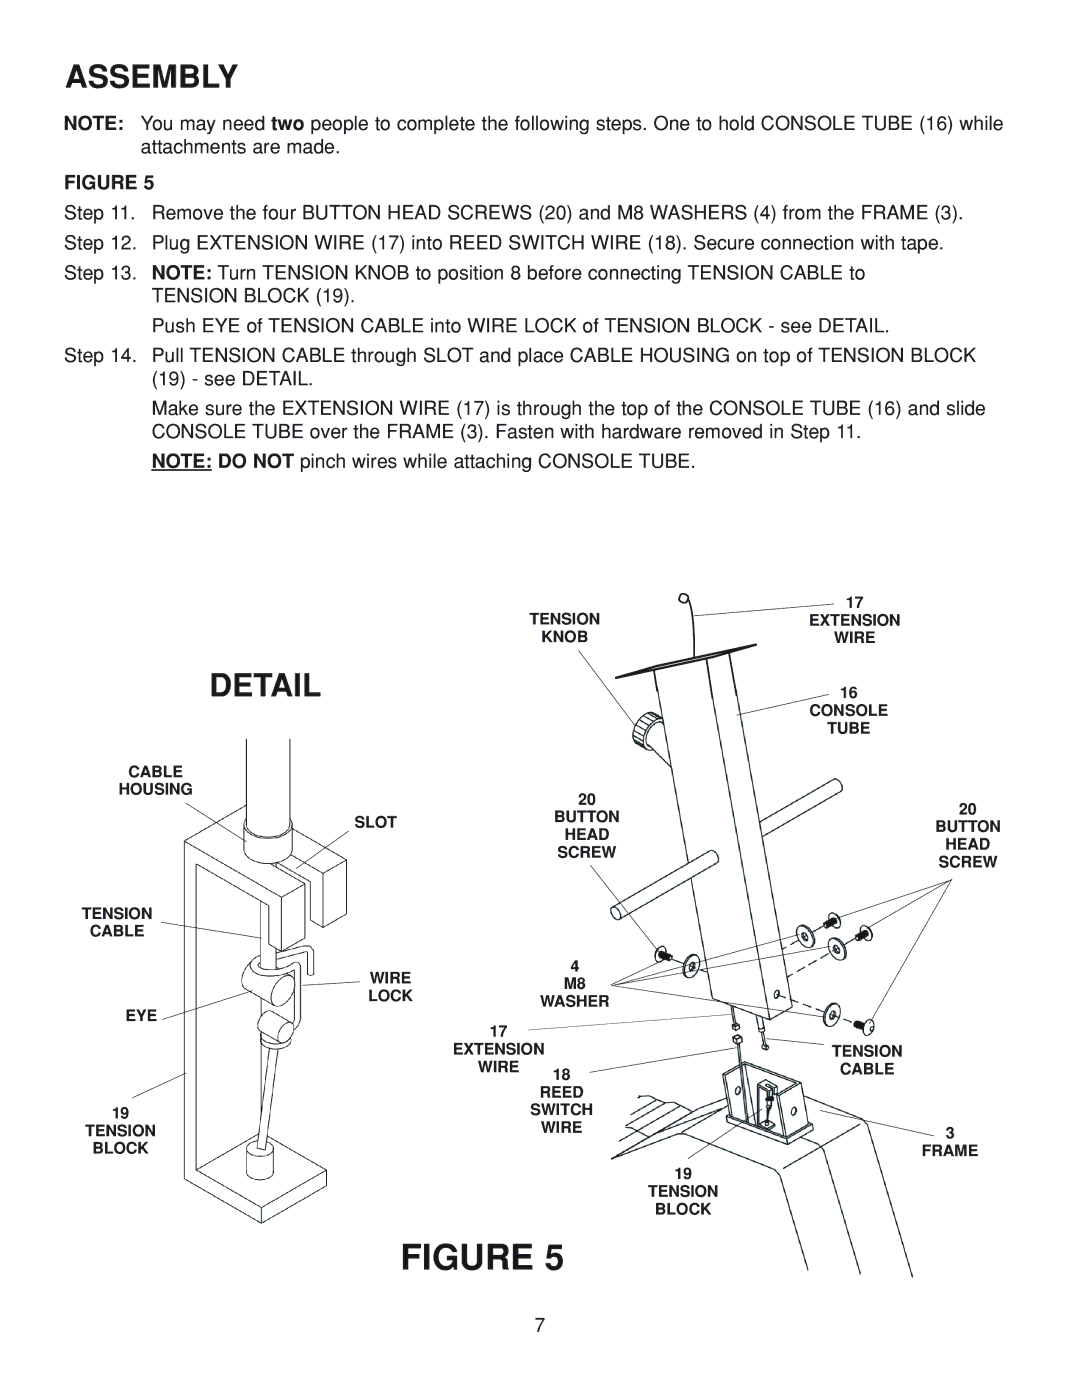
FIGURE 5
Step 11. Remove the four BUTTON HEAD SCREWS (20) and M8 WASHERS (4) from the FRAME (3).
Step 12. Plug EXTENSION WIRE (17) into REED SWITCH WIRE (18). Secure connection with tape.
Step 13. NOTE: Turn TENSION KNOB to position 8 before connecting TENSION CABLE to TENSION BLOCK (19).
Push EYE of TENSION CABLE into WIRE LOCK of TENSION BLOCK - see DETAIL.
Step 14. Pull TENSION CABLE through SLOT and place CABLE HOUSING on top of TENSION BLOCK (19) - see DETAIL.
Make sure the EXTENSION WIRE (17) is through the top of the CONSOLE TUBE (16) and slide CONSOLE TUBE over the FRAME (3). Fasten with hardware removed in Step 11.
NOTE: DO NOT pinch wires while attaching CONSOLE TUBE.
|
|
| TENSION |
| ||
CABLE | DETAIL |
| KNOB |
|
| |
|
|
| ||||
|
|
|
|
| ||
|
|
|
|
| ||
|
|
|
|
| ||
|
|
|
|
|
| |
HOUSING |
|
| 20 |
|
|
|
|
|
|
|
|
| |
| SLOT |
| BUTTON |
| ||
|
| HEAD |
| |||
|
|
|
| |||
|
|
| SCREW |
| ||
TENSION |
|
|
|
|
|
|
CABLE |
|
|
|
|
|
|
| WIRE |
| 4 |
|
|
|
|
| M8 |
| |||
| LOCK |
|
| |||
|
| WASHER |
| |||
EYE |
|
|
| |||
| 17 |
|
|
|
| |
|
|
|
|
|
| |
|
| EXTENSION |
| |||
|
| WIRE | 18 |
|
|
|
|
|
|
|
|
| |
|
|
| REED |
| ||
19 |
|
| SWITCH |
| ||
TENSION |
|
| WIRE |
| ||
BLOCK
19
TENSION
BLOCK
FIGURE 5
17
EXTENSION
WIRE
16
CONSOLE
TUBE
20
BUTTON
HEAD
SCREW
TENSION
CABLE
![]() 3 FRAME
3 FRAME
7