Getting Ready Basic Photography
Graphical symbols are located on the bottom of the case
For customers in the U.S.A
For customers in Canada
Contents
GADJUSTING the Monitor Brightness GUSING SET-UP
IHOW to Specify Print Options Dpof IDPOF SET Frame
From FinePixViewer installation to restart
Preface
Camera Features and Accessories
Camera Features
Accessories
H16 MB, xD-Picture Card
Mode switch
Nomenclature
Battery compartment
Attaching the strap
Example of LCD Monitor Text Display Playback mode
Example of LCD Monitor Text Display Still photography mode
Nomenclature Sample display
Compatible batteries XD-Picture Card sold separately
FrontBack
When you want to replace the battery
Loading the Batteries and xD-Picture Card
Replacing an xD-Picture Card
You can then pull the xD-Picture Card the rest
Switching on and OFF
Setting the Date and Time
Changing the date and time
To change the date display format
To change the date and time
You can select your preferred date format
Power Save Function
Checking the remaining battery charge
Setting Explanation
Selecting the Language
Screens in this manual are shown in English
See P.64 for more information on the g Option
Menu
Basic Operation Guide
4Confirm your selection. Press the MENU/OK button
Using the Menus
Press the Disp button to use the zoom
Taking Pictures a Auto Mode
If a ∂, ƒ, å or ˙ message appears, see P.106
Subject in the frame
Camera strap, you may not be able to obtain
Viewfinder
Beep
Viewfinder lamp display
Display Status
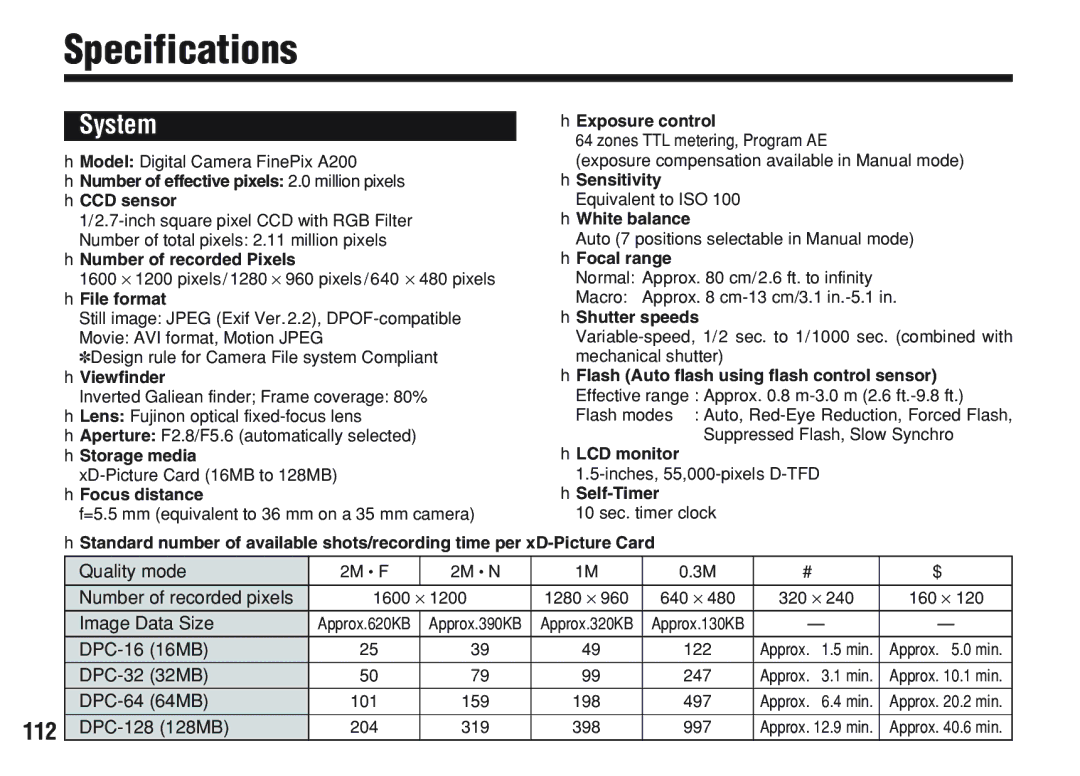
Quality mode 2M F 2M N
Number of Available Frames
Number of available shots is displayed on1M the LCD monitor
Standard number of shots per xD-Picture Card
Qmode Framing Guideline Function
Scene
LCD monitor OFF
LCD monitor on
Digital Zoom
Zoom bar appears on the LCD monitor
HDigital zoom focal distance 35 mm camera equivalent
Zoom bar
When you cancel Macro mode, the LCD monitor Remains on
Macro CLOSE-UP Photography
Viewing Your Images Playback
Fast Forwarding Images
WMODE
Still images that can be viewed
MULTI-FRAME Playback
Normal playback
No text displayed
Multi-frame playback
HZoom scales
Playback Zoom
1280
Erasing Single Frame
Press the Back button to cancel frame erasing
Erasing Single Frame
Selecting a Auto or S Manual
Set the Mode switch to Q
See P.44 for information on shooting movies
Depending on the still photography mode
Settings available in the menu screen differ
Photography Menu Operation
Photography and Movie Menu Options
Sample LCD monitor display Accessible menu settings
Mode
Setting the Quality
Examples
HFor printing on A5 paper → 2M F, 2M N
Use Quality
You cannot use this setting in Macro close-up photography
Auto Auto Flash Mode
Flash
Red-Eye Reduction Forced Flash
Flash
Red-Eye Effect
Suppressed Flash
Slow Synchro
= SELF-TIMER Photography Selecting A/SP.33
This mode can be selected in the a still photography mode
Page
This mode can be selected in the S still photography mode
Guide to using + positive compensation
Guide to using negative compensation
HCorrection range 13 steps
White Balance Selecting the Light Source
Mode Tmovie Video
XD-Picture Card Quality mode
Without sound
Capacity
Press the shutter button
Movie Video
320 ⋅
Quality settings for movies
160 ⋅
Playing Back Movies Video
Playing back movie files
Playing back movies
Control Description
Erasing Single ALL FRAMES/FORMATTING
1Use a or b to select FRAME, ALL
Frames or Format
2Press the MENU/OK button to confirm
Selection
Erasing Single ALL FRAMES/FORMATTING
Pressing the MENU/OK button erases all the unprotected files
To stop the procedure mid-way
Protecting Images FRAME/ALL
Use d or c to select k Protect
Protect ALL or Frame SET/RESET
1Press a or b to select Unprotect ALL
Removes the protection from all the files
Protects all the files
Protecting Images FRAME/ALL
To remove the protection, press the MENU/OK button
Press the MENU/OK button to protect all the files
Press the MENU/OK button to unprotect all the files
HOW to Specify Print Options Dpof
Playback Menu iDPOF SET Frame
Dpof SET Frame
1Press a to select OK 2Press the MENU/OK button
If you press the Back button, no Dpof settings are specified
Dpof settings cannot be changed
Adjusting the Monitor Brightness
Using SET- UP
List of settings
Still photography mode Movie mode Playback mode
Settings Display
SET-UP Menu Options
HPower saving on default setting
SET-UP gPOWER Save
HPower saving OFF
Software Components
Installation on a Windows PC
Switch on your PC and start up Windows
Double-click the My Computer icon
Windows XP users should click My Computer in the Start menu
USB drivers are installed Install FinePixViewer
FinePixViewer installation begins and notes
Install QuickTime as directed by the on- screen instructions
To install Acrobat Reader later
To install Acrobat Reader, click Install Acrobat Reader
Switch on your Macintosh and start up Mac OS 8.6 to
Enable File Exchange
From FinePixViewer installation to restart
Click the Save button
To install Acrobat Reader later
Installation on a Mac OS
AVI movies cannot be played back on version
Page
PC CAM PC Camera Mode
DSC Mass storage device Mode
Software for FinePix SX
DC in 3V socket AC power adapter
Always use a Fujifilm AC Power Adapter AC-3V P.98
Sold separately
AC power adapter Socket
Use at DSC mode
Special USB Socket
Camera Operation
PC Operation
Windows 98/98 SE/Me/2000 Professional
FinePixViewer automatically starts up
Specify the settings in the AutoPlay dialog box
Proceed to Using FinePixViewer on
Windows XP
Click the OK button and launch FinePixViewer manually
Slide the power switch to the side to turn the camera on
Use at PC-CAM mode
Slide the power switch to the side to turn Camera off
Camera Operation
Windows 2000 Professional
Windows 98/98 SE/Me
If the live image does not appear, refer to
Disconnecting the Camera
Left-click the Eject icon in the taskbar and eject USB Disk
Screen for Windows Me
Menu option shown below appears. Click on this option
Special USB
Connect the camera to your computer in DSC mode P.80
Saving Images on Your Computer
Windows
Mac OS
Making a FinePix CD Album
Double-click a still-image thumbnail to open an image window
To the user registration window Internet menu is Updated
User Registration
For Windows and Mac OS 8.6 to
First-time users
Page
Double-click the FinePixViewer icon in the installed folder
For Mac OS
Enter the required information in the user registration
At the bottom
Select User’s registration and click the OK button
OK button
Bottom
Once you complete the registration, a confirmation
To read How to Use FinePixViewer
What is explained in How to Use FinePixViewer
Mastering FinePixViewer
Example Looking up slide shows
Uninstalling the Software
Uninstalling Mass Storage Driver and PC Camera Driver
Uninstalling Exif Launcher, FinePixViewer and DP Editor
Uninstalling FinePixViewer
Macintosh
System Expansion Options
Accessories Guide
AC Power Adapter AC-3V
Fujifilm Rechargeable Battery 2HR-3UF
XD-Picture Card
DPC-R1 Image Memory Card Reader
SC-FXA01
DPC-AD PC Card Adapter
Places to Avoid
101
Soil such as fingerprints on the battery terminals can
Loading the batteries
Disposing of Batteries
AC Power Adapter
103
Image Memory Card
104
Protecting Your Data
Specifications
105
106
Explanation Remedy
Settings Card is
107
Playback frame number has
Was first applied
Troubleshooting
108
109
Troubleshooting
110
Explanation of Terms
111
Specifications
113
Safety Notes
About the Icons
Do not allow water or foreign objects to enter the camera
Do not place the camera on an unstable surface
Use of other power sources can cause a fire
115
Safety Notes
116
Keep xD-Picture Cards out of the reach of small children
Keep out of the reach of small children
117
Failure to do so can cause a fire or electric shock
EC Declaration of Conformity
Fuji Photo Film Europe G.m.b.H
118
Weggooien maar inleveren als KCA
Be sure to read this page before using theSoftware
End User License Agreement
FGS-204107-Ni