Troubleshooting | Possible causes |
| Solutions | ||||
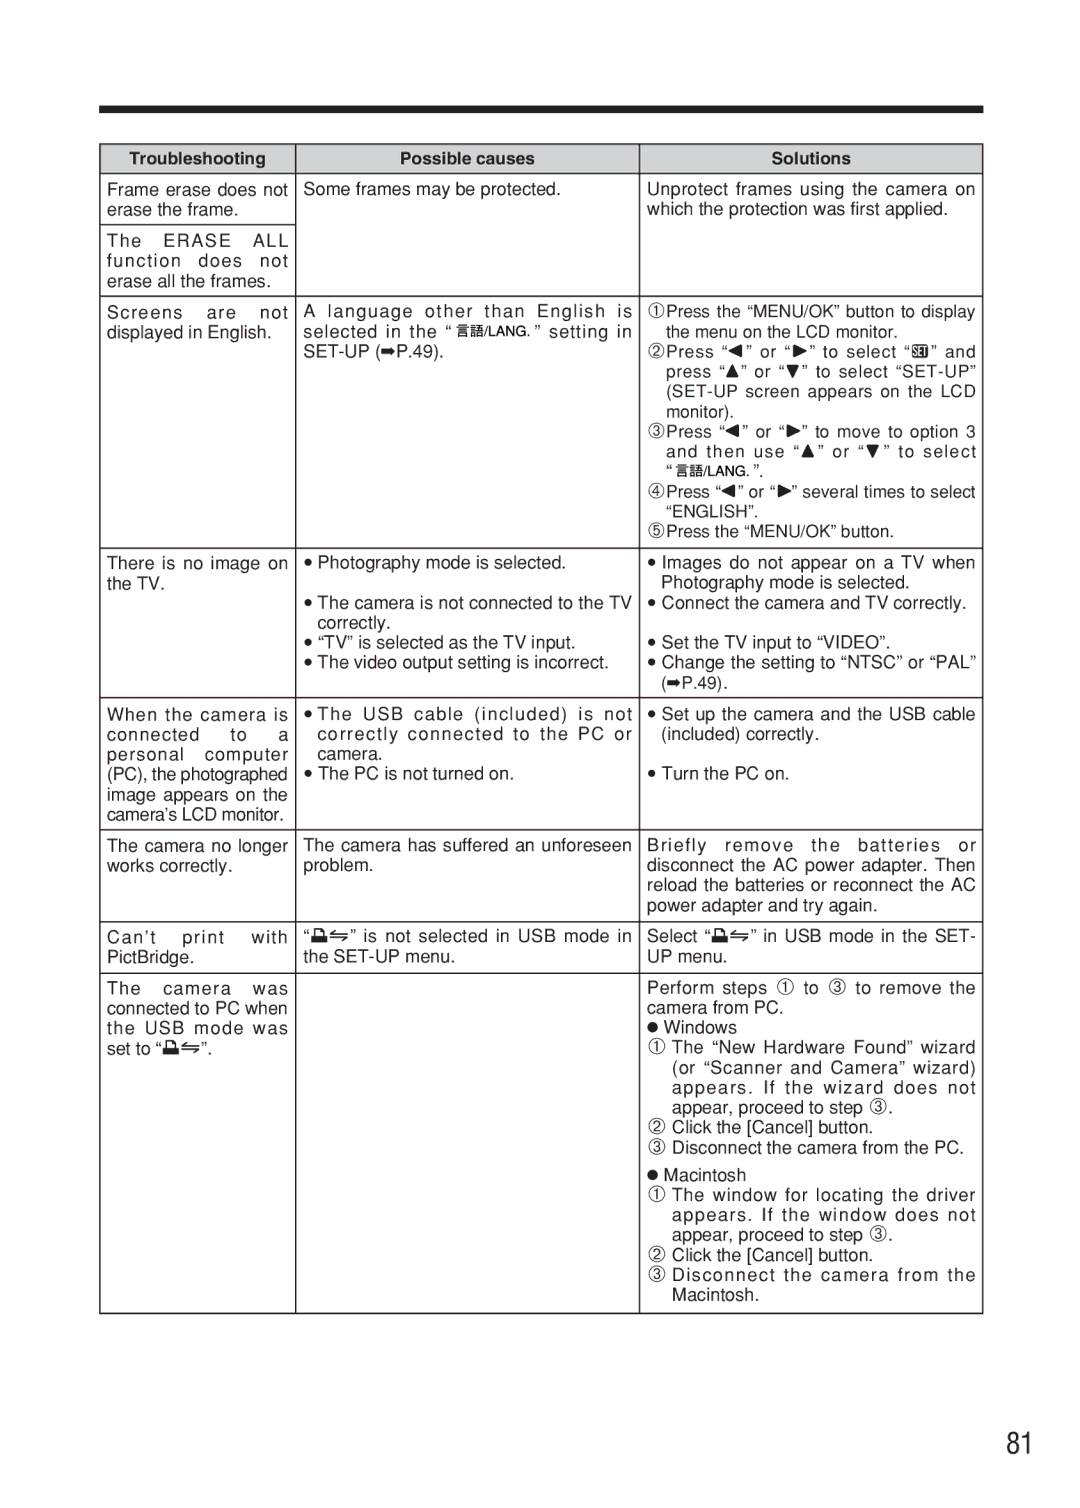
Frame erase does not | Some frames may be protected. | Unprotect frames using the camera on | |||||
erase the frame. |
|
|
| which the protection was first applied. | |||
|
|
|
|
|
|
| |
The | ERASE | ALL |
|
|
|
| |
function does | not |
|
|
|
| ||
erase all the frames. |
|
|
|
| |||
|
|
|
|
| |||
Screens | are | not | A language other than English is | 1Press the “MENU/OK” button to display | |||
displayed in English. | selected in the “ | ” setting in | the menu on the LCD monitor. | ||||
|
|
|
|
| 2Press “d” or “c” to select “F” and | ||
|
|
|
|
|
| press “a” or “b” to select | |
|
|
|
|
|
| ||
|
|
|
|
|
| monitor). | |
|
|
|
|
|
| 3Press “d” or “c” to move to option 3 | |
|
|
|
|
|
| and then use “a” or “b” to select | |
|
|
|
|
|
| “ | ”. |
|
|
|
|
|
| 4Press “d” or “c” several times to select | |
|
|
|
|
|
| “ENGLISH”. | |
|
|
|
|
|
| 5Press the “MENU/OK” button. | |
|
|
| |||||
There is no image on | i Photography mode is selected. | i Images do not appear on a TV when | |||||
the TV. |
|
|
|
| Photography mode is selected. | ||
|
|
|
| i The camera is not connected to the TV | i Connect the camera and TV correctly. | ||
|
|
|
| correctly. |
|
|
|
|
|
|
| i “TV” is selected as the TV input. | i Set the TV input to “VIDEO”. | ||
|
|
|
| i The video output setting is incorrect. | i Change the setting to “NTSC” or “PAL” | ||
|
|
|
|
|
| (➡P.49). | |
|
|
| |||||
When the camera is | i The USB cable (included) is not | i Set up the camera and the USB cable | |||||
connected | to | a | correctly connected to the PC or | (included) correctly. | |||
personal | computer | camera. |
|
|
| ||
(PC), the photographed | i The PC is not turned on. |
| i Turn the PC on. | ||||
image appears on the |
|
|
|
| |||
camera’s LCD monitor. |
|
|
|
| |||
|
|
| |||||
The camera no longer | The camera has suffered an unforeseen | Briefly remove the batteries or | |||||
works correctly. |
| problem. |
| disconnect the AC power adapter. Then | |||
|
|
|
|
|
| reload the batteries or reconnect the AC | |
|
|
|
|
|
| power adapter and try again. | |
|
|
|
|
| |||
Can’t | with | “¢” is not selected in USB mode in | Select “¢” in USB mode in the SET- | ||||
PictBridge. |
|
| the |
| UP menu. | ||
|
|
|
|
|
| ||
The | camera | was |
|
| Perform steps 1 to 3 to remove the | ||
connected to PC when |
|
| camera from PC. | ||||
the USB mode was |
|
| h Windows | ||||
set to “¢”. |
|
|
| 1 The “New Hardware Found” wizard | |||
|
|
|
|
|
|
| (or “Scanner and Camera” wizard) |
|
|
|
|
|
|
| appears. If the wizard does not |
|
|
|
|
|
|
| appear, proceed to step 3. |
|
|
|
|
|
| 2 Click the [Cancel] button. | |
|
|
|
|
|
| 3 Disconnect the camera from the PC. | |
|
|
|
|
|
| h Macintosh | |
|
|
|
|
|
| 1 The window for locating the driver | |
|
|
|
|
|
|
| appears. If the window does not |
|
|
|
|
|
|
| appear, proceed to step 3. |
|
|
|
|
|
| 2 Click the [Cancel] button. | |
|
|
|
|
|
| 3 Disconnect the camera from the | |
|
|
|
|
|
|
| Macintosh. |
|
|
|
|
|
|
|
|
81