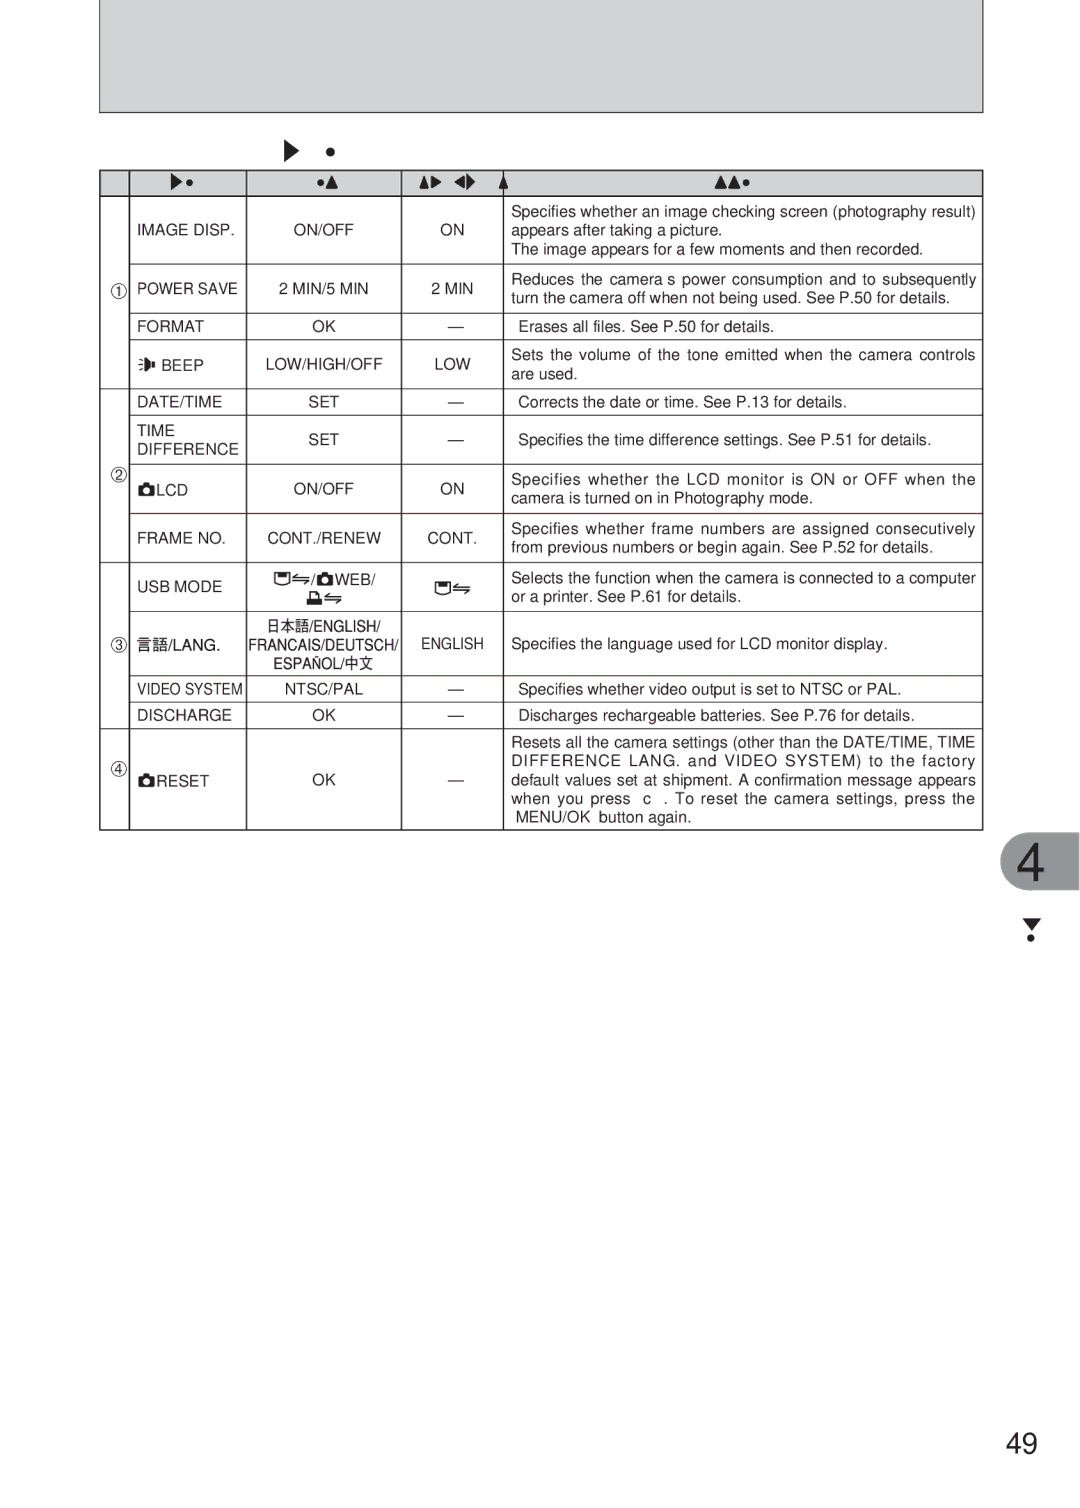
■SET-UP menu options
| Settings | Display | Factory default | Explanation | |||
|
|
|
|
|
| Specifies whether an image checking screen (photography result) | |
| IMAGE DISP. | ON/OFF | ON | appears after taking a picture. | |||
|
|
|
|
|
| The image appears for a few moments and then recorded. | |
|
|
|
|
|
|
| |
1 | POWER SAVE | 2 MIN/5 MIN | 2 MIN | Reduces the camera’s power consumption and to subsequently | |||
turn the camera off when not being used. See P.50 for details. | |||||||
|
|
|
|
|
| ||
|
|
|
|
|
| ||
| FORMAT |
| OK | – | Erases all files. See P.50 for details. | ||
|
|
|
|
|
|
| |
| § BEEP | LOW/HIGH/OFF | LOW | Sets the volume of the tone emitted when the camera controls | |||
| are used. | ||||||
|
|
|
|
|
| ||
|
|
|
|
| |||
| DATE/TIME | SET | – | Corrects the date or time. See P.13 for details. | |||
|
|
|
|
|
|
| |
| TIME | SET | – | Specifies the time difference settings. See P.51 for details. | |||
| DIFFERENCE | ||||||
|
|
|
|
|
| ||
2 |
|
|
|
|
|
| |
qLCD | ON/OFF | ON | Specifies whether the LCD monitor is ON or OFF when the | ||||
| camera is turned on in Photography mode. | ||||||
|
|
|
|
|
| ||
|
|
|
|
|
|
| |
| FRAME NO. | CONT./RENEW | CONT. | Specifies whether frame numbers are assigned consecutively | |||
| from previous numbers or begin again. See P.52 for details. | ||||||
|
|
|
|
|
| ||
|
|
|
|
| |||
| USB MODE | ¶/qWEB/ | ¶ | Selects the function when the camera is connected to a computer | |||
|
| ¢ |
|
| or a printer. See P.61 for details. | ||
3 |
|
|
|
| ENGLISH | Specifies the language used for LCD monitor display. | |
|
|
|
| ||||
|
|
|
| ||||
|
|
|
| ||||
|
|
|
| ||||
|
|
|
|
| |||
| VIDEO SYSTEM | NTSC/PAL | – | Specifies whether video output is set to NTSC or PAL. | |||
|
|
|
|
|
| ||
| DISCHARGE |
| OK | – | Discharges rechargeable batteries. See P.76 for details. | ||
|
|
|
|
|
|
| |
|
|
|
|
|
| Resets all the camera settings (other than the DATE/TIME, TIME | |
4 |
|
|
|
|
| DIFFERENCE LANG. and VIDEO SYSTEM) to the factory | |
qRESET |
| OK | – | default values set at shipment. A confirmation message appears | |||
|
|
|
|
|
| when you press “c”. To reset the camera settings, press the | |
|
|
|
|
|
| “MENU/OK” button again. | |
4
Settings
49
