L i f e B o o k E 8 0 0 0 N o t e b o o k

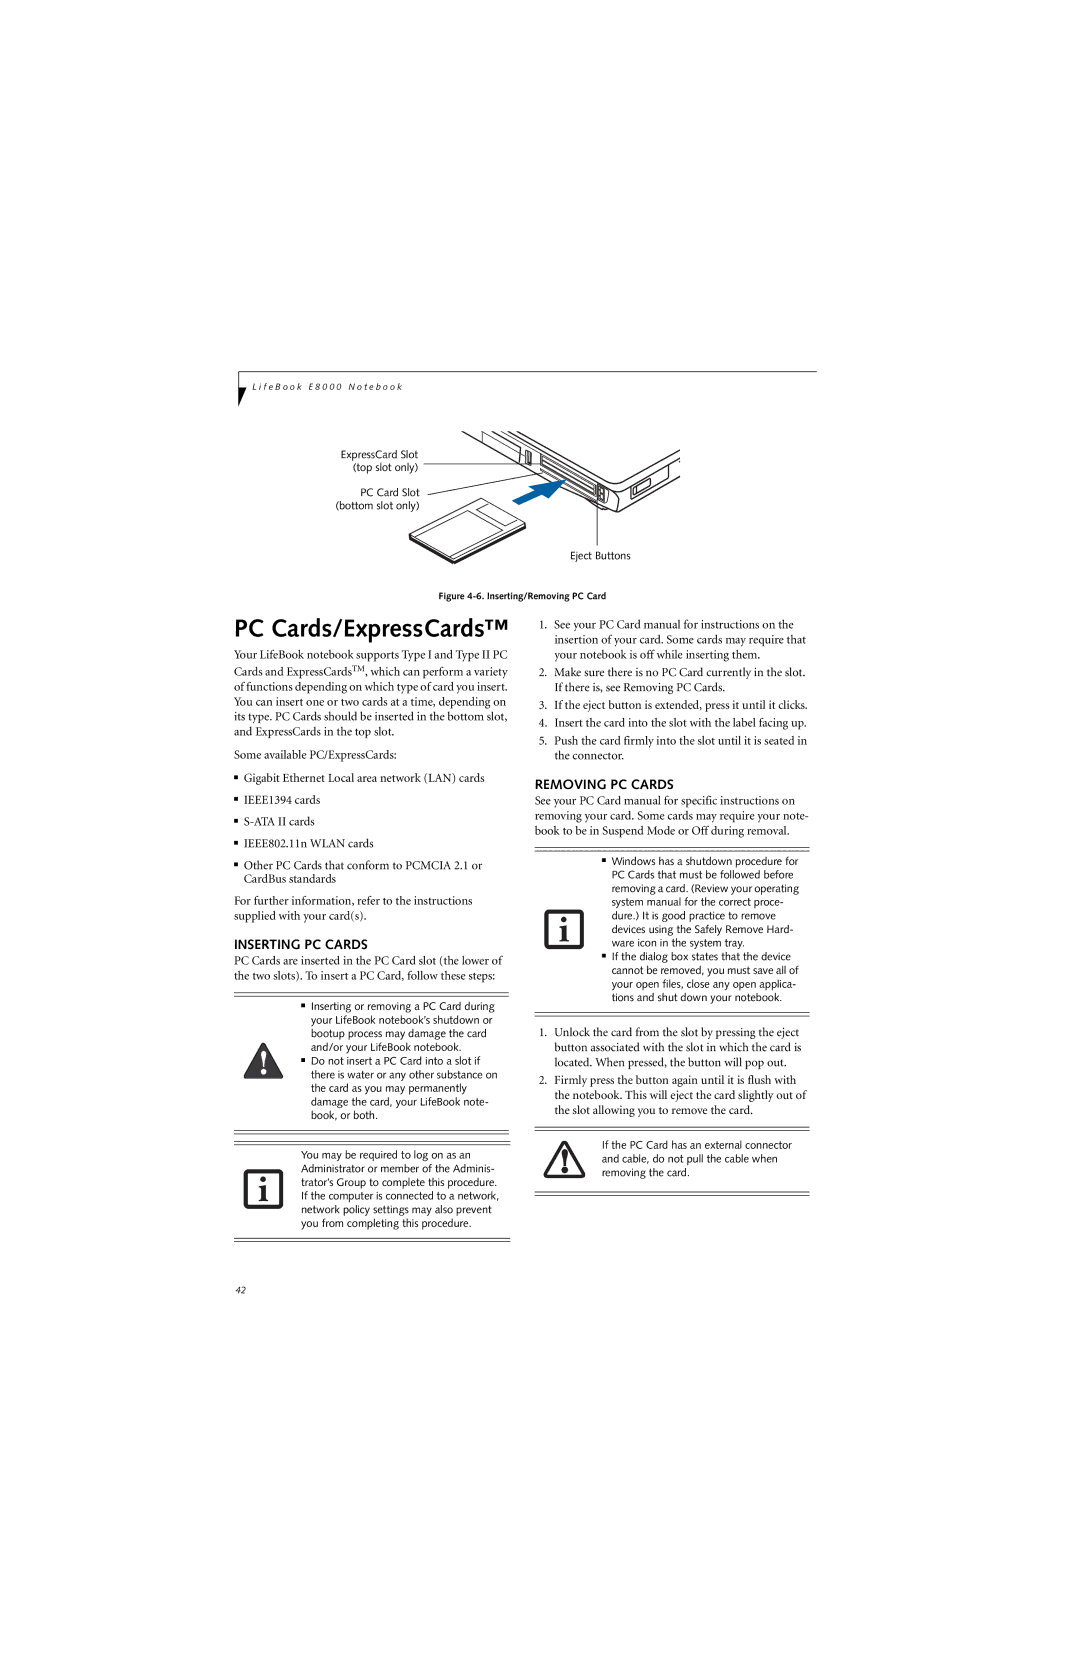
ExpressCard Slot (top slot only)

PC Card Slot (bottom slot only)

Eject Buttons

Figure 4-6. Inserting/Removing PC Card

PC Cards/ExpressCards™

Your LifeBook notebook supports Type I and Type II PC Cards and ExpressCardsTM, which can perform a variety of functions depending on which type of card you insert. You can insert one or two cards at a time, depending on its type. PC Cards should be inserted in the bottom slot, and ExpressCards in the top slot.

Some available PC/ExpressCards:

Gigabit Ethernet Local area network (LAN) cards

IEEE1394 cards

S-ATA II cards

IEEE802.11n WLAN cards

Other PC Cards that conform to PCMCIA 2.1 or CardBus standards

For further information, refer to the instructions supplied with your card(s).

INSERTING PC CARDS

PC Cards are inserted in the PC Card slot (the lower of the two slots). To insert a PC Card, follow these steps:

Inserting or removing a PC Card during your LifeBook notebook’s shutdown or bootup process may damage the card and/or your LifeBook notebook.

Do not insert a PC Card into a slot if there is water or any other substance on the card as you may permanently damage the card, your LifeBook note- book, or both.

1.See your PC Card manual for instructions on the insertion of your card. Some cards may require that your notebook is off while inserting them.

2.Make sure there is no PC Card currently in the slot. If there is, see Removing PC Cards.

3.If the eject button is extended, press it until it clicks.

4.Insert the card into the slot with the label facing up.

5.Push the card firmly into the slot until it is seated in the connector.

REMOVING PC CARDS

See your PC Card manual for specific instructions on removing your card. Some cards may require your note- book to be in Suspend Mode or Off during removal.

Windows has a shutdown procedure for PC Cards that must be followed before removing a card. (Review your operating system manual for the correct proce- dure.) It is good practice to remove devices using the Safely Remove Hard- ware icon in the system tray.

If the dialog box states that the device cannot be removed, you must save all of your open files, close any open applica- tions and shut down your notebook.

1.Unlock the card from the slot by pressing the eject button associated with the slot in which the card is located. When pressed, the button will pop out.

2.Firmly press the button again until it is flush with the notebook. This will eject the card slightly out of the slot allowing you to remove the card.

You may be required to log on as an Administrator or member of the Adminis- trator’s Group to complete this procedure. If the computer is connected to a network, network policy settings may also prevent you from completing this procedure.

If the PC Card has an external connector and cable, do not pull the cable when removing the card.

42

Page 52
Image 52
Fujitsu E8310 manual Inserting PC Cards, Removing PC Cards

E8310 specifications

The Fujitsu E8310 is a high-performance enterprise server that is engineered to meet the demanding needs of complex data centers and robust cloud environments. Designed with reliability and scalability in mind, the E8310 is an ideal solution for businesses looking to enhance their IT infrastructure.

At the heart of the E8310 is its powerful Intel Xeon Scalable processors, which offer exceptional processing speed and multitasking capabilities. This computing power allows the server to efficiently handle extensive workloads and serve multiple virtual machines, making it suitable for virtualization environments and mission-critical applications.

One of the standout features of the Fujitsu E8310 is its advanced memory architecture. With support for high-speed DDR4 RAM and a large memory capacity, the server can accommodate resource-intensive applications and heavy workloads. This ensures maximum performance, enabling businesses to run complex computations and analytics effectively.

The E8310 excels in storage options, featuring a flexible architecture that supports both HDD and SSD configurations. This versatility allows organizations to configure storage based on their specific performance and capacity requirements. The server also incorporates advanced RAID technology, enhancing data protection and ensuring continuous availability.

The design of the Fujitsu E8310 emphasizes energy efficiency. Equipped with innovative cooling technologies, the server minimizes energy consumption while maintaining optimal performance. This not only reduces operational costs but also contributes to environmentally sustainable practices, making it a responsible choice for organizations aiming to reduce their carbon footprint.

Ease of management is another key characteristic of the E8310. Fujitsu integrates intelligent remote management tools, allowing IT administrators to monitor server health, deploy updates, and manage configurations efficiently, all from a centralized interface. This feature streamlines operations and reduces the time required for routine maintenance tasks.

In terms of connectivity, the Fujitsu E8310 is equipped with multiple I/O options, including high-speed Ethernet and Fibre Channel interfaces. This ensures seamless integration into existing networks and enhances data transfer speeds, catering to the evolving demands of modern applications.

Overall, the Fujitsu E8310 combines cutting-edge technology with exceptional performance and reliability. Its robust features, including powerful processing capabilities, advanced memory and storage options, energy efficiency, and strong management tools, make it a formidable choice for businesses seeking to elevate their IT infrastructure. Whether for cloud computing, virtualization, or intensive data applications, the E8310 stands out as a leader in enterprise server solutions.