8.4 Installing the appliance
|
|
| m |
| m |
|
| |
| 8,5 m | 28 | 8 m | 0 mm | ||||
|
|
| 6´´ | |||||
|
| 6´´ |
| 11 | 5/1 |
| 6´´ | |
| 5/1 |
|
|
| 20 | 1/1 | ||
88 m | m/3 | 1/2 | ´´ |
|
|
|
| |
|
|
|
|
| ||||
|
|
|
|
|
|
| ||
|
|
|
|
|
|
|
| |
|
|
|
|
|
|
| 1,4 m |
|
|
|
|
|
|
|
|
|
|
|
| |
|
|
|
|
|
|
|
| 8´´ |
|
|
|
|
|
|
|
|
|
|
|
|
|
|
|
|
|
|
| 551/ | mm |
|
|
|
|
|
|
|
|
|
|
| |
|
|
|
|
|
|
|
| 43,5 |
|
|
|
|
|
|
|
|
|
|
| |
|
|
|
|
|
|
|
| 6´´ |
|
|
|
|
|
|
|
|
|
|
| |
|
| min. |
|
|
| 1 11/1 |
|
|
|
|
|
|
|
|
|
|
| |||
|
| 30 | mm |
|
|
|
|
|
|
|
|
|
|
|
|
|
|
|
| |
|
| /16´´ |
|
|
|
|
|
|
|
|
|
|
|
|
|
|
|
| ||
|
| 1 | 3 |
|
|
|
|
|
|
|
|
|
|
|
|
|
|
|
| |
|
|
|
|
|
|
|
|
|
|
|
|
|
|
|
|
|
|
| ||
|
|
|
|
| 49 | 0 m | m |
|
|
|
|
|
|
|
|
|
|
|
| |
|
| in | . |
| 6´´ |
|
|
|
|
|
|
|
|
|
|
|
| |||
|
|
|
|
|
|
|
|
|
|
|
|
|
|
|
|
| ||||
| m |
|
| 19 | 5/1 |
|
|
|
|
|
|
|
|
|
|
|
|
| ||
50 | mm |
|
|
|
|
|
|
|
|
|
|
|
|
|
|
|
|
| ||
| 2´´ |
|
|
|
|
|
|
|
|
|
|
|
|
|
|
|
|
| ||
|
|
|
|
|
|
|
|
| m |
|
|
|
|
|
|
|
|
| ||
|
|
|
|
|
|
|
|
|
|
|
|
|
|
|
|
|
|
|
| |
|
|
|
|
|
|
|
|
| 26 | 8 m |
|
|
|
|
|
|
|
|
| |
|
|
|
|
|
|
|
|
|
| 6´´ |
|
|
|
|
|
|
|
|
| |
|
|
|
|
|
|
|
|
| 10 | 9/1 |
| 1/16´´ |
| 6´´ |
|
| ||||
|
|
|
|
|
|
|
|
|
|
|
|
|
|
| ||||||
|
|
|
|
|
|
|
|
| 561 | mm/22 |
| /3 | 3 9 | /1 |
| 6´´ | ||||
|
|
|
|
|
|
|
|
| 854 | m | m |
| mm | /45 | 1 | /1 | ||||
|
|
|
|
|
|
|
|
|
|
|
| 47 |
|
| ||||||
|
|
|
|
|
|
|
|
|
|
|
|
|
|
|
| |||||
|
|
|
|
|
|
|
|
|
|
|
| 11 |
|
|
|
|
|
| ||
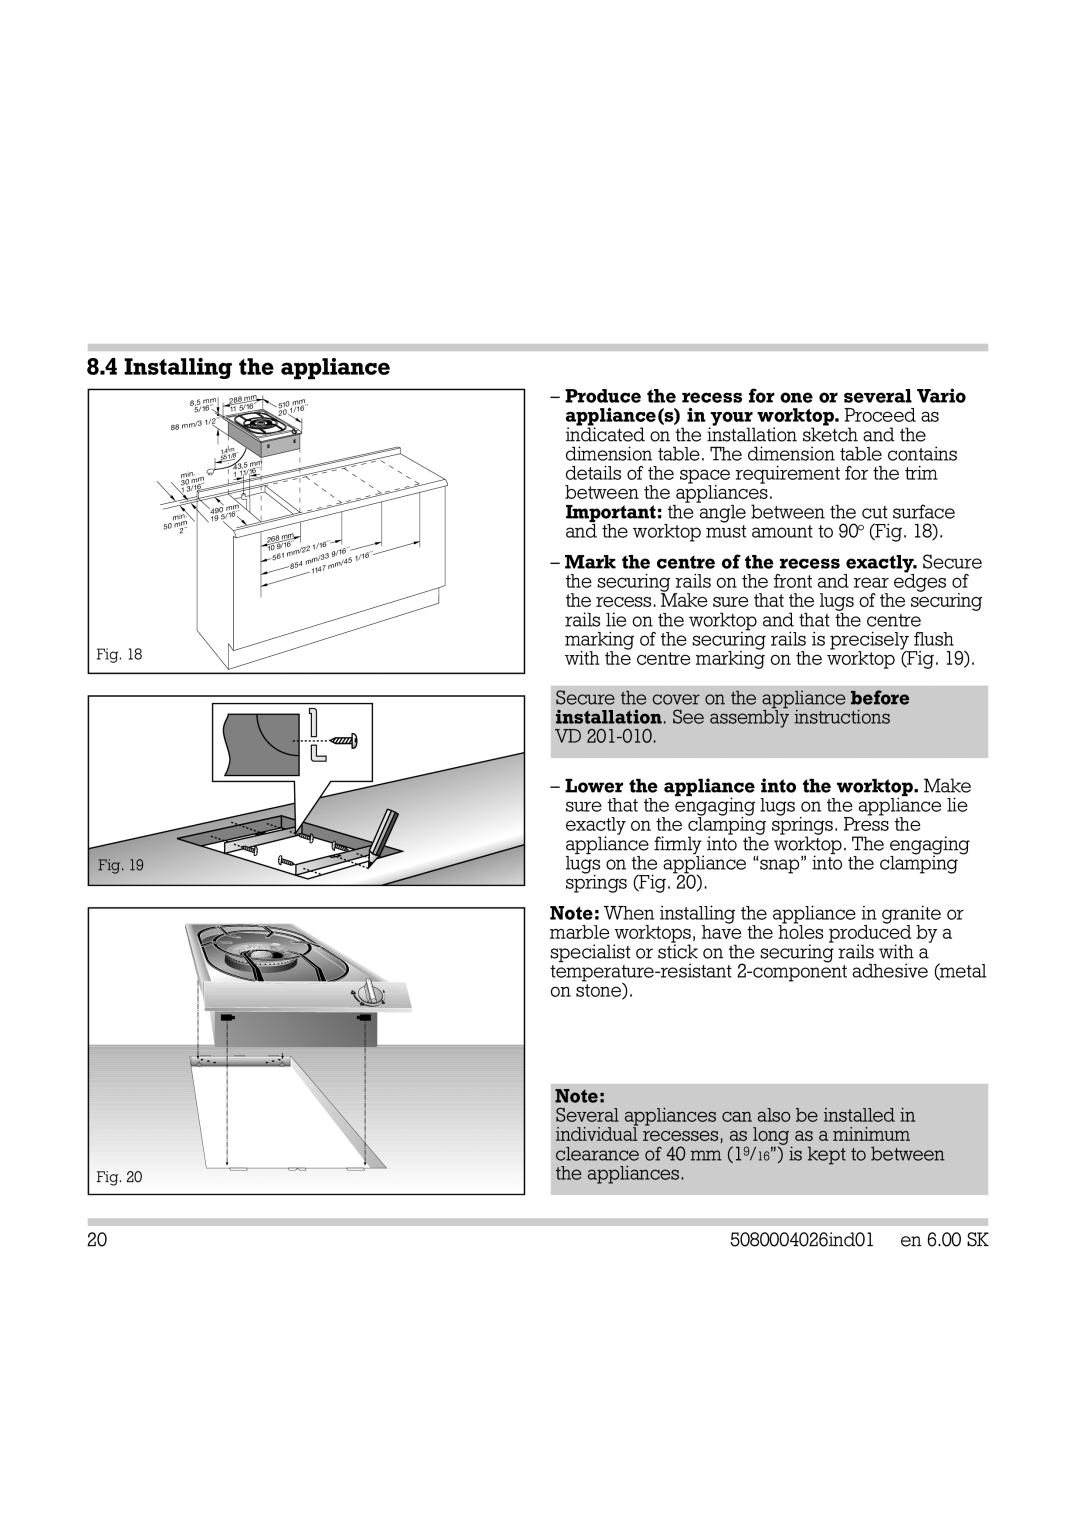
Fig. 18
–Produce the recess for one or several Vario appliance(s) in your worktop. Proceed as indicated on the installation sketch and the dimension table. The dimension table contains details of the space requirement for the trim between the appliances.
Important: the angle between the cut surface and the worktop must amount to 90° (Fig. 18).
–Mark the centre of the recess exactly. Secure the securing rails on the front and rear edges of the recess. Make sure that the lugs of the securing rails lie on the worktop and that the centre marking of the securing rails is precisely flush with the centre marking on the worktop (Fig. 19).
Fig. 19
Secure the cover on the appliance before installation. See assembly instructions VD
–Lower the appliance into the worktop. Make sure that the engaging lugs on the appliance lie exactly on the clamping springs. Press the appliance firmly into the worktop. The engaging lugs on the appliance “snap" into the clamping springs (Fig. 20).
| Note: When installing the appliance in granite or | |
| marble worktops, have the holes produced by a | |
| specialist or stick on the securing rails with a | |
| ||
| on stone). |
|
| Note: |
|
| Several appliances can also be installed in | |
| individual recesses, as long as a minimum | |
| clearance of 40 mm (19/16”) is kept to between | |
Fig. 20 | the appliances. |
|
20 | 5080004026ind01 | en 6.00 SK |