Installation Instructions

3ELECTRICAL CONNECTIONS (CONT.)

B. Usage Situations where Appliance Power Cord will be Disconnected Frequently.

Do not use an adapter plug in these situations because disconnecting of the power cord places undue strain on the adapter and leads to eventual failure of the adapter ground terminal. The customer should have the two- prong wall receptacle replaced with a three-prong (grounding) receptacle by a qualified electrician before using the appliance.

The installation of appliances designed for mobile home installation must conform with the Manufactured Home Construction and Safety Standard, Title 24 CFR, Part 3280 (formerly the Federal Standard for Mobile Home Construction and Safety, Title 24, HUD, Part

280)or, when such standard is not applicable, the Standard for Manufactured Home Installations, latest edition (Manufactured Home Sites, Communities and Set-Ups), ANSI A225.1, latest edition, or with local codes. In Canada, mobile home installation must be in accordance with the current CAN/CSA Z240/MH Mobile Home Installation Code.

Electric Disconnect

Locate disconnect plug on the range back.

Pinch sides of connector and pull out of range back.

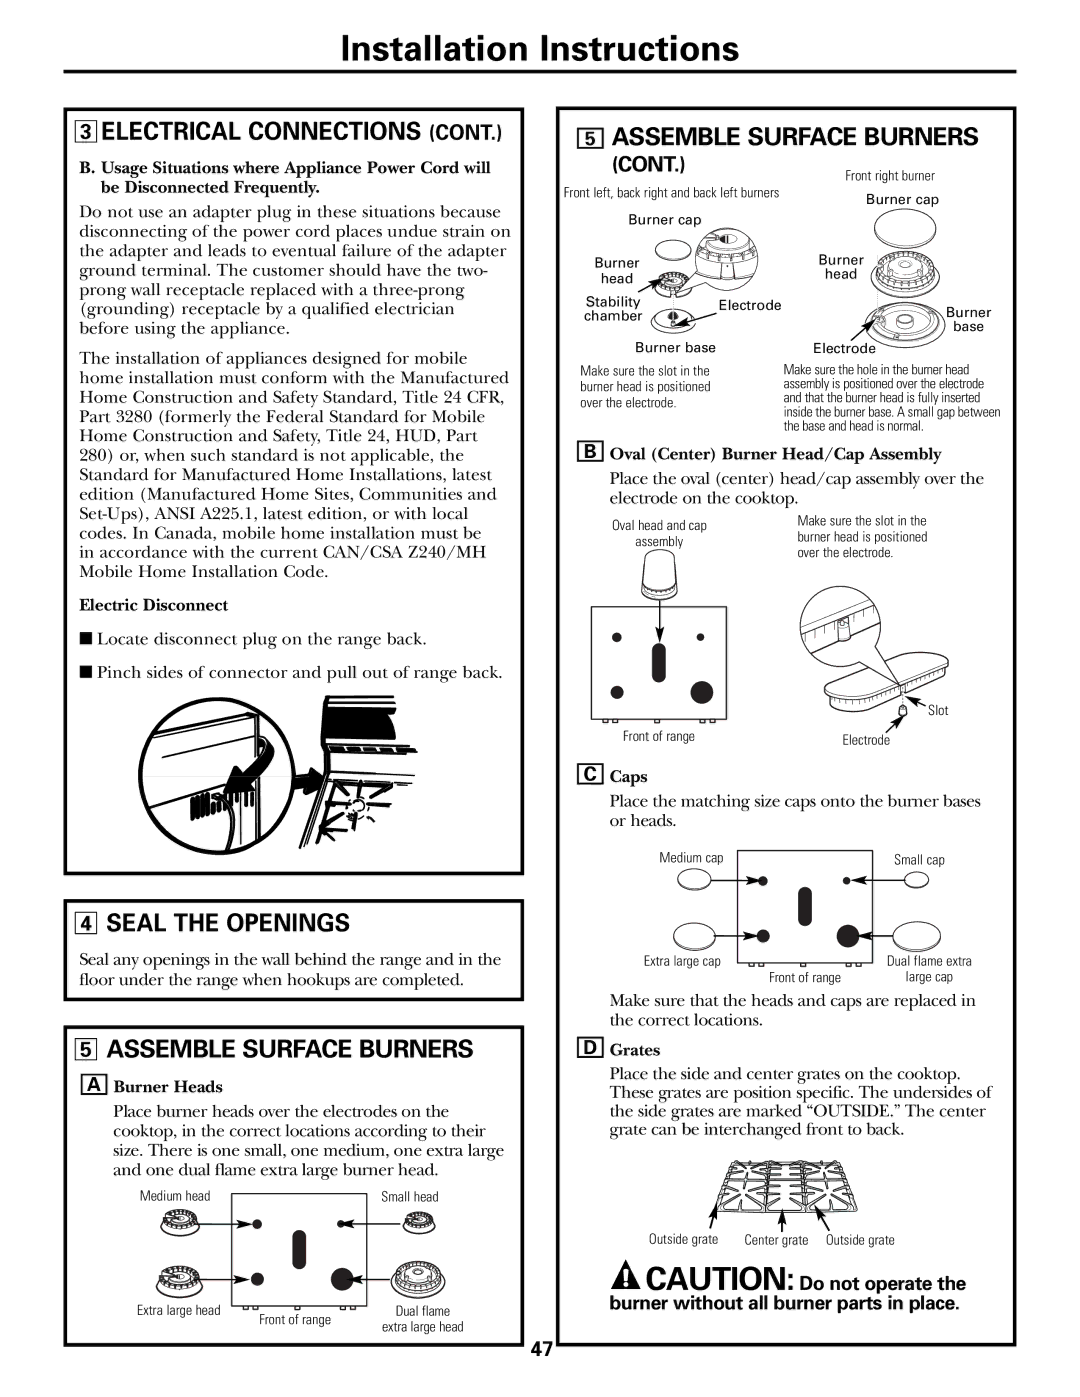
4SEAL THE OPENINGS

Seal any openings in the wall behind the range and in the floor under the range when hookups are completed.

5ASSEMBLE SURFACE BURNERS

ABurner Heads

Place burner heads over the electrodes on the cooktop, in the correct locations according to their size. There is one small, one medium, one extra large and one dual flame extra large burner head.

Medium head


Small head


Extra large head


Dual flame


Front of range


extra large head


47

5ASSEMBLE SURFACE BURNERS

(CONT.)


Front right burner


Front left, back right and back left burners

Burner cap


Burner cap


Burner


Burner

head


head


Stability

Electrode

Burner

chamber


base

Burner base


Electrode

Make sure the slot in the


Make sure the hole in the burner head

burner head is positioned


assembly is positioned over the electrode

over the electrode.


and that the burner head is fully inserted


inside the burner base. A small gap between


the base and head is normal.

BOval (Center) Burner Head/Cap Assembly

Place the oval (center) head/cap assembly over the electrode on the cooktop.

Oval head and cap

Make sure the slot in the

burner head is positioned

assembly

over the electrode.


Slot

Front of range

Electrode

CCaps

Place the matching size caps onto the burner bases or heads.

Medium cap

Small cap

Extra large cap


Dual flame extra


Front of range


large cap

Make sure that the heads and caps are replaced in the correct locations.

DGrates

Place the side and center grates on the cooktop. These grates are position specific. The undersides of the side grates are marked “OUTSIDE.” The center grate can be interchanged front to back.

Outside grate

Center grate

Outside grate

CAUTION: Do not operate the burner without all burner parts in place.

Page 47
Image 47
GE CGS980 installation instructions Seal the Openings, Assemble Surface Burners

CGS980 specifications

The GE CGS980 range is a standout appliance in the world of cooking, combining state-of-the-art technology with user-friendly features that elevate the culinary experience. Designed with the modern chef in mind, this gas range is appreciated for its precision and versatility, making it an excellent choice for both amateur cooks and seasoned professionals.

One of the most notable features of the GE CGS980 is its powerful gas burners. The range includes an array of burners, each with varying BTU outputs, allowing for both high-heat searing and gentle simmering. The dual-ring burner particularly stands out, providing the ability to switch between lower and higher heat outputs seamlessly. This translates into a more controlled cooking process, enabling users to achieve their desired results with ease.

The oven technology is equally impressive, boasting an advanced convection system that ensures even heat distribution. This means that whether you’re baking delicate pastries or roasting a large turkey, you can expect consistent results every time. The oven also features a self-cleaning mode, making maintenance straightforward and hassle-free, while the heavy-duty oven racks can be adjusted to accommodate various dish sizes.

In terms of design, the GE CGS980 offers a sleek appearance with its stainless steel finish, complementing any contemporary kitchen. The range is equipped with a modern interface that includes knobs for manual control and a digital display for easier monitoring of cooking times and temperatures. This combination of aesthetics and functionality makes the GE CGS980 a centerpiece in any culinary space.

Moreover, the range is equipped with smart technology, allowing users to connect their appliances to Wi-Fi. This feature opens up a world of possibilities, such as remote monitoring and control through a smartphone app, keeping the user informed about what’s cooking, even from a distance. Features such as voice control compatibility with smart home systems further enhance the convenience of the GE CGS980.

Safety is also a priority in the design of this range. The oven includes a safety lock to prevent accidental operation, and the burners have an automatic reignition feature that ensures that if the flame goes out, it will relight without manual intervention.

In conclusion, the GE CGS980 gas range is a perfect blend of power, technology, and design, making it a superb addition to any kitchen. With its robust features and modern conveniences, it supports a wide variety of cooking tasks, making meal preparation not just easier but also more enjoyable for everyone.