Cómo usar el horno.

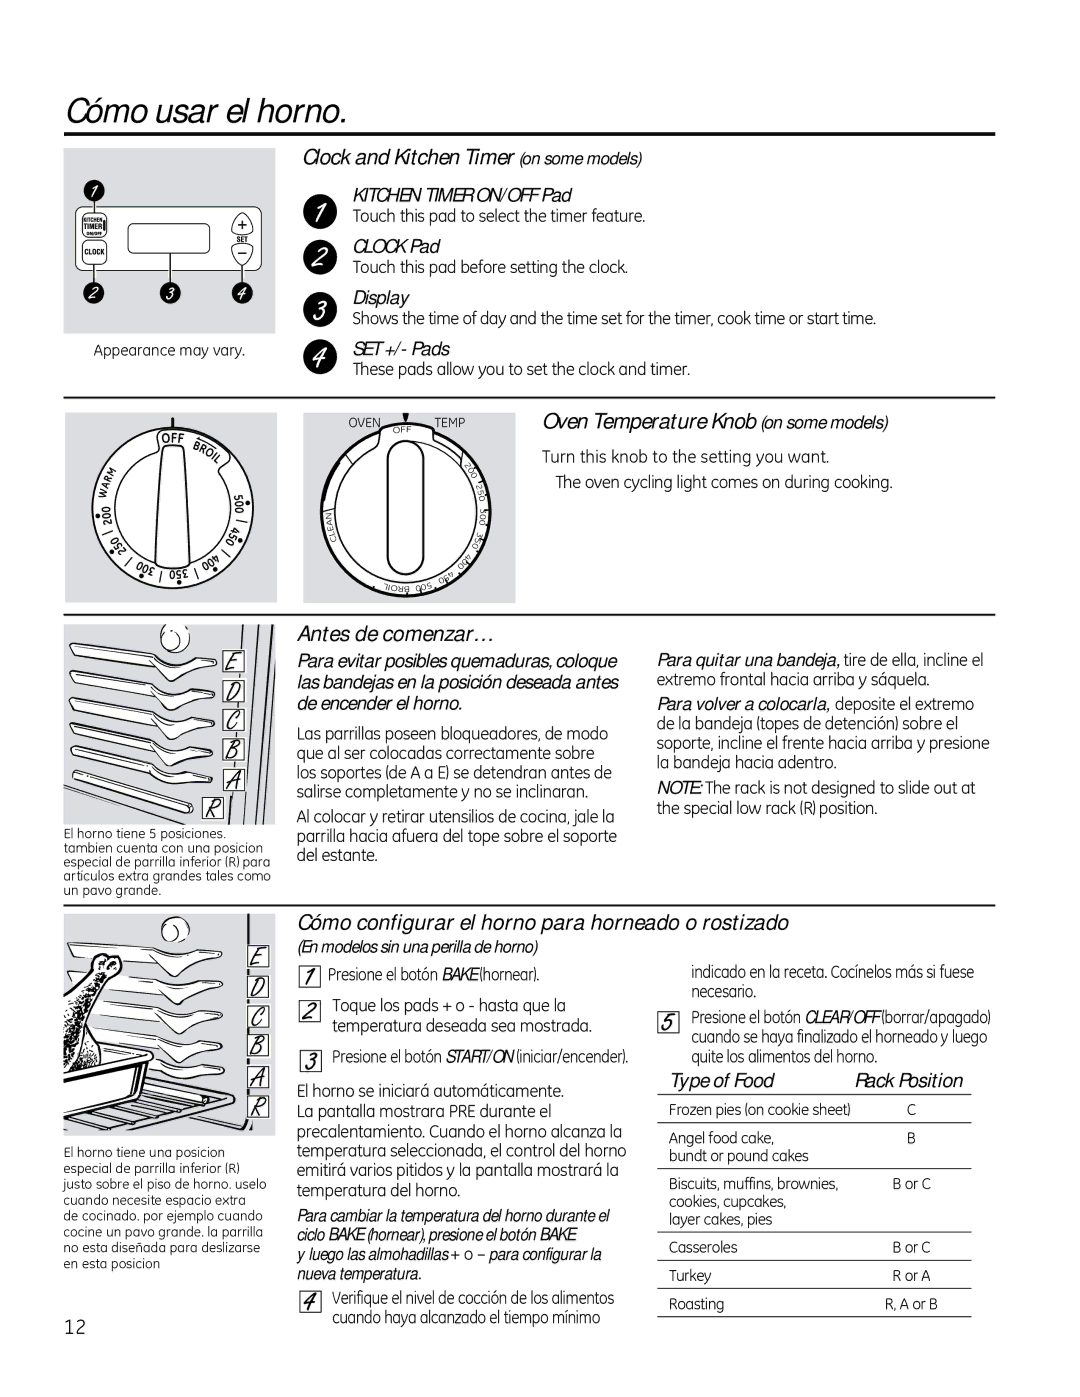
Clock and Kitchen Timer (on some models)

KITCHEN TIMER ON/OFF Pad

Touch this pad to select the timer feature.

CLOCK Pad

Touch this pad before setting the clock.

Display

Shows the time of day and the time set for the timer, cook time or start time.

Appearance may vary.

SET +/- Pads

These pads allow you to set the clock and timer.

N

A

E

L C

OVEN

O

FF

LIORB

TEMP

2 0

0

2


5


0


3


0


0


3

0

5

0

0

4


4 5 0 005

Oven Temperature Knob (on some models)

Turn this knob to the setting you want.

￿The oven cycling light comes on during cooking.

El horno tiene 5 posiciones. tambien cuenta con una posicion especial de parrilla inferior (R) para articulos extra grandes tales como un pavo grande.

Antes de comenzar…

Para evitar posibles quemaduras, coloque las bandejas en la posición deseada antes de encender el horno.

Las parrillas poseen bloqueadores, de modo que al ser colocadas correctamente sobre los soportes (de A a E) se detendran antes de salirse completamente y no se inclinaran.

Al colocar y retirar utensilios de cocina, jale la parrilla hacia afuera del tope sobre el soporte del estante.

Para quitar una bandeja, tire de ella, incline el extremo frontal hacia arriba y sáquela.

Para volver a colocarla, deposite el extremo de la bandeja (topes de detención) sobre el soporte, incline el frente hacia arriba y presione la bandeja hacia adentro.

NOTE: The rack is not designed to slide out at the special low rack (R) position.

Cómo configurar el horno para horneado o rostizado

El horno tiene una posicion especial de parrilla inferior (R) justo sobre el piso de horno. uselo cuando necesite espacio extra de cocinado. por ejemplo cuando cocine un pavo grande. la parrilla no esta diseñada para deslizarse en esta posicion

12

(En modelos sin una perilla de horno)

Presione el botón BAKE (hornear).

Toque los pads + o - hasta que la temperatura deseada sea mostrada.

Presione el botón START/ON (iniciar/encender).

El horno se iniciará automáticamente. La pantalla mostrara PRE durante el precalentamiento. Cuando el horno alcanza la temperatura seleccionada, el control del horno emitirá varios pitidos y la pantalla mostrará la temperatura del horno.

Para cambiar la temperatura del horno durante el ciclo BAKE (hornear), presione el botón BAKE

y luego las almohadillas + o – para configurar la nueva temperatura.

Verifique el nivel de cocción de los alimentos cuando haya alcanzado el tiempo mínimo

indicado en la receta. Cocínelos más si fuese necesario.

Presione el botón CLEAR/OFF (borrar/apagado) cuando se haya finalizado el horneado y luego quite los alimentos del horno.

Type of Food

Rack Position

Frozen pies (on cookie sheet)

C


Angel food cake,

B

bundt or pound cakes


Biscuits, muffins, brownies,

B or C

cookies, cupcakes,


layer cakes, pies


Casseroles

B or C


Turkey

R or A


Roasting

R, A or B


Page 52
Image 52
GE JBP15, JBS56, JBS27SI, JBS27DI Cómo usar el horno, Antes de comenzar…, Cómo configurar el horno para horneado o rostizado

RB525, RB792, RB790, RB526, RB800 specifications

General Electric (GE) offers a range of high-performing wall ovens, including the JBP35, JBP27, JBP24, and JBP25 models. These ovens are designed to meet the needs of modern cooking while delivering outstanding convenience, reliability, and aesthetics. Each model has its unique features, technologies, and characteristics tailored to different cooking preferences and kitchen designs.

The GE JBP35 is a freestanding electric range that combines classic style with reliability. It features a large capacity oven, allowing multiple dishes to be cooked simultaneously. The JBP35 includes a smooth ceramic glass cooktop for easy cleanup and high-performance electric burners, offering precision heating. Its convection technology ensures that heat circulates evenly throughout the oven, resulting in perfectly baked goods. Additionally, it has an intuitive control panel, making temperature adjustments quick and easy.

The JBP27 model is ideal for those seeking a built-in wall oven option. Its contemporary design seamlessly integrates into any kitchen, providing a sleek appearance. The JBP27 features self-cleaning capabilities, which dramatically reduce the time and effort required for oven maintenance. With smart oven technology, users can control cooking settings remotely, allowing for greater flexibility and convenience.

For compact spaces, the GE JBP24 is an excellent choice with its smaller footprint without sacrificing functionality. This model still offers a variety of cooking modes, including bake, broil, and warm, ensuring versatility in meal preparation. The JBP24 also comes equipped with a range of safety features, including a control lockout, which prevents accidental operation, making it ideal for families with young children.

Lastly, the JBP25 model combines the durability of commercial-grade materials with a residential design, offering professional performance in a home kitchen. It is packed with user-friendly features like a digital temperature display and multiple cooking modes that enhance cooking precision. The JBP25 also includes a large viewing window for easy monitoring of cooking progress without opening the door, preserving the oven's heat and ensuring consistent results.

In conclusion, each of these GE wall oven models—JBP35, JBP27, JBP24, and JBP25—brings unique advantages and features, catering to various cooking styles and kitchen aesthetics. With advanced technologies and user-friendly designs, GE continues to uphold its commitment to quality and innovation in home cooking solutions.