ge.com

Breaking a Salt Bridge

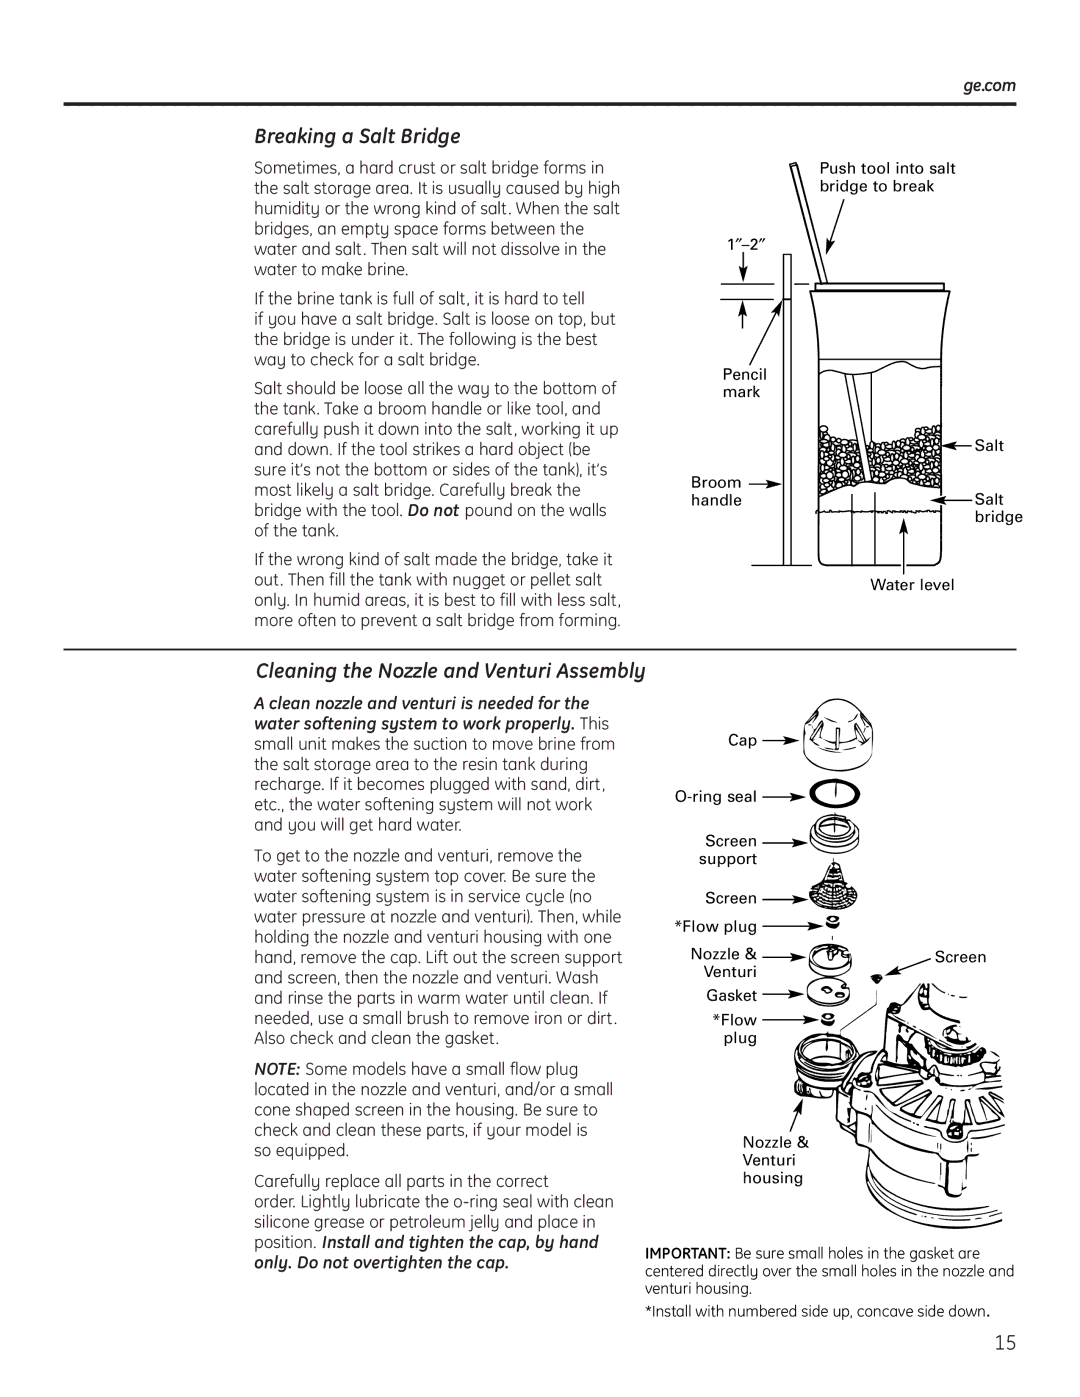
Sometimes, a hard crust or salt bridge forms in the salt storage area. It is usually caused by high humidity or the wrong kind of salt. When the salt bridges, an empty space forms between the water and salt. Then salt will not dissolve in the water to make brine.

If the brine tank is full of salt, it is hard to tell

if you have a salt bridge. Salt is loose on top, but the bridge is under it. The following is the best way to check for a salt bridge.

Salt should be loose all the way to the bottom of the tank. Take a broom handle or like tool, and carefully push it down into the salt, working it up and down. If the tool strikes a hard object (be sure it’s not the bottom or sides of the tank), it’s most likely a salt bridge. Carefully break the bridge with the tool. Do not pound on the walls of the tank.

If the wrong kind of salt made the bridge, take it out. Then fill the tank with nugget or pellet salt only. In humid areas, it is best to fill with less salt, more often to prevent a salt bridge from forming.

Push tool into salt bridge to break

1–2

Pencil mark


Salt

Broom

Salt

handle


bridge


Water level

Cleaning the Nozzle and Venturi Assembly

A clean nozzle and venturi is needed for the water softening system to work properly. This small unit makes the suction to move brine from the salt storage area to the resin tank during recharge. If it becomes plugged with sand, dirt, etc., the water softening system will not work and you will get hard water.

To get to the nozzle and venturi, remove the water softening system top cover. Be sure the water softening system is in service cycle (no water pressure at nozzle and venturi). Then, while holding the nozzle and venturi housing with one hand, remove the cap. Lift out the screen support and screen, then the nozzle and venturi. Wash and rinse the parts in warm water until clean. If needed, use a small brush to remove iron or dirt. Also check and clean the gasket.

NOTE: Some models have a small flow plug located in the nozzle and venturi, and/or a small cone shaped screen in the housing. Be sure to check and clean these parts, if your model is so equipped.

Carefully replace all parts in the correct

order. Lightly lubricate the o-ring seal with clean silicone grease or petroleum jelly and place in position. Install and tighten the cap, by hand only. Do not overtighten the cap.

Cap

O-ring seal

Screen support

Screen

*Flow plug

Nozzle &


Screen


Venturi


Gasket

*Flow plug

Nozzle & Venturi housing

IMPORTANT: Be sure small holes in the gasket are centered directly over the small holes in the nozzle and venturi housing.

*Install with numbered side up, concave side down.

15

Page 15
Image 15
GE Monogram GXSF18G installation instructions Breaking a Salt Bridge, Cleaning the Nozzle and Venturi Assembly, Ge.com

GXSF18G specifications

The GE Monogram GXSF18G is a premium side-by-side refrigerator that combines sophisticated design with cutting-edge technology. This model is designed to meet the needs of modern households, blending style, functionality, and energy efficiency. It stands out with its sleek stainless steel finish and a professional look that elevates any kitchen decor.

One of the primary features of the GE Monogram GXSF18G is its spacious interior. With an impressive capacity, this refrigerator offers ample storage options for all your food items. The adjustable shelves allow for customization of the space, accommodating tall bottles or large containers with ease. The clear drawers provide easy visibility, ensuring that you can quickly find what you need without rummaging through the fridge.

The GXSF18G includes advanced cooling technologies that help maintain optimal temperature and humidity levels for food preservation. Its dual climate control system ensures separate temperature zones for the refrigerator and freezer. This innovation not only keeps your food fresher for longer but also helps reduce energy consumption, thus improving efficiency.

Another standout feature is the energy-efficient LED lighting, which illuminates the interior while consuming less power than traditional bulbs. This feature enhances visibility, making it easier to see everything inside and find items quickly, even in low light conditions.

The water and ice dispensing system is also noteworthy. It provides easy access to clean drinking water and ice without opening the refrigerator door, minimizing temperature fluctuations and maintaining freshness. The water filtration system is designed to reduce contaminants, ensuring you have access to pure, refreshing water.

Furthermore, the GE Monogram GXSF18G is equipped with smart technology, allowing you to monitor and manage settings right from your smartphone. This tech-savvy feature offers convenience for busy individuals, making it simple to keep track of your refrigerator's performance and any alerts that may arise.

In conclusion, the GE Monogram GXSF18G is a top-tier refrigerator that combines style, efficiency, and advanced technology. With its spacious interior, innovative cooling solutions, energy-saving features, and smart connectivity, it is an excellent choice for those looking to enhance their kitchen with a premium appliance that doesn't compromise on performance or design. Investing in this refrigerator means investing in quality and convenience for your home.