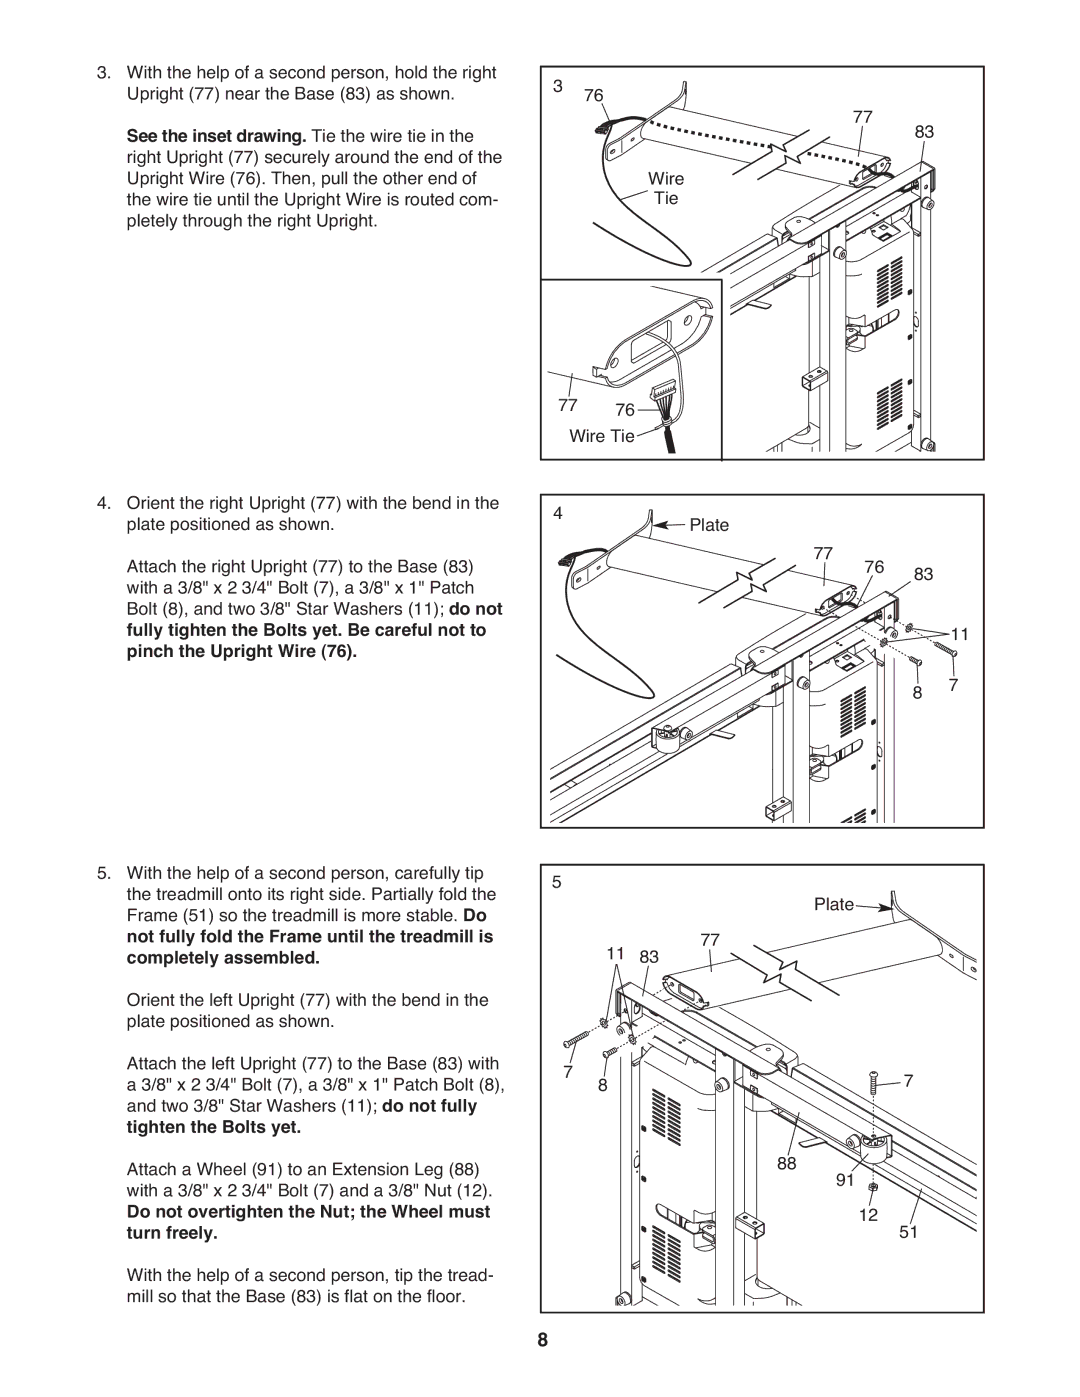
3. With the help of a second person, hold the right | 3 | 76 |
|
|
|
|
|
|
|
Upright (77) near the Base (83) as shown. |
|
|
| 77 | 83 |
| |||
See the inset drawing. Tie the wire tie in the |
|
|
|
|
|
| |||
right Upright (77) securely around the end of the |
|
| Wire |
|
|
|
|
|
|
Upright Wire (76). Then, pull the other end of |
|
|
|
|
|
|
|
| |
the wire tie until the Upright Wire is routed com- |
|
| Tie |
|
|
|
|
|
|
pletely through the right Upright. |
|
|
|
|
|
|
|
|
|
| 77 | 76 |
|
|
|
|
|
|
|
| Wire Tie |
|
|
|
|
|
|
| |
4. Orient the right Upright (77) with the bend in the | 4 |
|
| Plate |
|
|
|
|
|
plate positioned as shown. |
|
| 77 |
| 76 |
|
| ||
Attach the right Upright (77) to the Base (83) |
|
|
|
|
| 83 |
| ||
with a 3/8" x 2 3/4" Bolt (7), a 3/8" x 1" Patch |
|
|
|
|
|
|
|
| |
Bolt (8), and two 3/8" Star Washers (11); do not |
|
|
|
|
|
|
|
| 11 |
fully tighten the Bolts yet. Be careful not to |
|
|
|
|
|
|
|
| |
pinch the Upright Wire (76). |
|
|
|
|
|
|
| 8 | 7 |
|
|
|
|
|
|
|
| ||
5. With the help of a second person, carefully tip | 5 |
|
|
|
|
|
|
|
|
the treadmill onto its right side. Partially fold the |
|
|
| Plate |
|
|
| ||
Frame (51) so the treadmill is more stable. Do |
|
|
|
|
|
|
| ||
not fully fold the Frame until the treadmill is |
| 11 | 83 | 77 |
|
|
|
|
|
completely assembled. |
|
|
|
|
|
| |||
Orient the left Upright (77) with the bend in the |
|
|
|
|
|
|
|
|
|
plate positioned as shown. |
|
|
|
|
|
|
|
|
|
Attach the left Upright (77) to the Base (83) with | 7 | 8 |
|
|
|
|
| 7 |
|
a 3/8" x 2 3/4" Bolt (7), a 3/8" x 1" Patch Bolt (8), |
|
|
|
|
|
| |||
and two 3/8" Star Washers (11); do not fully |
|
|
|
|
|
|
|
|
|
tighten the Bolts yet. |
|
|
|
| 88 |
|
|
|
|
Attach a Wheel (91) to an Extension Leg (88) |
|
|
|
| 91 |
|
|
| |
with a 3/8" x 2 3/4" Bolt (7) and a 3/8" Nut (12). |
|
|
|
|
|
|
|
| |
Do not overtighten the Nut; the Wheel must |
|
|
|
|
|
| 12 | 51 |
|
turn freely. |
|
|
|
|
|
|
| ||
With the help of a second person, tip the tread- |
|
|
|
|
|
|
|
|
|
mill so that the Base (83) is flat on the floor. | 8 |
|
|
|
|
|
|
|
|
|
|
|
|
|
|
|
|
| |
