INSTALLATION
Parts List
Drive + Play includes the following components and parts:
•Text Display With Universal Mounting Base and Attached Cable (3m)
•Control Knob With 30° Mounting Base and Attached Cable (3m)
•Electronics Enclosure (the Brain)
•
•
•Line Out Cable (1.6m): Stereo 3.5mm (M) Plug to L/R RCA
(M) Plugs
•iPod Cable (3m):
•(2) Control Knob Bases: 0° and 60°
•(2) Mounting Plates for Knob Base and Display Base
•(10) Mounting Screws: (3) Knob Base, (3) Display Base and
(4) Electronics Enclosure
•(6) Cable Ties, Black
•(2) Hex Keys: 3mm and 1.5mm
•(2) Adhesive Mounting Pads
•(2) Alcohol Prep Pads
•Warranty Card
Tools and Precautions
To install Drive + Play components, we recommend using the following tools:
•Electric or cordless drill with drill bit set
•Phillips screwdriver set
•Pencil
•Protective eyewear
Before starting the installation, please observe the following precautions:
•Turn off all audio system power, including the iPod, before making any connections.
•Always wear protective eyewear when using tools.
INSTALLATION
Choosing Installation Locations
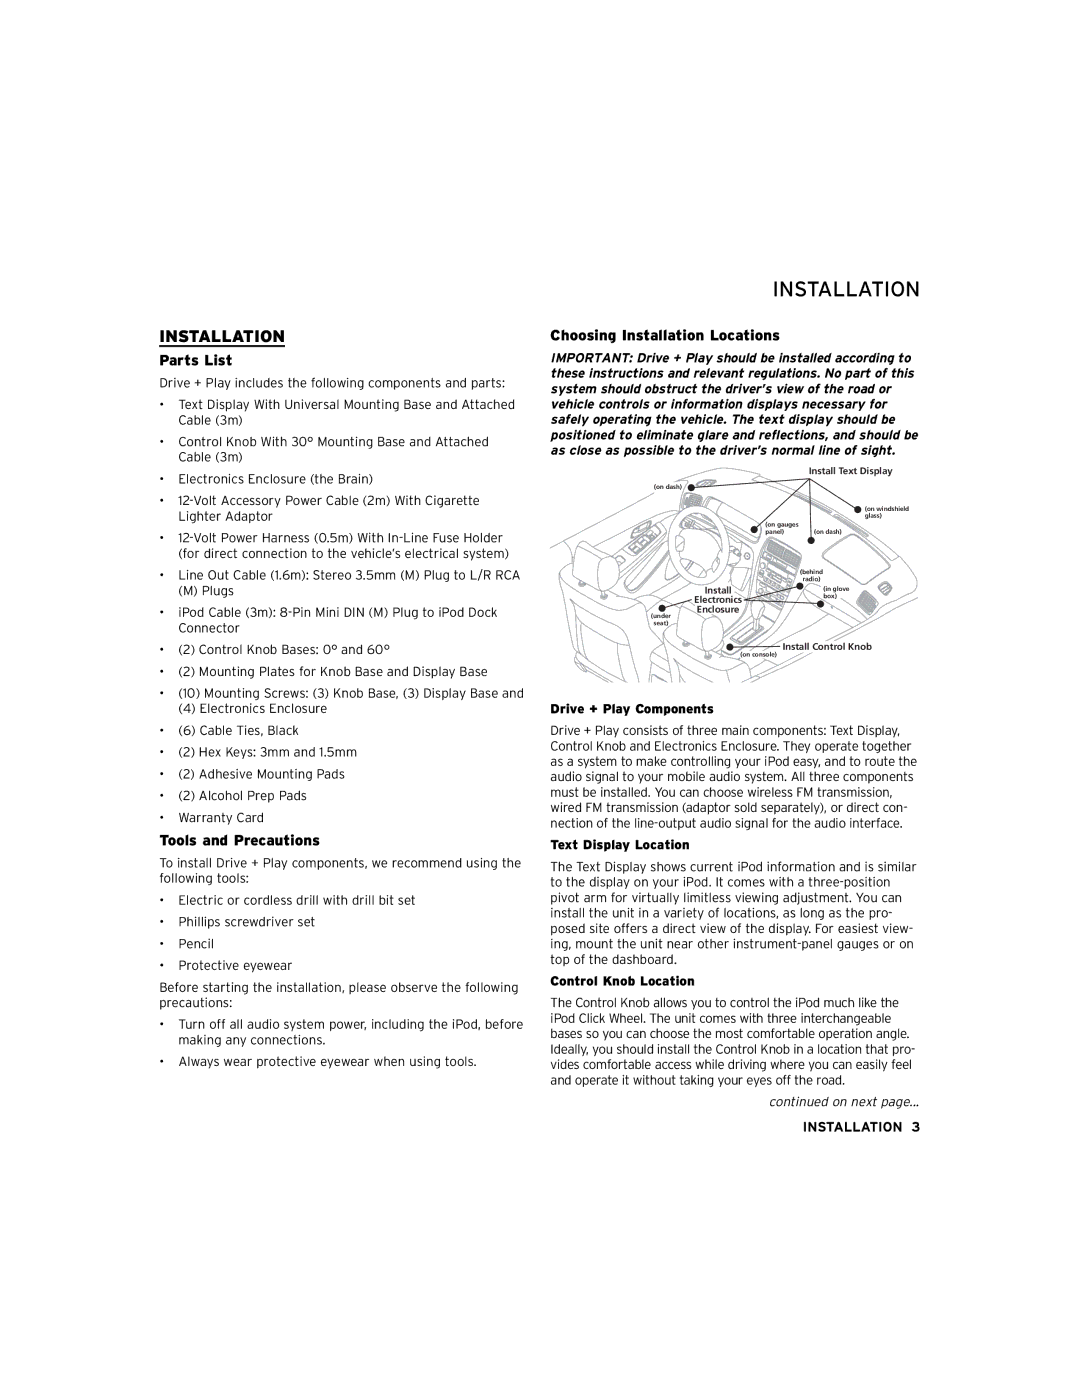
IMPORTANT: Drive + Play should be installed according to these instructions and relevant regulations. No part of this system should obstruct the driver’s view of the road or vehicle controls or information displays necessary for safely operating the vehicle. The text display should be positioned to eliminate glare and reflections, and should be as close as possible to the driver’s normal line of sight.
Install Text Display
(on dash)
(on windshield glass)
(on gauges |
|
panel) | (on dash) |
| (behind |
| radio) |
Install | (in glove |
Electronics | box) |
| |
Enclosure |
|
(under |
|
seat) |
|
Install Control Knob | |
(on console) |
|
Drive + Play Components
Drive + Play consists of three main components: Text Display, Control Knob and Electronics Enclosure. They operate together as a system to make controlling your iPod easy, and to route the audio signal to your mobile audio system. All three components must be installed. You can choose wireless FM transmission, wired FM transmission (adaptor sold separately), or direct con- nection of the
Text Display Location
The Text Display shows current iPod information and is similar to the display on your iPod. It comes with a
Control Knob Location
The Control Knob allows you to control the iPod much like the iPod Click Wheel. The unit comes with three interchangeable bases so you can choose the most comfortable operation angle. Ideally, you should install the Control Knob in a location that pro- vides comfortable access while driving where you can easily feel and operate it without taking your eyes off the road.
continued on next page...
INSTALLATION 3
