|
| Oakleaf Woodburning Stove |
|
|
|
7 | Appliance |
|
|
| |
A. Outside Air Attachment | B. Leveling the Appliance | |
Parts and Supplies Needed: 1 piece of metal flexible | ||
pipe, 4" X needed length. 1 Rodent Screen, and alu- | To adjust the leveling bolts, you must first loosen the | |
minum tape. Plus, a trim ring for finishing around the | locking nut. Turn the leveling bolt to the desired posi- | |
pipe on the inside wall. | tion, and tighten the locking nut against the cast iron | |
|
| leg. |
1. Determine an appropriate hole location, through the wall. Be sure there are no studs or other sup- porting members. Also ensure there are no electri- cal wires or plumbing contained within the wall.
2. Make the hole through the exterior wall using a hole saw or reciprocating saw. You'll want the hole to be just slightly larger than the metal flex pipe.
3. Attach the rodent screen to one end of the flex |
| ||||||||||||||
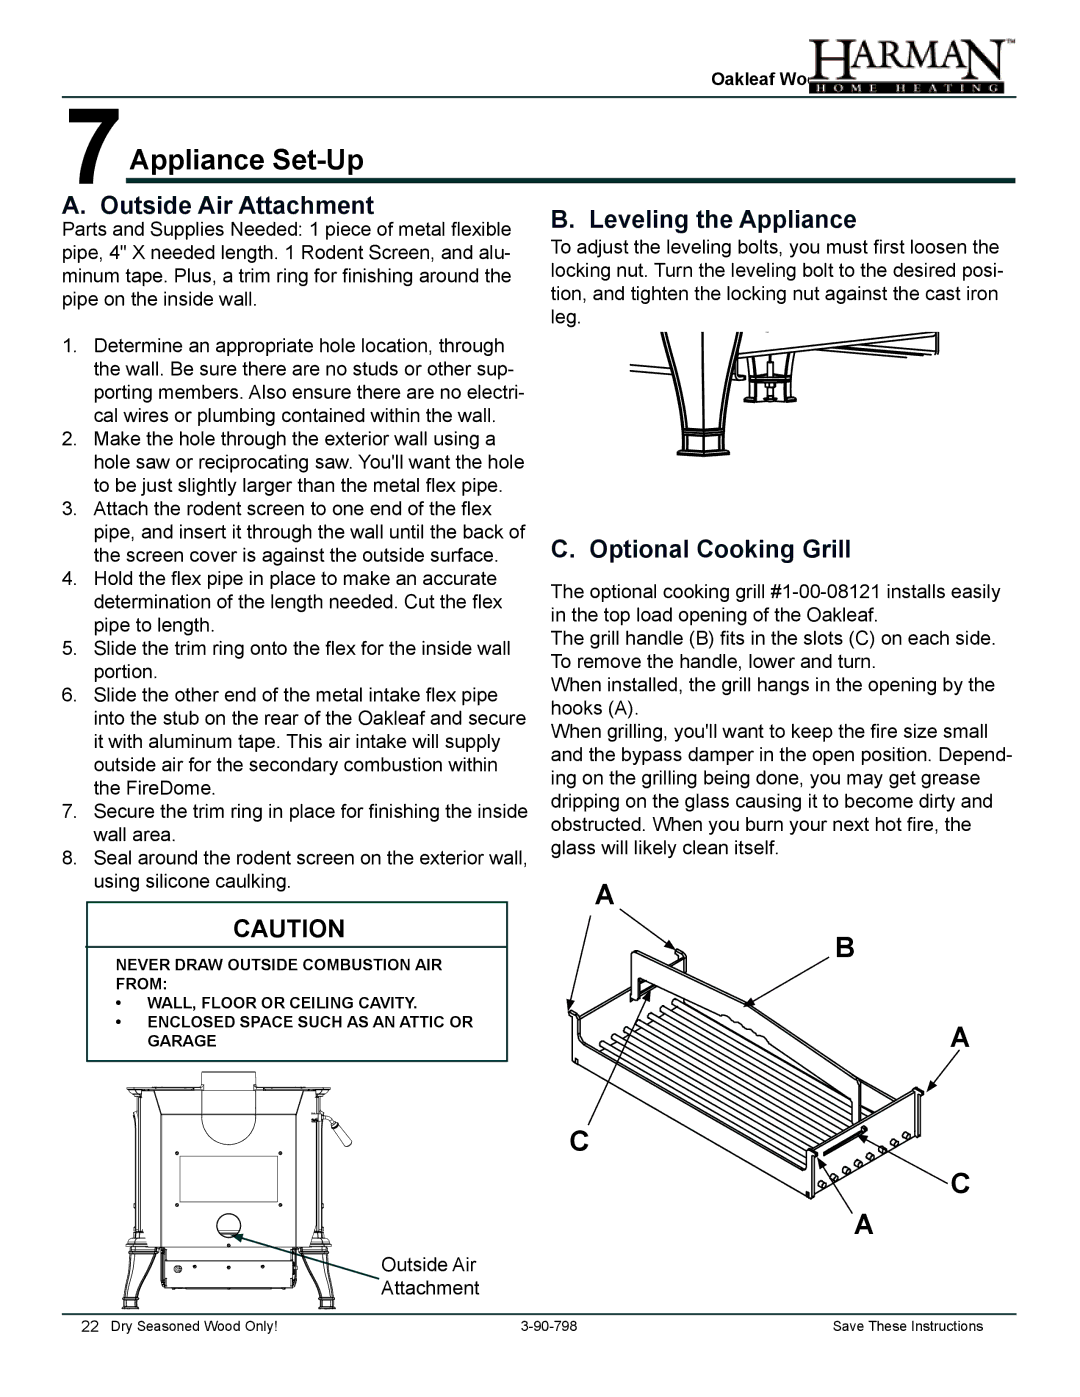
| pipe, and insert it through the wall until the back of | C. Optional Cooking Grill | |||||||||||||
| the screen cover is against the outside surface. | ||||||||||||||
4. Hold the flex pipe in place to make an accurate | The optional cooking grill | ||||||||||||||
| determination of the length needed. Cut the flex | ||||||||||||||
| in the top load opening of the Oakleaf. | ||||||||||||||
| pipe to length. | ||||||||||||||
| The grill handle (B) fits in the slots (C) on each side. | ||||||||||||||
5. Slide the trim ring onto the flex for the inside wall | |||||||||||||||
To remove the handle, lower and turn. | |||||||||||||||
| portion. | ||||||||||||||
| When installed, the grill hangs in the opening by the | ||||||||||||||
6. Slide the other end of the metal intake flex pipe | |||||||||||||||
hooks (A). | |||||||||||||||
| into the stub on the rear of the Oakleaf and secure | ||||||||||||||
| When grilling, you'll want to keep the fire size small | ||||||||||||||
| it with aluminum tape. This air intake will supply | ||||||||||||||
| and the bypass damper in the open position. Depend- | ||||||||||||||
| outside air for the secondary combustion within | ||||||||||||||
| ing on the grilling being done, you may get grease | ||||||||||||||
| the FireDome. | ||||||||||||||
| dripping on the glass causing it to become dirty and | ||||||||||||||
7. Secure the trim ring in place for finishing the inside | |||||||||||||||
obstructed. When you burn your next hot fire, the | |||||||||||||||
| wall area. | ||||||||||||||
| glass will likely clean itself. | ||||||||||||||
8. Seal around the rodent screen on the exterior wall, | |||||||||||||||
| |||||||||||||||
| using silicone caulking. | A | |||||||||||||
|
|
|
|
|
|
|
|
|
|
|
|
|
| ||
|
|
|
|
|
| CAUTION |
| ||||||||
|
|
|
|
|
|
| B | ||||||||
| Never draw outside combustion air |
| |||||||||||||
|
|
| |||||||||||||
| from: |
|
| ||||||||||||
| • Wall, floor or ceiling cavity. |
|
| ||||||||||||
| • Enclosed space such as an attic or |
| A | ||||||||||||
|
|
|
|
| garage |
| |||||||||
|
|
|
|
|
|
|
|
|
|
|
|
|
|
| |
|
|
|
|
|
|
|
|
|
|
|
|
|
|
| |
|
|
|
|
|
|
|
|
|
|
|
|
|
|
| |
|
|
|
|
|
|
|
|
|
|
|
|
|
|
| |
|
|
|
|
|
|
|
|
|
|
|
|
|
|
| |
|
|
|
|
|
|
|
|
|
|
|
|
|
|
| |
C
C
A
Outside Air
Attachment
22 Dry Seasoned Wood Only! | Save These Instructions |