GRIP BUTTONS AND CONTROLS
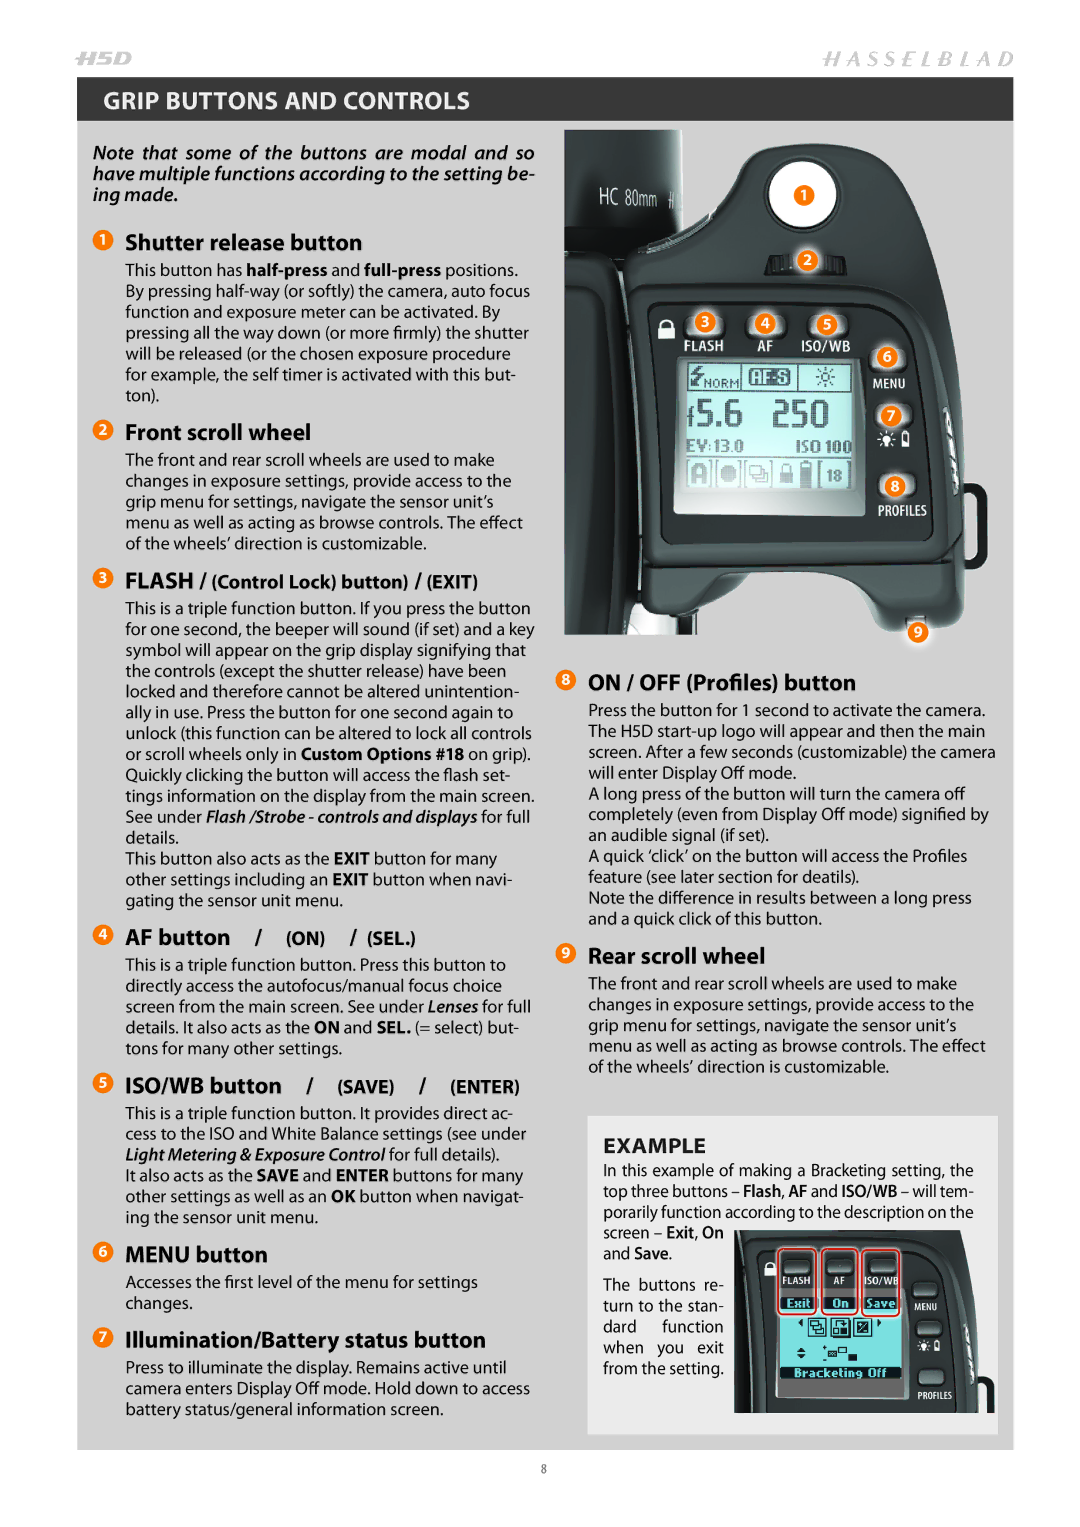
Note that some of the buttons are modal and so have multiple functions according to the setting be- ing made.
1 Shutter release button
This button has
2 Front scroll wheel
The front and rear scroll wheels are used to make changes in exposure settings, provide access to the grip menu for settings, navigate the sensor unit’s menu as well as acting as browse controls. The effect of the wheels’ direction is customizable.
3 FLASH / (Control Lock) button) / (EXIT)
This is a triple function button. If you press the button for one second, the beeper will sound (if set) and a key symbol will appear on the grip display signifying that the controls (except the shutter release) have been locked and therefore cannot be altered unintention- ally in use. Press the button for one second again to unlock (this function can be altered to lock all controls or scroll wheels only in Custom Options #18 on grip). Quickly clicking the button will access the flash set- tings information on the display from the main screen. See under Flash /Strobe - controls and displays for full details.
This button also acts as the EXIT button for many other settings including an EXIT button when navi- gating the sensor unit menu.
4 AF button / (ON) / (SEL.)
This is a triple function button. Press this button to directly access the autofocus/manual focus choice screen from the main screen. See under Lenses for full details. It also acts as the ON and SEL. (= select) but- tons for many other settings.
5 ISO/WB button / (SAVE) / (ENTER)
This is a triple function button. It provides direct ac- cess to the ISO and White Balance settings (see under Light Metering & Exposure Control for full details).
It also acts as the SAVE and ENTER buttons for many other settings as well as an OK button when navigat- ing the sensor unit menu.
6 MENU button
Accesses the first level of the menu for settings changes.
7 Illumination/Battery status button
Press to illuminate the display. Remains active until camera enters Display Off mode. Hold down to access battery status/general information screen.
1
2
3 4 5
6
7
8
9
8 ON / OFF (Profiles) button
Press the button for 1 second to activate the camera. The H5D
A long press of the button will turn the camera off completely (even from Display Off mode) signified by an audible signal (if set).
A quick ‘click’ on the button will access the Profiles feature (see later section for deatils).
Note the difference in results between a long press and a quick click of this button.
9 Rear scroll wheel
The front and rear scroll wheels are used to make changes in exposure settings, provide access to the grip menu for settings, navigate the sensor unit’s menu as well as acting as browse controls. The effect of the wheels’ direction is customizable.
EXAMPLE
In this example of making a Bracketing setting, the top three buttons – Flash, AF and ISO/WB – will tem- porarily function according to the description on the screen – Exit, On
and Save.
The buttons re- turn to the stan- dard function when you exit from the setting.
8
