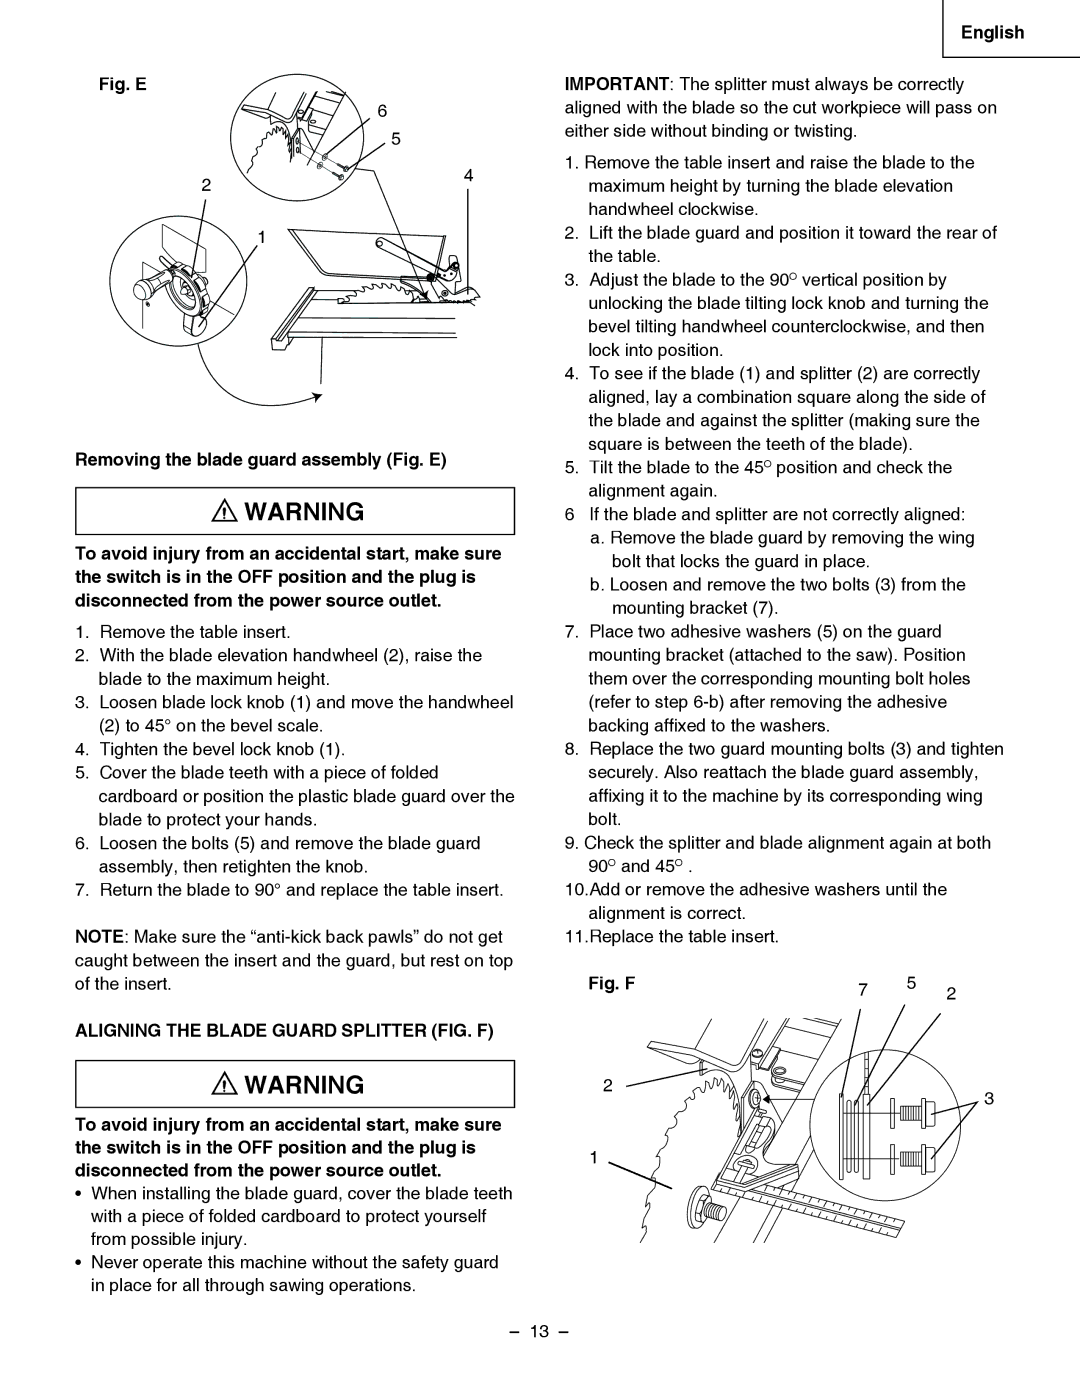
Fig. E


6


5

2

4


1

Removing the blade guard assembly (Fig. E)

WARNING

To avoid injury from an accidental start, make sure the switch is in the OFF position and the plug is disconnected from the power source outlet.

1.Remove the table insert.

2.With the blade elevation handwheel (2), raise the blade to the maximum height.

3.Loosen blade lock knob (1) and move the handwheel

(2) to 45° on the bevel scale.

4.Tighten the bevel lock knob (1).

5.Cover the blade teeth with a piece of folded cardboard or position the plastic blade guard over the blade to protect your hands.

6.Loosen the bolts (5) and remove the blade guard assembly, then retighten the knob.

7.Return the blade to 90° and replace the table insert.

NOTE : Make sure the “anti-kick back pawls” do not get caught between the insert and the guard, but rest on top of the insert.

ALIGNING THE BLADE GUARD SPLITTER (FIG. F)

WARNING

To avoid injury from an accidental start, make sure the switch is in the OFF position and the plug is disconnected from the power source outlet.

When installing the blade guard, cover the blade teeth with a piece of folded cardboard to protect yourself from possible injury.

Never operate this machine without the safety guard in place for all through sawing operations.

English

IMPORTANT: The splitter must always be correctly aligned with the blade so the cut workpiece will pass on either side without binding or twisting.

1.Remove the table insert and raise the blade to the maximum height by turning the blade elevation handwheel clockwise.

2.Lift the blade guard and position it toward the rear of the table.

3.Adjust the blade to the 90O vertical position by unlocking the blade tilting lock knob and turning the bevel tilting handwheel counterclockwise, and then lock into position.

4.To see if the blade (1) and splitter (2) are correctly aligned, lay a combination square along the side of the blade and against the splitter (making sure the square is between the teeth of the blade).

5.Tilt the blade to the 45O position and check the alignment again.

6If the blade and splitter are not correctly aligned:

a.Remove the blade guard by removing the wing bolt that locks the guard in place.

b.Loosen and remove the two bolts (3) from the

mounting bracket (7).

7.Place two adhesive washers (5) on the guard mounting bracket (attached to the saw). Position them over the corresponding mounting bolt holes (refer to step 6-b) after removing the adhesive backing affi xed to the washers.

8.Replace the two guard mounting bolts (3) and tighten securely. Also reattach the blade guard assembly, affi xing it to the machine by its corresponding wing bolt.

9.Check the splitter and blade alignment again at both 90O and 45O

10.Add or remove the adhesive washers until the alignment is correct.

11.Replace the table insert.

Fig. F

7

5

2


2

3

1

– 13 –

Page 13
Image 13
Hitachi C 10LA instruction manual Aligning the Blade Guard Splitter FIG. F, Fig. F

C 10LA specifications

The Hitachi C 10LA is a powerful and versatile miter saw that stands out in the realm of woodworking and construction tools. Known for its precision, efficiency, and durability, this saw is designed to meet the needs of both professional contractors and DIY enthusiasts.

One of the main features of the Hitachi C 10LA is its robust 15-amp motor, which delivers a remarkable no-load speed of up to 5,000 RPM. This high-speed capability allows users to make clean and accurate cuts through various materials, including hardwood, softwood, and even composite materials. The saw’s large cutting capacity provides a maximum miter cut of 52 degrees to the right and 45 degrees to the left, along with a maximum bevel cut of 45 degrees. This range of motion makes it ideal for creating precise angled cuts, commonly required for crown molding and other intricate woodworking projects.

The C 10LA also features a unique laser marker system that enhances cutting accuracy. This technology projects a laser line onto the workpiece, indicating exactly where the blade will cut, thereby eliminating guesswork and reducing the risk of errors. Additionally, the saw is equipped with a large, sturdy base, providing stability during use and reducing vibration for smoother operation.

Safety is a significant consideration in the design of the Hitachi C 10LA. It includes an electric brake that halts the blade almost instantly after the trigger is released, ensuring that users can operate the saw with confidence. Its dust collector attachment helps maintain a clean work environment by capturing sawdust and debris, which not only improves visibility but also promotes a safer workspace.

The C 10LA’s lightweight design, weighing approximately 26.3 lbs, coupled with a comfortable handle, makes it easy to transport and maneuver, whether in a workshop or on a job site. The saw is also designed for easy blade changes and maintenance, further enhancing its usability and convenience.

In summary, the Hitachi C 10LA miter saw combines powerful performance with advanced features, making it a reliable choice for tradespeople and hobbyists alike. With its high-speed motor, accurate laser guide, impressive cutting capacity, and safety features, it is well-equipped to handle a wide variety of cutting tasks with precision and ease.