Hitachi
Hitachi Authorized Service Centers
Dust Collection
Product Specifications
NET Weight
Motor
Before Using the Band SAW
Safety
General Safety Instructions
Grounding Instructions
Specific Safety Instructions for Band Saws
Power Supply and Motor Specifications
Electrical Requirements
Minimum Gauge for Extension Cords AWG
When using 120 Volt only
Guidelines for Extension Cords
Carton Contents
Accessories and Attachments
Unpacking Your Band SAW
Know Your Band SAW
Woodworking Terms
Glossary of Terms
Band SAW Terms
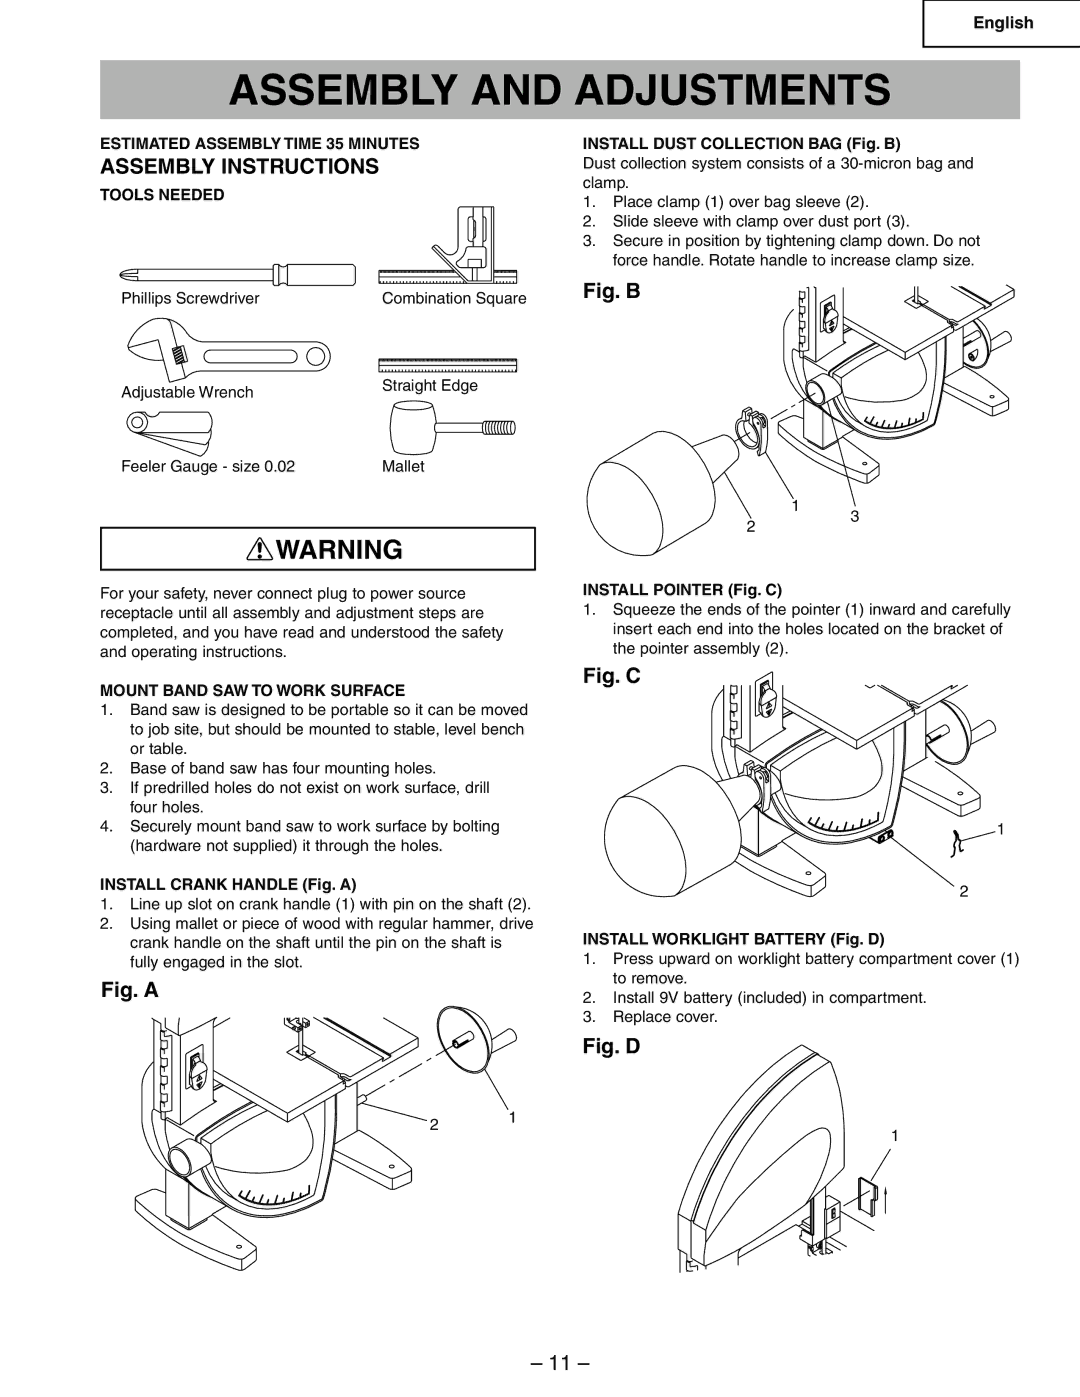
Tools Needed
Assembly and Adjustments
Assembly Instructions
Estimated Assembly Time 35 Minutes
Miter Gauge Fig. G
Installing Blade Fig. F
Removing Blade Fig. E, F
Blade Tracking Fig
Upper Blade Guide Assembly Fig. J
Tilting the SAW Fig. H
Blade guides Fig. M
Upper Blade Guides and Blade Support Bearing Fig. K, L
Blade guides Fig. K
Lower Blade Guides and Support Bearing Fig. M, N
Support bearing Fig. N
ON/OFF Switch Fig. O
Operation
Basic SAW Operations
Blade Selection Fig. Q
Cutting Curves
Circle Cutting Fig. P
Maintenance
General
Troubleshooting Guide
Problem Probable Cause Remedy
Motor
English
Poids NET
Spécifications DU Produit
Moteur
Récupération DES Copeaux
Avant D’UTILISER LA Scie À Ruban
Sécurité
Consignes DE Sécurité Générales
Alimentation Électrique ET Spécifications DU Moteur
Utiliser Uniquement LES Accessoires Recommandés
Consignes DE Sécurité Spécifiques Pour LA Scie À Ruban
Exigences Électriques
Calibre Minimal Pour Cordons Prolongateurs
Directives Pour LES Rallonges Électriques
Utiliser LA Rallonge Électrique QUI Convient
’assurer que la rallonge électrique est correctement câblée
Déballage ET Vérification DU Contenu
Accessoires ET Équipements
Accessoires Recommandés
Contenu DU Carton
Déballage DE LA Scie À Ruban
MARCHE/ARRÊT
Connaître SA Scie À Ruban
Bouton DE Verrouillage DE Guide Supérieur
Glossaire DES Termes
Glossaire DES Termes DE LA Scie À Ruban
Bouton DE Verrouillage DE Table Verrouille la table
Instructions D’ASSEMBLAGE
Installation DE LA Pile DE LA Lampe DE Travail Fig. D
Assemblage ET Ajustements
Guide À Onglets Fig. G
Installation DE LA Lame Fig. F
Dépose DE LA Lame Fig. E, F
GUIDE-LAME Supérieur Fig. J
Inclinaison DE LA Scie Fig. H
Alignement DE LA Lame Fig
GUIDE-LAME Inférieurs ET Palier DE Support Fig. M, N
GUIDE-LAME Supérieurs ET PALIER-SUPPORT DE Lame Fig. K, L
Guide-lame Fig. K
Palier-support Fig. L
Interrupteur DE MARCHE/ARRÊT Fig. O
Fonctionnement
Sciage DE Base
Palier-support Fig. N
Sélection DE Lame Fig. Q
Coupe DES Courbes
Coupe DE Cercles Fig. P
Entretien
Fonctionnement
Guide DE Dépannage
Problème Cause Probable Action Corrective
Ajsutement
Moteur
Français
Amperios
Especificaciones DEL Producto
Motor
Fuente de alimentación 120 V, CA, 60 HZ
Antes DE Usar LA Sierra DE Banda
Seguridad
Instrucciones Generales DE Seguridad
Instrucciones Para LA Conexion a Tierra
Requisitos Electricos
USE LOS Accesorios Recomendados Únicamente
Especificaciones DE LA Alimentacion Electrica Y EL Motor
Cuando se usa 120 voltios únicamente
Pautas Para EL USO DE Cables DE Extension
Calibre Minimo Para Cables DE Extension AWG
Desempaque Y Verificacion DEL Contenido
Accesorios Y Aditamentos
Contenido DE LA Caja
Accesorios Recomendados
Desempaque DE SU Sierra DE Banda
Conozca SU Sierra DE Banda
Manilla DE Fijacion DE LA Mesa Fija la mesa en
Glosario DE Terminos
Terminos DE LA Sierra DE Banda
Interruptor DE Encendido Y Apagado ON/OFF
Herramientas Necesarias
Montaje Y Ajustes
Instrucciones DE Montaje
Tiempo DE Montaje Estimado 35 Minutos
Guia DE Ingletes Fig. G
Demontaje DE LA Hoja Fig. E, F
Instalacion DE LA Hoja Fig. F
Conjunto DE LA Guia DE LA Hoja Superior FIG. J
Inclinacion DE LA Sierra Fig. H
Alineacion DE LA Hoja Fig
Guías de la hoja Fig. M
Guías de la hoja Fig. K
Cojinete de soporte Fig. L
Cojinete DE Soporte Y Guias DE LA Hoja Inferiores Fig. M, N
Interruptor DE Encendido Y Apagado ON/OFF Fig. O
Operacion
Operaciones Basicas DE LA Sierra
Cojinete de soporte Fig. N
Seleccion DE LA Hoja FIG. Q
Corte DE Curvas
Corte Circular Fig. P
Mantenimiento
Generalidades
Guia DE Identificacion DE Problemas
Problema Causa Probable Solucion
Identificacion DE Problemas DEL
Motor
Model NO. CB6Y
Schematic a
10″ Band SAW
Always Order by Part NO. and I.D. Number
Parts List
Parts List for Schematic a
Model NO. CB6Y
Schematic B
Parts List for Schematic B
Hitachi Koki Canada Co