TROUBLESHOOTING (continued)
Actions to Correct Abnormal Displays (RGB Input)
Corrections d'affichage anormales RVB 1 seulement
Depending on the kind of system equipment used, images may not be displayed normally. In this case, make the adjustments suggested below. (only for RGB)
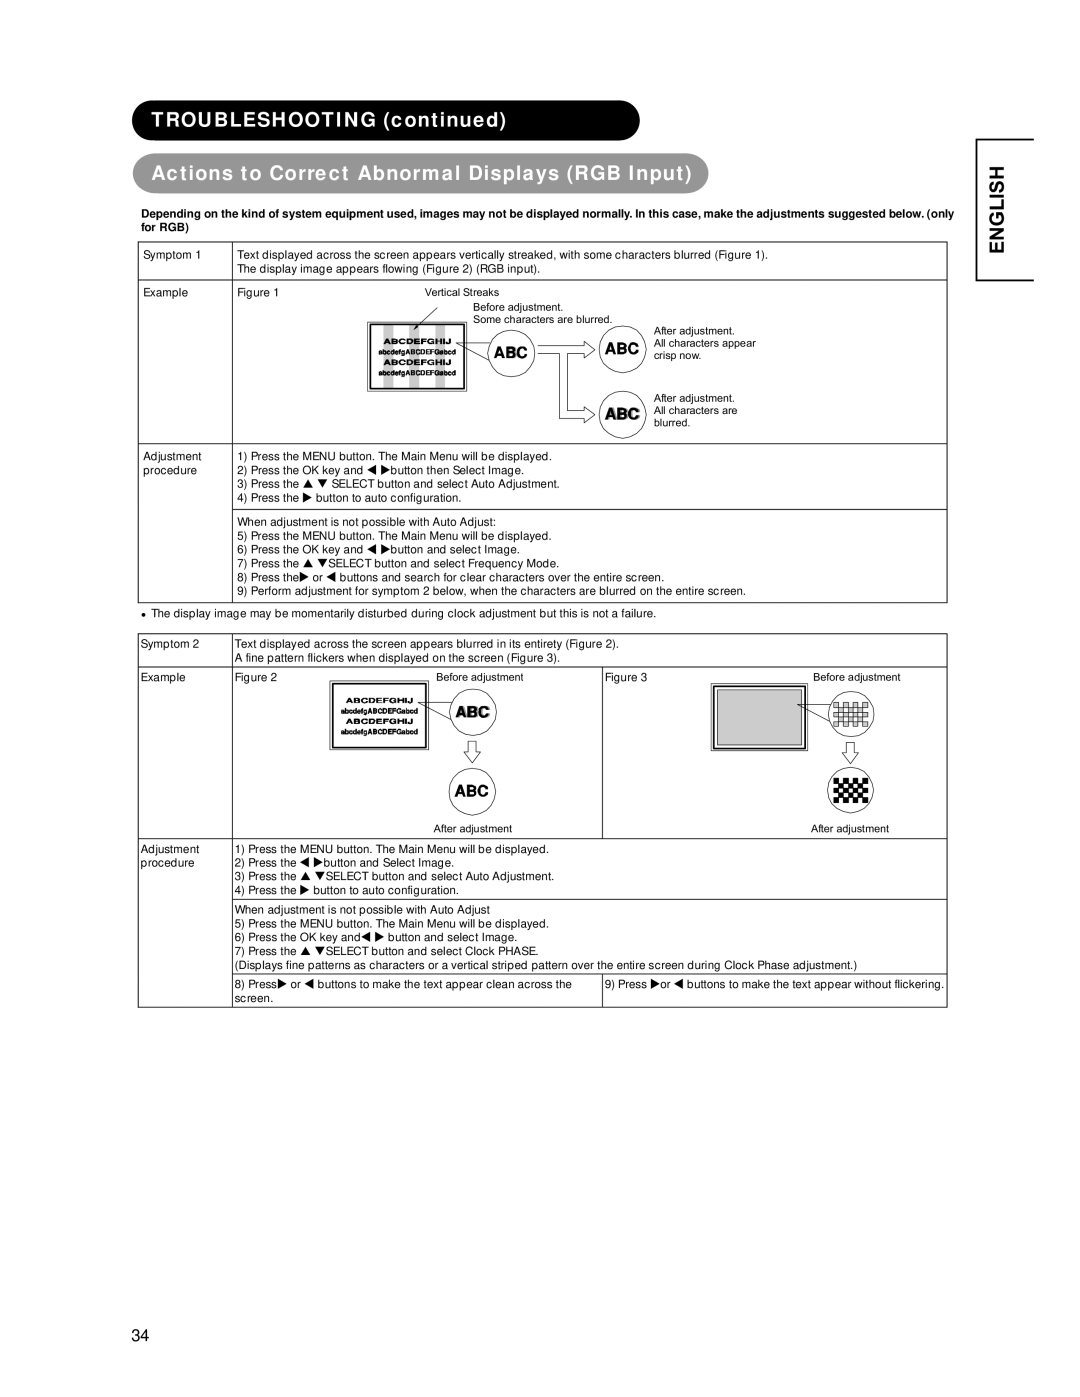
Symptom 1 | Text displayed across the screen appears vertically streaked, with some characters blurred (Figure 1). | |
| The display image appears flowing (Figure 2) (RGB input). | |
Example | Figure 1 | Vertical Streaks |
|
| Before adjustment. |
|
| Some characters are blurred. |
|
| After adjustment. |
|
| All characters appear |
|
| crisp now. |
After adjustment. All characters are blurred.
Adjustment | 1) | Press the MENU button. The Main Menu will be displayed. |
procedure | 2) | Press the OK key and W Xbutton then Select Image. |
| 3) | Press the S T SELECT button and select Auto Adjustment. |
| 4) | Press the X button to auto configuration. |
When adjustment is not possible with Auto Adjust:
5)Press the MENU button. The Main Menu will be displayed.
6)Press the OK key and W Xbutton and select Image.
7)Press the S TSELECT button and select Frequency Mode.
8)Press theX or W buttons and search for clear characters over the entire screen.
9)Perform adjustment for symptom 2 below, when the characters are blurred on the entire screen.
zThe display image may be momentarily disturbed during clock adjustment but this is not a failure.
Symptom 2 | Text displayed across the screen appears blurred in its entirety (Figure 2). |
|
|
|
|
|
|
|
| |||||||
| A fine pattern flickers when displayed on the screen (Figure 3). |
|
|
|
|
|
|
|
|
| ||||||
|
|
|
|
|
|
|
|
|
|
|
|
|
|
| ||
Example | Figure 2 |
|
|
|
|
| Before adjustment | Figure 3 |
|
|
| Before adjustment | ||||
|
|
|
|
|
|
|
|
|
|
|
|
|
|
|
|
|
|
|
|
|
|
|
|
|
|
|
|
|
|
|
|
|
|
|
|
|
|
|
|
|
|
|
|
|
|
|
|
|
|
|
|
|
|
|
|
|
|
|
|
|
|
|
|
|
|
|
|
|
|
|
|
|
|
|
|
|
|
|
|
|
|
|
|
|
|
|
|
|
|
|
|
|
|
|
|
|
|
|
|
|
|
|
|
|
|
|
|
|
|
|
|
|
|
|
|
|
|
|
|
|
|
|
|
|
|
|
|
|
|
|
|
|
|
|
|
|
|
|
|
|
|
|
|
|
|
|
|
|
|
|
|
|
|
|
|
|
|
|
|
|
|
|
|
|
|
|
|
|
|
|
| After adjustment | After adjustment |
|
|
|
|
Adjustment | 1) | Press the MENU button. The Main Menu will be displayed. |
|
procedure | 2) | Press the W Xbutton and Select Image. |
|
| 3) | Press the S TSELECT button and select Auto Adjustment. |
|
| 4) | Press the X button to auto configuration. |
|
When adjustment is not possible with Auto Adjust
5)Press the MENU button. The Main Menu will be displayed.
6)Press the OK key andW X button and select Image.
7)Press the S TSELECT button and select Clock PHASE.
(Displays fine patterns as characters or a vertical striped pattern over the entire screen during Clock Phase adjustment.)
| 8) PressX or W buttons to make the text appear clean across the | 9) Press Xor W buttons to make the text appear without flickering. |
| screen. |
|
|
|
|
ENGLISH
34
