Mode D’EMPLOI ET Instructions DE Securite
Contents
Blade
Product Specifications
Motor
English
Power Tool Safety
General Safety Instructions Before Using this Power Tool
Think Safety
Scroll SAW Safety
Specific Safety Instructions for this Scroll SAW
Hold Workpiece Firmly against the table top
Guidelines for Extension Cords
Electrical Requirements and Safety
Grounding Instructions
Recommended Accessories
Accessories and Attachments
Tools Needed for Assembly
Supplied Not Supplied Mm Hex Wrench Medium Screwdriver
Carton Contents
Know Your Scroll SAW
Woodworking Terms
Glossary of Terms
Scroll SAW Terms
Mounting the Scroll SAW FIG. A, B
Assembly and Adjustments
Estimated Assembly Time 15~20 Minutes Assemble Stand FIG. a
Blade Storage FIG. D
Blade Removal and Installation
Mounting Scroll SAW to Work Surface FIG. C
Sawdust Collection Port FIG. E
PLAIN-END Blade Installation FIG. H, I, J
PLAIN-END Blade Removal FIG. F, G, H
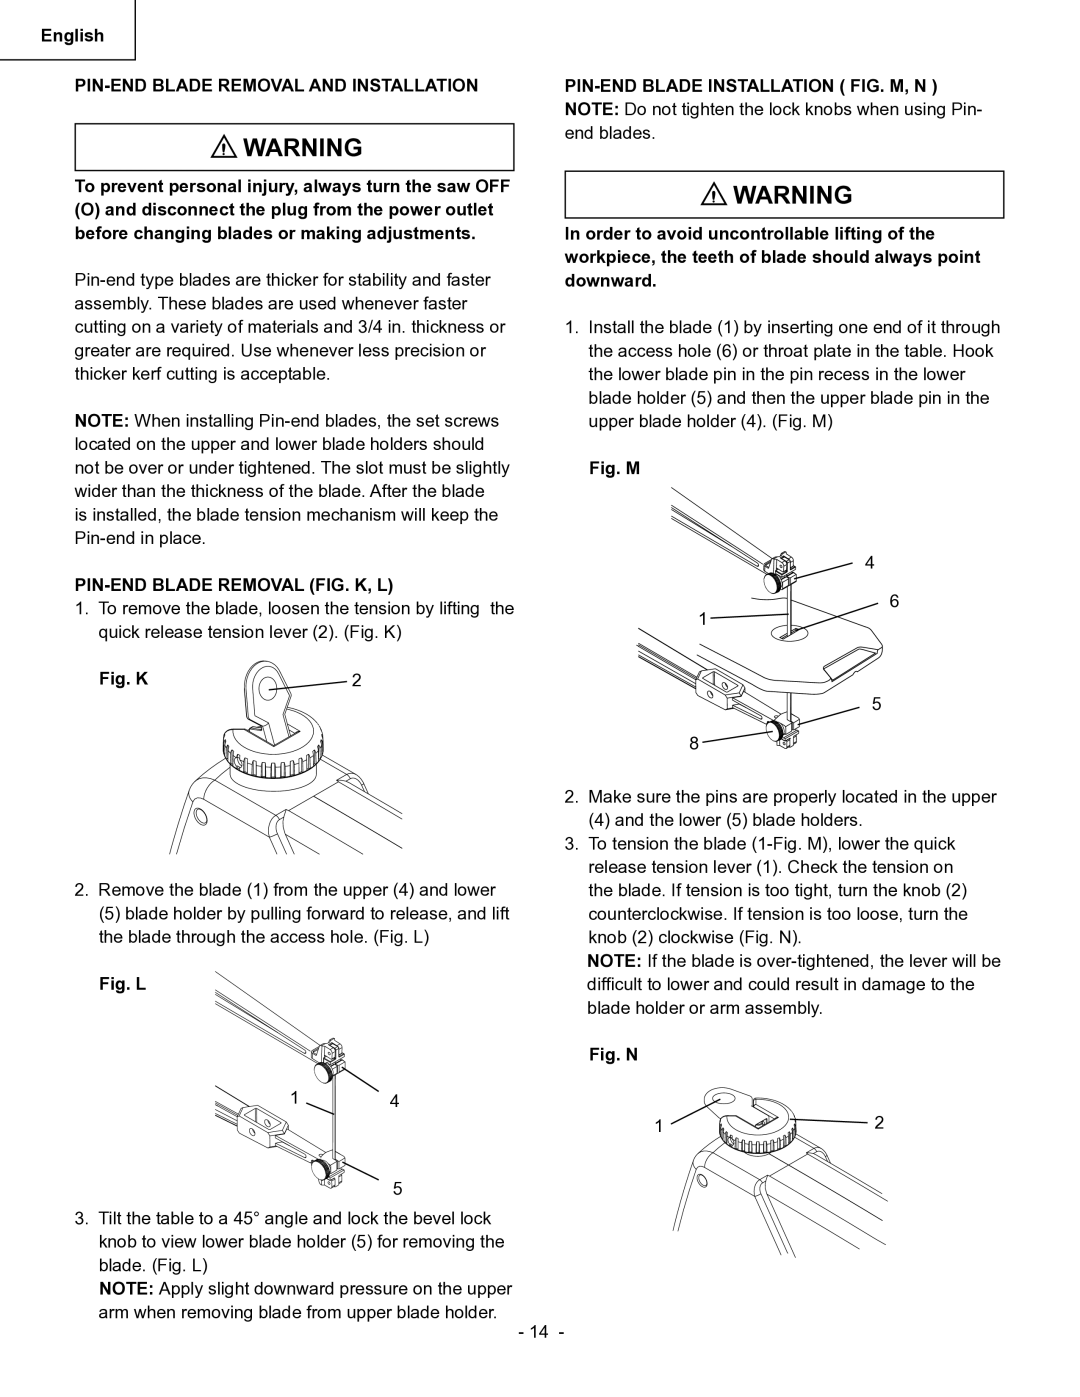
PIN-END Blade Removal and Installation
PIN-END Blade Removal FIG. K, L
Sawdust Blower FIG. Q
Blade Guard Foot Adjustment FIG. O, P
Blade Selection FIG. R
Replacing the Bulb FIG. S
On I / OFF O Switch FIG. S
Operation
Variable Speed Control Knob FIG. S
Freehand Cutting FIG. U
Angle Cutting FIG. U
RIP or Straight Line Cutting FIG. W
Interior Cutting FIG
Replacing Carbon Brushes FIG. Y, Z
Maintenance
General
Troubleshooting Guide
Symptom Possible Causes Corrective Action
Moteur
Fiche Technique DU Produit
Français
Lames
Découper
Consignes DE Sécurité Générales À
Respecter Avant D’UTILISER LA Scie
26.SÉCURITÉ Avant Tout
Consignes DE Sécurité Spécifiques À Cette Scie À Découper
Tenir Fermement LE Matériau À Scier
Rallonges
Directives DE Mise À LA Terre
Directives Concernant LES
Mise EN Garde
Fourni Not Fourni
Accessoires
Outils Requis Pour Assemblage
Pied
Contenu DE LA Boîte
ART Description Quantité
Apprendre À Connaìtre LA Scie À Découper
Termes DE Menuiserie
Glossaire
Termes Relatifs AUX Scies À Découper
Assemblage ET Réglages
Remarque
Compartiment DE Rangement DES Lames FIG. D
Pose ET Dépose DES Lames À Ergot FIG. F, G, H
Pose DES Lames Ordinaires FIG. H, I, J
Pose ET Dépose DES Lames À Ergot
Dépose DES Lames À Ergot FIG. K, L
Souffleur DE Sciure FIG. Q
Réglage DU Pied DU PROTÈGE-LAME FIG. O, P
Choix DES Lames FIG. R
Utilisation
Remplacement DE L’AMPOULE FIG. S
Recommandations Pour LES Coupes
Interrupteur Marche I -ARRÊT O FIG. S
Coupes EN Biais FIG. U
Coupe À Main Libre
Coupe Intérieure FIG
Coupes DE Refente OU EN Ligne Droite FIG. W
Quantité Description
Généralités
Remplacement DES Balais DE Charbon FIG
Entretien
Guide DE Dépannage
Problèmes Causes Possibles Remèdes
Motor Mesa
Especificaciones DEL Producto
Español
Extractor DE Polvo
Seguridad Antes DE Utilizar Esta
Seguridad DE LAS Herramientas
Instrucciones Generales DE
Herramienta Eléctrica
Seguridad Para Esta Sierra
Segurida DE LA Sierra Caladora
Instrucciones Específicas DE
Caladora
Directrices Para EL Cable DE Extensión
Seguridad Y Requisitos Eléctricos
Instrucciones DE Puesta a Tierra
Funciona, a fi n de proteger al operario de posibles
Suministran No se suministran
Accesorios Y Acoplamientos
Accesorios Recomendados
Desembalaje DE SU Sierra DE Marquetería
Contenido DEL Embalaje
Desembalaje Y Comprobación DE SU Contenido
Soporte
Familiarícese CON SU Sierra Caladora
Términos DEL Trabajo CON Madera
Glosario DE Terminos
Términos DE LOS Componentes DE LA Sierra
Botón DE Bloqueo DEL PIE DEL Guardahojas
Montaje DE LA Sierra DE Marqueteria FIG. A, B
Montaje Y Ajustes
Nota
Montaje DE LA Sierra Caladora AL Plano DE Trabajo FIG. C
Almacenamiento DE Hojas FIG. D
Desmontaje DE LA Hoja DE Extremo Liso FIG. F, G, H
Montaje DE LA Hoja DE Extremo Liso FIG. H, I, J
Montaje DE LA Hoja CON Extremo DE Pasador FIG. M, N
Desmontaje Y Montaje DE Hojas CON Extremo DE Pasador
Desmontaje DE LA Hoja CON Extremo DE Pasador FIG. K, L
Extractor DE Serrín FIG. Q
Regulación DEL PIE DEL Guardahojas FIG. O, P
Selección DE LA Hoja FIG. R
Interruptor DE Encendido I /APAGADO O FIG. S
Funcionamiento
Cambio DE LA Bombilla FIG. S
Boton DE Control DE Velocidad Variable FIG. S
Corte a Mano FIG. U
Corte EN Ángulo FIG. U
Regado O Corte EN Línea Recta FIG. W
Corte Interior FIG
Reemplazo DE LAS Escobillas DE Carbon FIG. Y, Z
Mantenimiento
Generalidades
Guia Para LA Solucion DE Problemas
Problema Causa DEL Problema Solución Recomendada
Scroll SAW Model NO. CW
Parts List
Parts List for Schematic
Always order by I.D. Number
Scroll SAW Model NO. CW
Parts List for Stand
Hitachi Koki Canada Co