PREPARING FOR USE
JOINING POWERHEAD TO ADD-ON ATTACHMENT
The lower unit connects to the power unit by means of the driveshaft coupler device attached to the power unit driveshaft tube.
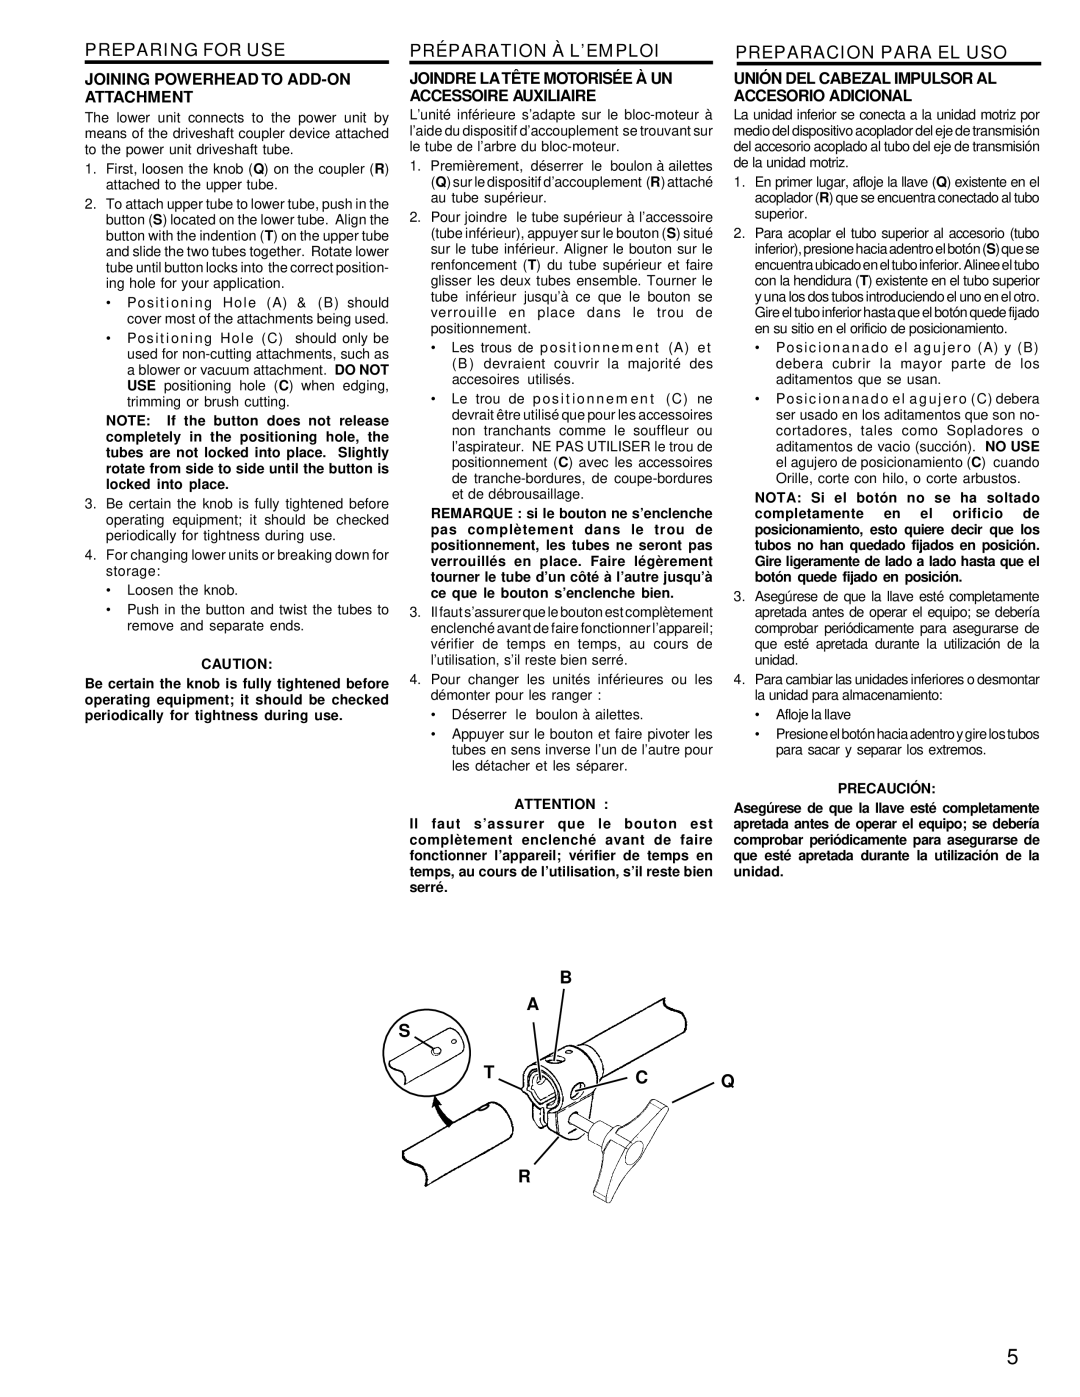
1.First, loosen the knob (Q) on the coupler (R) attached to the upper tube.
2.To attach upper tube to lower tube, push in the button (S) located on the lower tube. Align the button with the indention (T) on the upper tube and slide the two tubes together. Rotate lower tube until button locks into the correct position- ing hole for your application.
•Positioning Hole (A) & (B) should cover most of the attachments being used.
•Positioning Hole (C) should only be used for non-cutting attachments, such as a blower or vacuum attachment. DO NOT USE positioning hole (C) when edging, trimming or brush cutting.
NOTE: If the button does not release completely in the positioning hole, the tubes are not locked into place. Slightly rotate from side to side until the button is locked into place.
3.Be certain the knob is fully tightened before operating equipment; it should be checked periodically for tightness during use.
4.For changing lower units or breaking down for storage:
•Loosen the knob.
•Push in the button and twist the tubes to remove and separate ends.
CAUTION:
Be certain the knob is fully tightened before operating equipment; it should be checked periodically for tightness during use.
PRÉPARATION À L’EMPLOI
JOINDRE LA TÊTE MOTORISÉE À UN ACCESSOIRE AUXILIAIRE
L’unité inférieure s’adapte sur le bloc-moteur à l’aide du dispositif d’accouplement se trouvant sur le tube de l’arbre du bloc-moteur.
1.Premièrement, déserrer le boulon à ailettes (Q) sur le dispositif d’accouplement (R) attaché au tube supérieur.
2.Pour joindre le tube supérieur à l’accessoire (tube inférieur), appuyer sur le bouton (S) situé sur le tube inférieur. Aligner le bouton sur le renfoncement (T) du tube supérieur et faire glisser les deux tubes ensemble. Tourner le tube inférieur jusqu’à ce que le bouton se verrouille en place dans le trou de positionnement.
•Les trous de positionnement (A) et
(B)devraient couvrir la majorité des accesoires utilisés.
•Le trou de positionnement (C) ne devrait être utilisé que pour les accessoires non tranchants comme le souffleur ou l’aspirateur. NE PAS UTILISER le trou de positionnement (C) avec les accessoires de tranche-bordures, de coupe-bordures et de débrousaillage.
REMARQUE : si le bouton ne s’enclenche pas complètement dans le trou de positionnement, les tubes ne seront pas verrouillés en place. Faire légèrement tourner le tube d’un côté à l’autre jusqu’à ce que le bouton s’enclenche bien.
3.Il faut s’assurer que le bouton est complètement enclenché avant de faire fonctionner l’appareil; vérifier de temps en temps, au cours de l’utilisation, s’il reste bien serré.
4.Pour changer les unités inférieures ou les démonter pour les ranger :
• Déserrer le boulon à ailettes.
•Appuyer sur le bouton et faire pivoter les tubes en sens inverse l’un de l’autre pour les détacher et les séparer.
ATTENTION :
Il faut s’assurer que le bouton est complètement enclenché avant de faire fonctionner l’appareil; vérifier de temps en temps, au cours de l’utilisation, s’il reste bien serré.
PREPARACION PARA EL USO
UNIÓN DEL CABEZAL IMPULSOR AL ACCESORIO ADICIONAL
La unidad inferior se conecta a la unidad motriz por medio del dispositivo acoplador del eje de transmisión del accesorio acoplado al tubo del eje de transmisión de la unidad motriz.
1.En primer lugar, afloje la llave (Q) existente en el acoplador (R) que se encuentra conectado al tubo superior.
2.Para acoplar el tubo superior al accesorio (tubo inferior), presione hacia adentro el botón (S) que se encuentra ubicado en el tubo inferior. Alinee el tubo con la hendidura (T) existente en el tubo superior y una los dos tubos introduciendo el uno en el otro. Gire el tubo inferior hasta que el botón quede fijado en su sitio en el orificio de posicionamiento.
•Posicionanado el agujero (A) y (B) debera cubrir la mayor parte de los aditamentos que se usan.
•Posicionanado el agujero (C) debera ser usado en los aditamentos que son no- cortadores, tales como Sopladores o aditamentos de vacio (succión). NO USE el agujero de posicionamiento (C) cuando Orille, corte con hilo, o corte arbustos.
NOTA: Si el botón no se ha soltado completamente en el orificio de posicionamiento, esto quiere decir que los tubos no han quedado fijados en posición. Gire ligeramente de lado a lado hasta que el botón quede fijado en posición.
3.Asegúrese de que la llave esté completamente apretada antes de operar el equipo; se debería comprobar periódicamente para asegurarse de que esté apretada durante la utilización de la unidad.
4.Para cambiar las unidades inferiores o desmontar la unidad para almacenamiento:
•Afloje la llave
•Presione el botón hacia adentro y gire los tubos para sacar y separar los extremos.
PRECAUCIÓN:
Asegúrese de que la llave esté completamente apretada antes de operar el equipo; se debería comprobar periódicamente para asegurarse de que esté apretada durante la utilización de la unidad.