INTRODUCTION IMPORTANT PRECAUTIONS
ASSEMBLY
BEFORE YOU BEGIN
A S S E M B LY STEP 2 ( C O N T I N U E D )
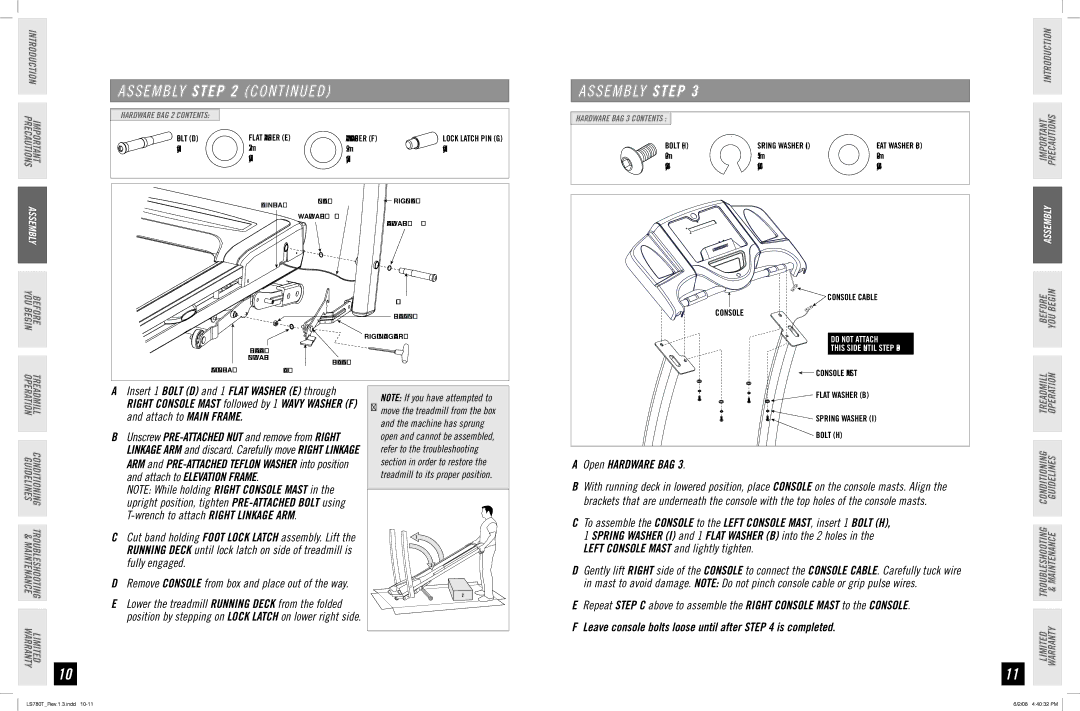
HARDWARE BAG 2 CONTENTS:
BOLT (D) | FLAT WASHER (E) | WAVY WASHER (F) | LOCK LATCH PIN (G) |
Qty: 1 | 27 mm | 29 mm | Qty: 1 |
| Qty: 1 | Qty: 1 |
|
| MAIN FRAME | CONSOLE CABLE | RIGHT CONSOLE MAST |
|
|
| |
|
| WAVY WASHER (F) | FLAT WASHER (E) |
|
|
| |
|
|
| BOLT (D) |
|
|
| |
|
|
| RIGHT LINKAGE ARM |
|
| ||
TEFLON WASHER | |||
ELEVATION FRAME |
| ||
FOOT LOCK LATCH |
| ||
A S S E M B LY STEP 3
HARDWARE BAG 3 CONTENTS : |
|
|
BOLT (H) | SPRING WASHER (I) | FLAT WASHER (B) |
20 mm | 15 mm | 20 mm |
Qty: 4 | Qty: 4 | Qty: 4 |
![]() CONSOLE CABLE
CONSOLE CABLE
CONSOLE
DO NOT ATTACH
THIS SIDE UNTIL STEP
![]() CONSOLE MAST
CONSOLE MAST
IMPORTANT PRECAUTIONS INTRODUCTION
ASSEMBLY
BEFORE YOU BEGIN
TREADMILL
OPERATION
CONDITIONING TROUBLESHOOTING LIMITED
GUIDELINES & MAINTENANCE WARRANTY
10
AInsert 1 bolt (D) and 1 FLAT washer (E) through RIGHT console mast followed by 1 WAVY washer (F) and attach to MAIN FRAME.
BUnscrew
Note: While holding RIGHT CONSOLE MAST in the upright position, tighten
CCut band holding FOOT LOCK LATCH assembly. Lift the running deck until lock latch on side of treadmill is fully engaged.
DRemove console from box and place out of the way.
ELower the treadmill running deck from the folded position by stepping on LOCK LATCH on lower right side.
Note: If you have attempted to
*move the treadmill from the box and the machine has sprung open and cannot be assembled, refer to the troubleshooting section in order to restore the treadmill to its proper position.
1 |
3 |
2 |
![]() FLAT WASHER (B)
FLAT WASHER (B)
![]()
![]() SPRING WASHER (I)
SPRING WASHER (I)
BOLT (H)
AOpen HARDWARE BAG 3.
BWith running deck in lowered position, place console on the console masts. Align the brackets that are underneath the console with the top holes of the console masts.
CTo assemble the CONSOLE to the LEFT CONSOLE MAST, insert 1 BOLT (H), 1 SPRING WASHER (I) and 1 FLAT WASHER (B) into the 2 holes in the left CONSOLE mast and lightly tighten.
DGently lift right side of the console to connect the console cable. Carefully tuck wire in mast to avoid damage. NOTE: Do not pinch console cable or grip pulse wires.
ERepeat step C above to assemble the right console mast to the console.
FLeave console bolts loose until after STEP 4 is completed.
11
TREADMILL OPERATION
LIMITED TROUBLESHOOTING CONDITIONING WARRANTY & MAINTENANCE GUIDELINES
LS780T_Rev.1.3.indd | 6/2/08 4:40:32 PM |