INTRODUCTION IMPORTANT
PRECAUTIONS
ASSEMBLY
BEFORE
YOU BEGIN
TREADMILL
OPERATION
CONDITIONING TROUBLESHOOTING LIMITED
GUIDELINES & MAINTENANCE WARRANTY
12
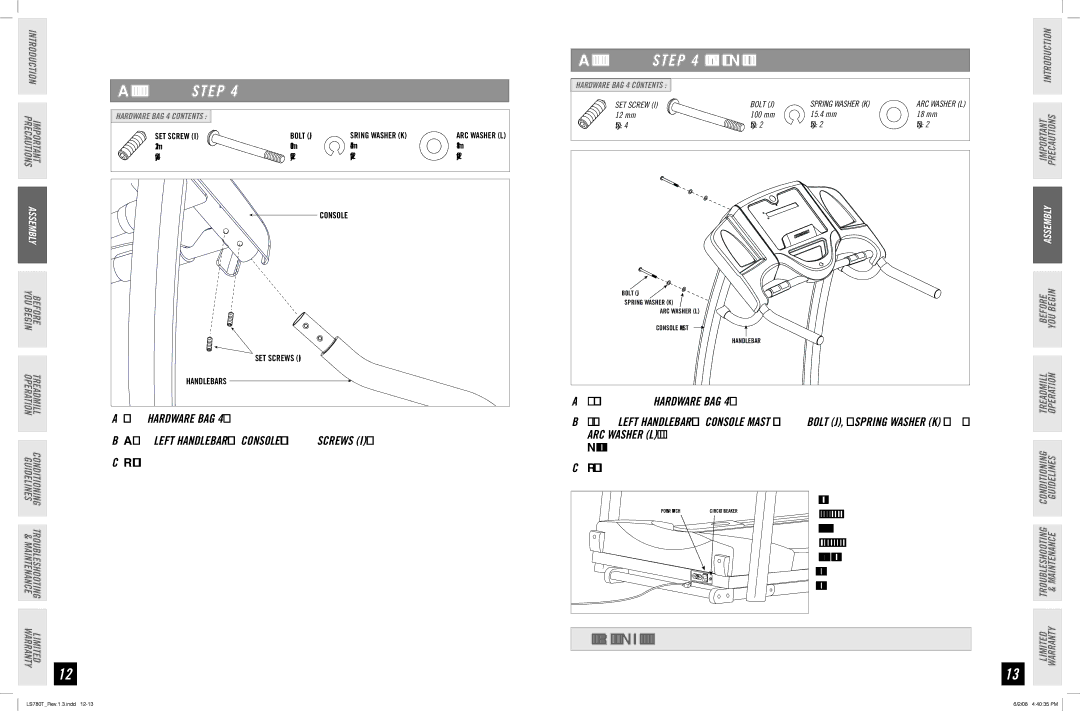
A S S E M B LY STEP 4
HARDWARE BAG 4 CONTENTS : |
|
|
|
SET SCREW (I) | BOLT (J) | SPRING WASHER (K) | ARC WASHER (L) |
12 mm | 100 mm | 15.4 mm | 18 mm |
Qty: 4 | Qty: 2 | Qty: 2 | Qty: 2 |
CONSOLE |
SET SCREWS (I) |
HANDLEBARS |
AOpen HARDWARE BAG 4.
BAttach LEFT HANDLEBAR to CONSOLE using 2 SCREWS (I) .
CRepeat on other side.
A S S E M B LY STEP 4 ( C O N T I N U E D )
HARDWARE BAG 4 CONTENTS : |
|
|
|
SET SCREW (I) | BOLT (J) | SPRING WASHER (K) | ARC WASHER (L) |
12 mm | 100 mm | 15.4 mm | 18 mm |
Qty: 4 | Qty: 2 | Qty: 2 | Qty: 2 |
BOLT (J) |
SPRING WASHER (K) |
ARC WASHER (L) |
CONSOLE MAST |
HANDLEBAR |
AContinue using Hardware Bag 4.
BFasten LEFT HANDLEBAR to CONSOLE MAST using 1 BOLT (J), 1 SPRING WASHER (K) and 1 ARC WASHER (L).
NOTE: Look into holes in the right mast before inserting bolts to avoid pinching cables.
CRepeat on other side.
|
| Connect power plug to the treadmill |
POWER SWITCH | CIRCUIT BREAKER | and connect the cord to a power |
| ||
|
| outlet. The on/off switch is located |
|
| next to the power cord. Flip this |
|
| switch to the 'ON' position, so that |
|
| the switch is lit. You will hear a beep |
|
| and the console will light up. |
YOU’RE FINISHED!
13
IMPORTANT PRECAUTIONS INTRODUCTION
ASSEMBLY
BEFORE YOU BEGIN
TREADMILL OPERATION
LIMITED TROUBLESHOOTING CONDITIONING WARRANTY & MAINTENANCE GUIDELINES
LS780T_Rev.1.3.indd | 6/2/08 4:40:35 PM |
