INTRODUCTION IMPORTANT PRECAUTIONS
A S S E M B LY STEP 3
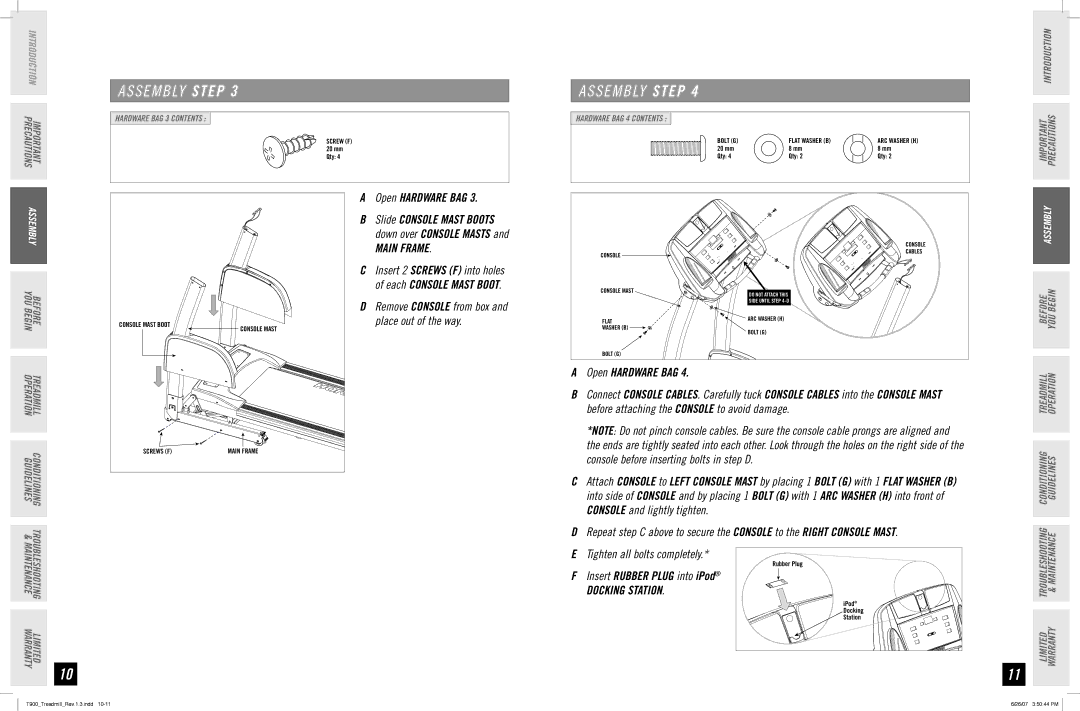
HARDWARE BAG 3 CONTENTS :
SCREW (F) 20 mm Qty: 4
A S S E M B LY STEP 4
HARDWARE BAG 4 CONTENTS :
BOLT (G) | FLAT WASHER (B) | ARC WASHER (H) |
20 mm | 8 mm | 8 mm |
Qty: 4 | Qty: 2 | Qty: 2 |
IMPORTANT PRECAUTIONS INTRODUCTION
ASSEMBLY
BEFORE
YOU BEGIN
TREADMILL
OPERATION
CONDITIONING TROUBLESHOOTING LIMITED
GUIDELINES & MAINTENANCE WARRANTY
10
CONSOLE MAST BOOT | CONSOLE MAST |
| |
SCREWS (F) | MAIN FRAME |
AOpen HARDWARE BAG 3.
BSlide CONSOLE MAST BOOTS down over CONSOLE MASTS and
MAIN FRAME.
CInsert 2 SCREWS (F) into holes of each CONSOLE MAST BOOT.
DRemove CONSOLE from box and place out of the way.
| CONSOLE |
CONSOLE | CABLES |
| |
CONSOLE MAST | DO NOT ATTACH THIS |
| |
| SIDE UNTIL STEP |
FLAT | ARC WASHER (H) |
| |
WASHER (B) | BOLT (G) |
|
BOLT (G)
AOpen HARDWARE BAG 4.
BConnect CONSOLE CABLES. Carefully tuck CONSOLE CABLES into the CONSOLE MAST before attaching the console to avoid damage.
*NOTE: Do not pinch console cables. Be sure the console cable prongs are aligned and the ends are tightly seated into each other. Look through the holes on the right side of the console before inserting bolts in step D.
CAttach CONSOLE to LEFT CONSOLE MAST by placing 1 BOLT (G) with 1 FLAT WASHER (B) into side of CONSOLE and by placing 1 BOLT (G) with 1 ARC WASHER (H) into front of CONSOLE and lightly tighten.
DRepeat step C above to secure the console to the RIGHT CONSOLE MAST.
ETighten all bolts completely.*
Rubber Plug
FInsert RUBBER PLUG into iPod®
DOCKING STATION.
iPod® Docking Station
11
ASSEMBLY
BEFORE YOU BEGIN
TREADMILL OPERATION
LIMITED TROUBLESHOOTING CONDITIONING WARRANTY & MAINTENANCE GUIDELINES
T900_Treadmill_Rev.1.3.indd | 6/26/07 3:50:44 PM |