TB
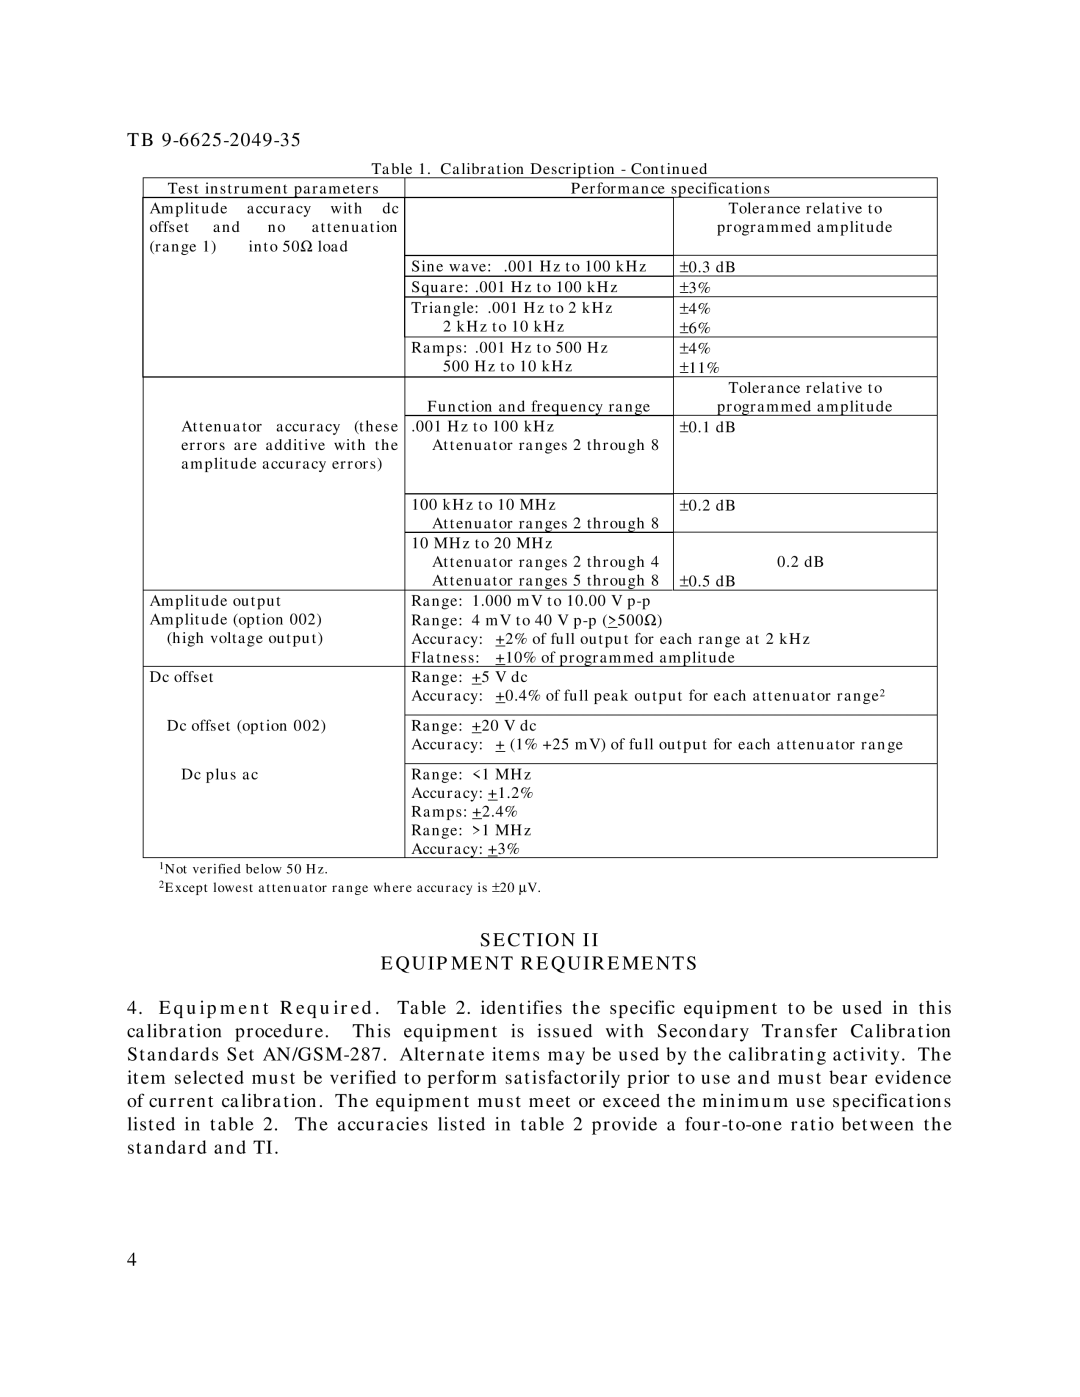
Table 1. Calibration Description - Continued
Test instrument parameters | Performance specifications | ||||
Amplitude | accuracy | with dc |
|
| Tolerance relative to |
offset and | no | attenuation |
|
| programmed amplitude |
(range 1) | into 50Ω load |
|
|
| |
|
|
| Sine wave: .001 Hz to 100 kHz | ±0.3 dB | |
|
|
| Square: .001 Hz to 100 kHz | ±3% | |
|
|
| Triangle: .001 Hz to 2 kHz | ±4% | |
|
|
| 2 kHz to 10 kHz | ±6% | |
|
|
| Ramps: .001 Hz to 500 Hz | ±4% | |
|
|
| 500 Hz to 10 kHz | ±11% | |
|
|
|
|
| Tolerance relative to |
|
|
| Function and frequency range | programmed amplitude | |
Attenuator accuracy (these | .001 Hz to 100 kHz | ±0.1 dB | |||
errors are additive with the | Attenuator ranges 2 through 8 |
| |||
amplitude accuracy errors) |
|
|
| ||
|
|
|
|
|
|
|
|
| 100 kHz to 10 MHz | ±0.2 dB | |
|
|
| Attenuator ranges 2 through 8 |
| |
|
|
| 10 MHz to 20 MHz |
| |
|
|
| Attenuator ranges 2 through 4 | 0.2 dB | |
|
|
| Attenuator ranges 5 through 8 | ±0.5 dB | |
Amplitude output |
| Range: 1.000 mV to 10.00 V |
|
| |
Amplitude (option 002) | Range: 4 mV to 40 V |
| |||
(high voltage output) | Accuracy: +2% of full output for each range at 2 kHz | ||||
|
|
| Flatness: +10% of programmed amplitude | ||
Dc offset |
|
| Range: +5 V dc |
| |
|
|
| Accuracy: +0.4% of full peak output for each attenuator range2 | ||
Dc offset (option 002) |
|
| |||
Range: +20 V dc |
| ||||
|
|
| Accuracy: + (1% +25 mV) of full output for each attenuator range | ||
Dc plus ac |
|
|
| ||
| Range: <1 MHz |
| |||
|
|
| Accuracy: +1.2% |
| |
|
|
| Ramps: +2.4% |
| |
|
|
| Range: >1 MHz |
| |
|
|
| Accuracy: +3% |
| |
1Not verified below 50 Hz. |
|
|
| ||
2Except lowest attenuator range where accuracy is ±20 μV.
SECTION II
EQUIPMENT REQUIREMENTS
4.Equipment Required. Table 2. identifies the specific equipment to be used in this calibration procedure. This equipment is issued with Secondary Transfer Calibration Standards Set
4
