HP | 3 | Important information to read before installing |
LED | State |
| Description |
| Off | The 5 | GHz radio is disabled. |
5 GHz |
|
|
|
Blue | The 5 | GHz radio is enabled. Flashing indicates | |
| wireless network activity. | ||
|
| ||
|
|
|
|
Powering the HP R110/R120
The HP R110/R120 is powered by an HP AC/DC Power Adapter.
Caution: Only use the AC/DC power adapter that is supplied with the HP R110/R120. Do not use any other adapter.
Important information to read before installing
Warning: This device is intended for indoor installation only. Before installing or using the HP R110/120, ensure that you read and understand all safety information and regulatory requirements, particularly those relevant to your region. Failure to follow this guidance could result in a non- compliant situation.
Cabling: You must use supported Cat 5e (or better) cables, and where applicable, surge protection, for your given region.
Country of use: During setup, you are prompted to select the country of use. After the country has been set, the HP R110/R120 automatically limits the available wireless channels, ensuring compliant operation in the selected country. Entering the incorrect country can result in illegal operation and can cause harmful interference to other systems.
Safety: Consider the following safety information during installation.
Installation
The HP R110/R120 can be mounted on a desktop or a wall.
When mounting the HP R110/R120 on a wall, ensure that the surface to which you attach the HP R110/R120 and the fasteners you use can support at least
0.58kg (1.3 lb). Allow extra weight for cables. When mounting on a wall, HP highly recommends that you use the included mounting screws and wall anchors.
There are two slots on the bottom of the HP R110/R120 that can be used for wall mounting.
Mounting on a wall
1.On the wall where the HP R110/R120 will be installed, mark two holes for the screws (wall anchors) 146 mm (5.75 inch) apart.
Note: The wall anchors are not needed when mounting on wooden walls.
2.Drill two holes for the wall anchors, typically 4.7 mm (3/16 inch) in diameter, and then insert the anchors and tap them flush with the wall surface.
3.Insert the mounting screws into the wall anchors, leaving their heads 3 mm (0.12 inch) clear of the wall surface.
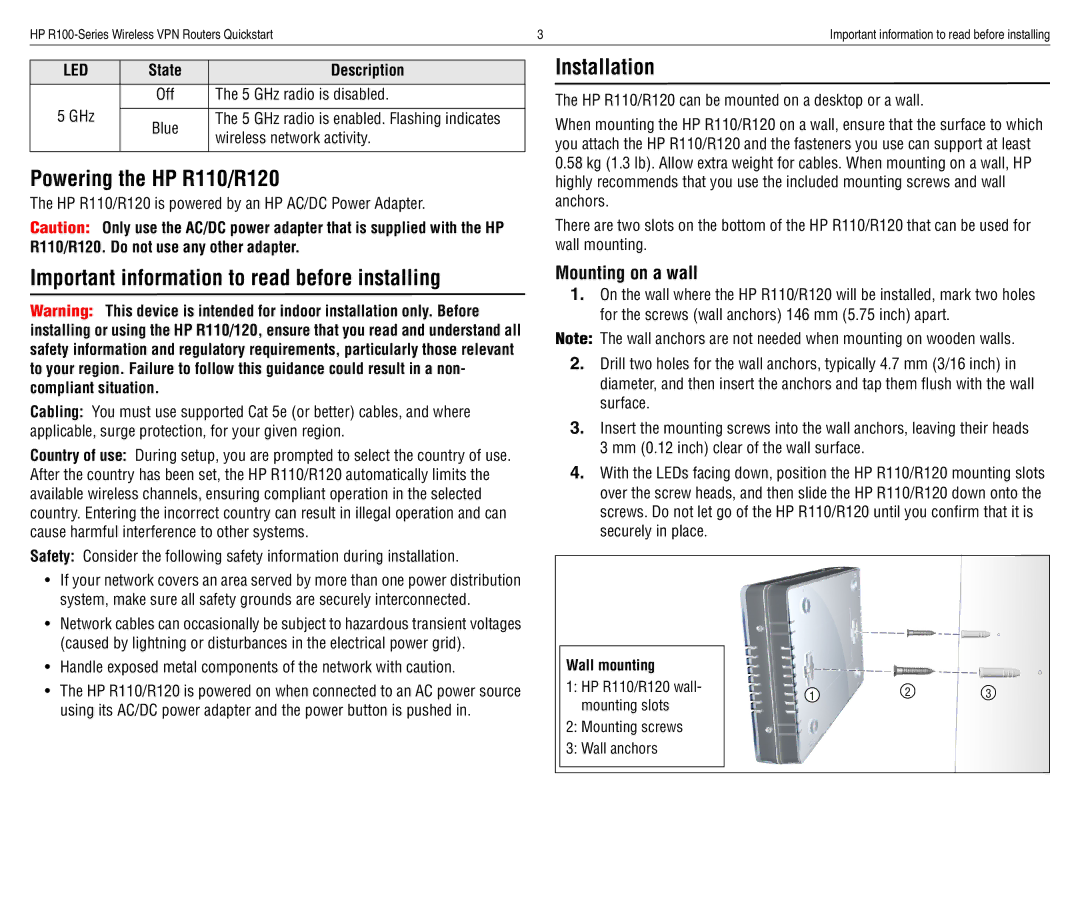
4.With the LEDs facing down, position the HP R110/R120 mounting slots over the screw heads, and then slide the HP R110/R120 down onto the screws. Do not let go of the HP R110/R120 until you confirm that it is securely in place.
•If your network covers an area served by more than one power distribution system, make sure all safety grounds are securely interconnected.
•Network cables can occasionally be subject to hazardous transient voltages (caused by lightning or disturbances in the electrical power grid).
•Handle exposed metal components of the network with caution.
•The HP R110/R120 is powered on when connected to an AC power source using its AC/DC power adapter and the power button is pushed in.
Wall mounting
1:HP R110/R120 wall- mounting slots
2:Mounting screws
3:Wall anchors
1 | 2 | 3 |