531617-1_A - 1197c_ManE.qxp 11/6/2007 4:36 AM Page 27

NOTE: If you have a flat-bottomed aluminum boat, some additional adjustment may be needed to accommodate the rivets on the bottom of the boat (i.e. the gap may need to be a little smaller than 1/8"). This will help you to avoid excessive turbulence at high speeds.

NOTE: If your propeller moves clockwise (in forward, as you're facing the stern of the boat from behind), mount the transducer on the starboard side, and align the bottom right corner of the mounting bracket with the bottom of the boat. If your propeller moves counter-clockwise (in forward, as you're facing the stern of the boat from behind), mount the transducer on the port side, and align the bottom left corner of the mounting bracket with the bottom of the boat.

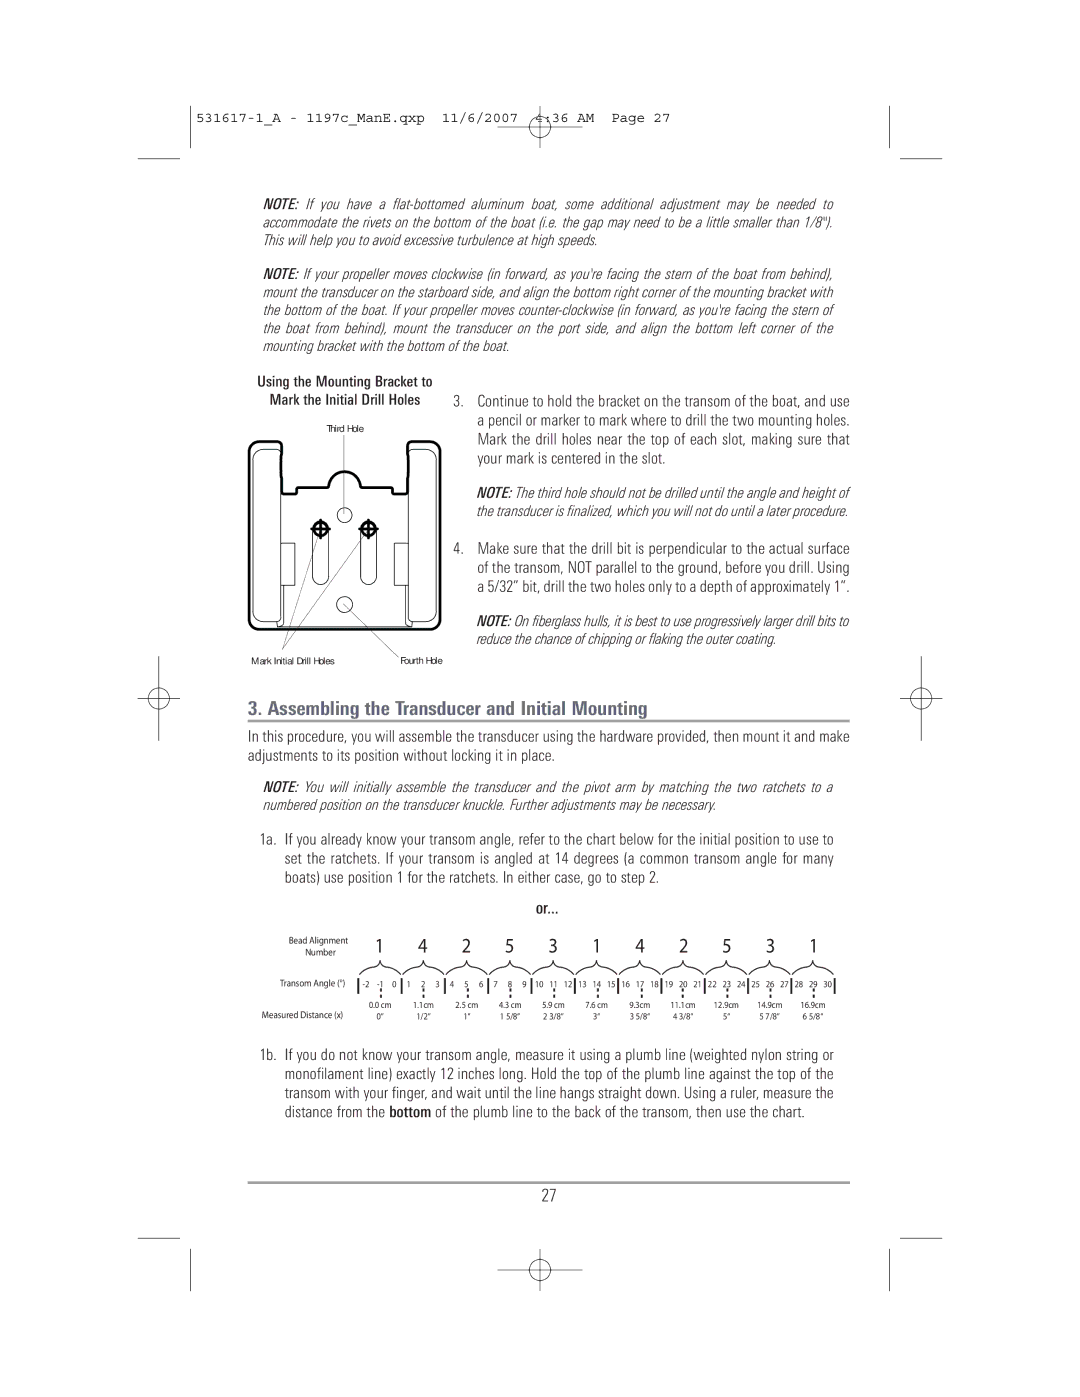
Using the Mounting Bracket to

Mark the Initial Drill Holes

Third Hole

3.Continue to hold the bracket on the transom of the boat, and use a pencil or marker to mark where to drill the two mounting holes. Mark the drill holes near the top of each slot, making sure that your mark is centered in the slot.

NOTE: The third hole should not be drilled until the angle and height of the transducer is finalized, which you will not do until a later procedure.

4.Make sure that the drill bit is perpendicular to the actual surface of the transom, NOT parallel to the ground, before you drill. Using a 5/32” bit, drill the two holes only to a depth of approximately 1”.

NOTE: On fiberglass hulls, it is best to use progressively larger drill bits to reduce the chance of chipping or flaking the outer coating.

Mark Initial Drill Holes

Fourth Hole

3. Assembling the Transducer and Initial Mounting

In this procedure, you will assemble the transducer using the hardware provided, then mount it and make adjustments to its position without locking it in place.

NOTE: You will initially assemble the transducer and the pivot arm by matching the two ratchets to a numbered position on the transducer knuckle. Further adjustments may be necessary.

1a. If you already know your transom angle, refer to the chart below for the initial position to use to set the ratchets. If your transom is angled at 14 degrees (a common transom angle for many boats) use position 1 for the ratchets. In either case, go to step 2.

or...

Bead Alignment

1

4

2

5

3

1

4

2

5

3

1

Number

Transom Angle (°)

Measured Distance (x)

-2 -1 0

1 2

3

4 5 6

7 8

9

10

11 12

13 14 15

16 17 18

19 20 21

22 23 24

25 26 27

28 29 30

0.0 cm

1.1cm


2.5 cm

4.3 cm


5.9 cm

7.6 cm

9.3cm

11.1cm

12.9cm

14.9cm

16.9cm

0“

1/2“


1“

1 5/8“

2

3/8“

3“

3 5/8“

4 3/8“

5“

5 7/8“

6 5/8“

1b. If you do not know your transom angle, measure it using a plumb line (weighted nylon string or monofilament line) exactly 12 inches long. Hold the top of the plumb line against the top of the transom with your finger, and wait until the line hangs straight down. Using a ruler, measure the distance from the bottom of the plumb line to the back of the transom, then use the chart.

27

Page 35
Image 35
Humminbird 1197C SI warranty Assembling the Transducer and Initial Mounting

1197C SI specifications

The Humminbird 1197C SI is a high-performance fishfinder that has made waves in the world of angling technology. This device seamlessly integrates cutting-edge sonar technology with an intuitive user interface, making it a favorite among both novice and professional anglers.

One of the standout features of the 1197C SI is its Side Imaging technology. This unique sonar function allows users to see what lies beneath the water's surface, providing a wide, detailed view of the underwater environment. It operates at a frequency of 455 kHz and 800 kHz, enabling exceptional clarity and detail, even at considerable depths. This feature is particularly beneficial for identifying underwater structures such as rocks, wrecks, and weed beds, which are often hotspots for fish.

Another innovative component of the 1197C SI is its DualBeam PLUS sonar. This technology provides both a narrow and a wide beam, giving users the versatility to search for fish over a broader area while also honing in on specific targets. The combination of Side Imaging and DualBeam sonar results in an impressive level of detail and accuracy in fish detection.

The 1197C SI also boasts a large 10.4-inch color display, providing crisp visuals and easy navigation through the various features. The screen is designed for easy reading in bright sunlight, ensuring that anglers can rely on it no matter the fishing conditions. Additionally, the unit supports a variety of view options, allowing users to select from different display modes to suit their preferences.

Integration with GPS is another key characteristic of the Humminbird 1197C SI. Built-in GPS capabilities allow anglers to mark waypoints, create routes, and access detailed maps and charts. This feature not only aids in navigation but also helps anglers return to successful fishing spots with ease.

The 1197C SI is also equipped with advanced networking capabilities, enabling it to connect with other devices, such as additional sonar units or autopilot systems. This increases the overall functionality and enhances the fishing experience by providing a more integrated system.

In conclusion, the Humminbird 1197C SI stands out for its advanced technologies such as Side Imaging, DualBeam sonar, and comprehensive GPS capabilities. With its large display and user-friendly interface, it has become an essential tool for anglers looking to increase their success on the water. With lasting durability and a wealth of features, the 1197C SI is a smart investment for serious fishing enthusiasts.