READ and SAVE THESE INSTRUCTIONS
83005 Sona Bath Ventilator with Light
I n s t a l l a t i o n
G u i d e
PREVENTATIVE MAINTENANCE
MAINTENANCE
POWER SUPPLY AND LOCK OUT SERVICE PANEL BEFORE SERVICING UNIT
W a r n i n g
Before Installation
Check all the parts. If damaged, call 1-888-830-1326 for replacements
Estimated assembly time 30 to 60 minutes
NOTE Remove all packing materials before installation
Remove the motor/blower from the housing
Remove the wiring cover screw
with the side of the housing
Remove the wiring cover
Choose Installation Option
For New Construction - attaching to joist go to step A11, page
New Construction - attaching to joist
A160
Route wires through the strain relief. For supply connection
use wires suitable for at least 90º C 194º F
Connect wires as shown
Go to step
on page 17 to attach grille
HANG FROM THE WIRING HARNESS
Reinstall the motor by inserting the tabs and pushing up
New Construction - suspended between joists
Mark position of screws by using holes as a template
Slide the mounting rails into brackets
1/8” bit
Connect wires as shown
Install the wiring cover plate. Make sure all wiring
connections are inside the box or under the wiring cover plate
Tighten screws
HANG FROM THE WIRING HARNESS
Reinstall the motor by inserting the tabs and pushing up
into position. Make sure the wires are not pinched
between the motor and the housing
Existing Construction - accessible from above
NO EXISTING FAN
EXISTING FAN
Cut out an opening for the housing
C15C16
Route wires through the strain relief. For supply connection
use wires suitable for at least 90º C 194º F
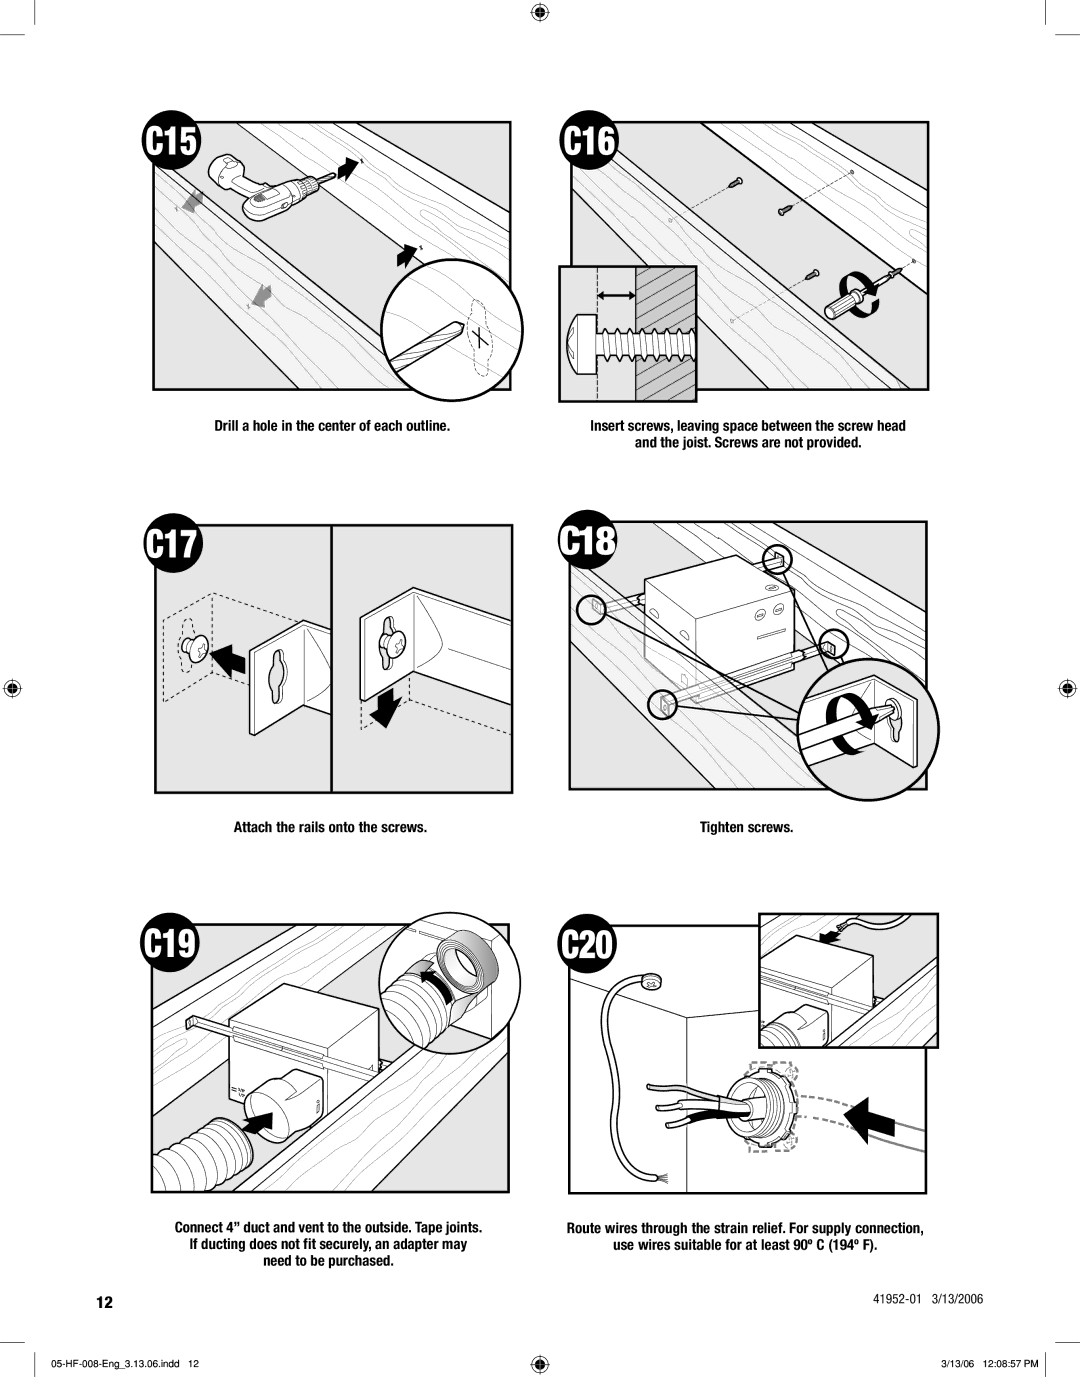
Drill a hole in the center of each outline
Connect wires as shown
Install the wiring cover plate. Make sure all wiring
connections are inside the box or under the wiring cover plate
Connect wiring harness. DO NOT ALLOW THE MOTOR TO
ON OFF
Reinstall the motor by inserting the tabs and pushing up
into position. Make sure the wires are not pinched
between the motor and the housing
Existing Construction - accessible only from below
use wires suitable for at least 90º C 194º F
Attach existing ducting to duct connector. Tape joints
EXISTING FAN
Connect wires as shown
Attaching the Grille
Turn on the power source
Connect wiring harness. DO NOT ALLOW THE MOTOR TO
HANG FROM THE WIRING HARNESS
Install fluorescent bulb Included
Align tabs on glass dome assembly with slots on light
Turn glass dome assembly as shown until it locks into position
Attach thumbscrews
Trouble Shooting
Solution
Solution
Solution
Warranty
LEA y CONSERVE ESTAS INSTRUCCIONES
Ventilador para baño 83005 Sona con luz
G u í a
i n s t a l a c i ó n
A D V E R T E N C I A
PRECAUCIÓN
ADVERTENCIA
Mantenimiento preventivo
Antes de la instalación
Verifique todos los
llame al para un reemplazo
E F G H I x2 J K L M N O
Retire el motor/soplador del alojamiento
Retire las cubiertas de las puntas de tornillo precargadas
Retire el tornillo de la cubierta del cableado
Retire las puntas de tornillo precargadas hasta que estén a
Escoja la opción de instalación
Construcción nueva - fijación a la viga
Expulse el primer tapón metálico de acceso del cableado
Utilice el segundo si es necesario
A160
Conecte los alambres como se muestra
Vaya al paso
en la página 37 para fijar la rejilla
ENCENDIDO
APAGADO
Construcción nueva - suspendido entre vigas
Deslice los rieles de montaje en los soportes
Ubique la correcta marca de profundidad en el borde
inferior de la viga, según el espesor de su plancha de yeso
Apriete los tornillos
Conecte los alambres como se muestra
Vaya al paso
en la página 37 para fijar la rejilla
ENCENDIDO
APAGADO
C11 VENTILADOR EXISTENTE
SIN VENTILADOR EXISTENTE
Construcción existente - accesible desde arriba
Recorte una abertura para el alojamiento
C15C16
Taladre un agujero en el centro de cada perfil
Fije los rieles con los tornillos
Introduzca los tornillos, dejando espacio entre la cabeza del
Apriete los tornillos del aliviador de tensiones
Conecte los alambres como se muestra
Conecte el mazo de cables. NO PERMITA QUE EL MOTOR
CUELGUE DEL MAZO DE CABLES
ENCENDIDO APAGADO
Vaya al paso
en la página 37 para fijar la rejilla
Encienda la fuente de alimentación
D11 VENTILADOR EXISTENTE
Construcción existente - accesible sólo desde abajo
Instale los tornillos precargados en la viga o el marco
Retire el ventilador existente y asegúrese que la abertura
Conecte los alambres como se muestra
Vuelva a instalar el motor introduciendo las pestañas y
levantando a su posición. Asegúrese que los alambres no se
pellizquen entre el motor y el alojamiento
Fijación de la rejilla
Vaya al paso
en la página 37 para fijar la rejilla
ENCENDIDO APAGADO
Instale la lámpara fluorescente incluida
Gire el conjunto de la pieza de cristal como se muestra
hasta que quede trabada en posición
05-HF-008-Sp3.13.06.indd
Solución de problemas
Solución
Solución
Solución
Garantía
2500 Frisco Avenue, Memphis, Tennessee Impreso en China