The water connection can be made using a shutoff valve. This is a more complex installation and should only be attempted by an experienced installer with the proper knowledge and tools.
Open the valve and let a small amount of water run through it into a pan. This will flush the line of sediment.

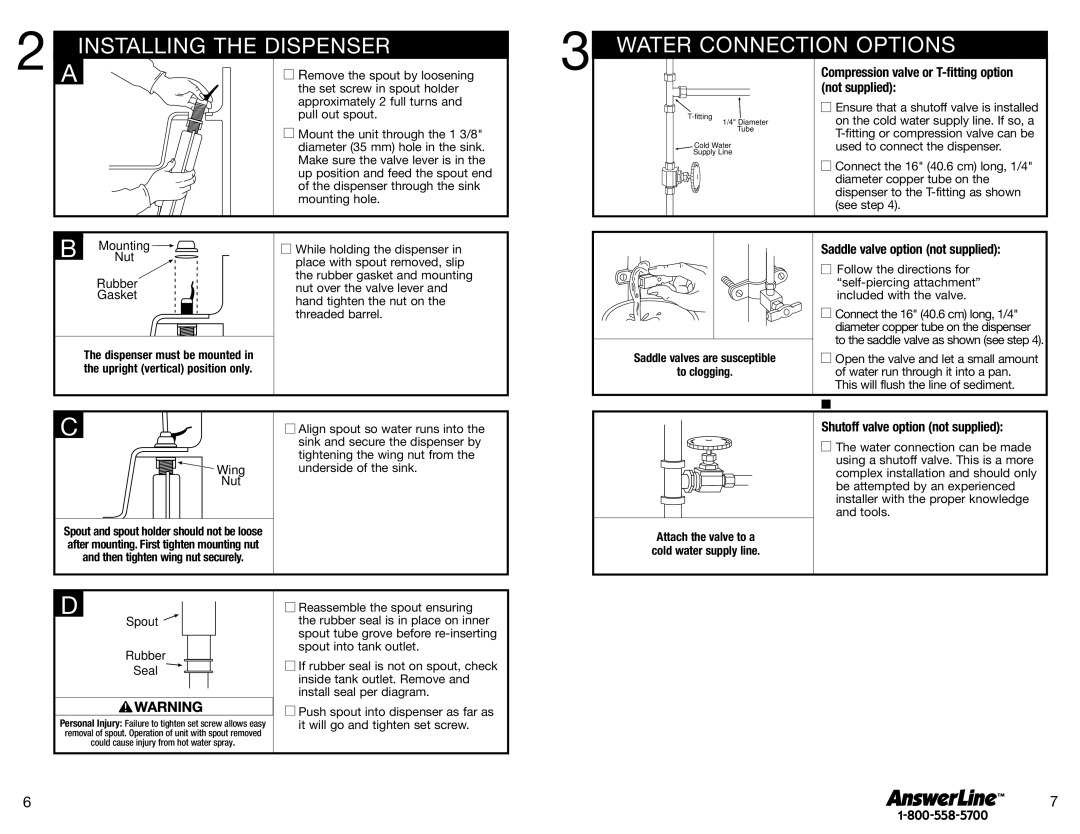
2 INSTALLING THE DISPENSER

3

WATER CONNECTION OPTIONS

A

■ Remove the spout by loosening


the set screw in spout holder


approximately 2 full turns and


pull out spout.


Mount the unit through the 1 3/8"


diameter (35 mm) hole in the sink.


Make sure the valve lever is in the


up position and feed the spout end


of the dispenser through the sink


mounting hole.

T-fitting

1/4" Diameter

Tube

Cold Water

Supply Line

Compression valve or T-fitting option (not supplied):

Ensure that a shutoff valve is installed on the cold water supply line. If so, a T-fitting or compression valve can be used to connect the dispenser.

Connect the 16" (40.6 cm) long, 1/4" diameter copper tube on the dispenser to the T-fitting as shown (see step 4).

B

Mounting

While holding the dispenser in

Nut

place with spout removed, slip


Rubber

the rubber gasket and mounting


nut over the valve lever and


Gasket


hand tighten the nut on the


threaded barrel.

The dispenser must be mounted in the upright (vertical) position only.

Saddle valves are susceptible

to clogging.

Saddle valve option (not supplied):

Follow the directions for “self-piercing attachment” included with the valve.

Connect the 16" (40.6 cm) long, 1/4" diameter copper tube on the dispenser

to the saddle valve as shown (see step 4).

C

Wing

Nut

Spout and spout holder should not be loose after mounting. First tighten mounting nut and then tighten wing nut securely.

Align spout so water runs into the sink and secure the dispenser by tightening the wing nut from the underside of the sink.

Shutoff valve option (not supplied):

Attach the valve to a cold water supply line.

D

Spout

Rubber

Seal

Personal Injury: Failure to tighten set screw allows easy removal of spout. Operation of unit with spout removed could cause injury from hot water spray.

Reassemble the spout ensuring the rubber seal is in place on inner spout tube grove before re-inserting spout into tank outlet.

If rubber seal is not on spout, check inside tank outlet. Remove and install seal per diagram.

Push spout into dispenser as far as it will go and tighten set screw.

6

7

Page 4
Image 4
InSinkErator Hot1 Installing the Dispenser, Saddle valve option not supplied, Shutoff valve option not supplied

Hot1 specifications

The InSinkErator Hot1 is a revolutionary product designed to simplify and enhance your kitchen experience. This innovative appliance delivers instant hot water, making it an invaluable tool for cooking, cleaning, and beverage preparation. Whether you need boiling water for instant coffee or tea, cooking pasta, or cleaning stubborn stains, the InSinkErator Hot1 is designed to deliver immediate hot water at your convenience.

One of the main features of the Hot1 is its impressive heating capability. It can provide water at a temperature of up to 200 degrees Fahrenheit, making it perfect for various culinary and household tasks. The tank of the Hot1 is compact yet powerful, capable of holding a substantial amount of hot water, which means you won’t have to wait for the kettle to boil or use up valuable time preparing hot water.

Technologically, the InSinkErator Hot1 is equipped with advanced insulation, which helps maintain the water temperature while minimizing energy consumption. This feature not only ensures that your hot water is always at the ready but also contributes to increased energy efficiency. The unit's sleek design includes a user-friendly faucet that allows for easy dispensing, making it a safe and convenient option for users of all ages.

In terms of safety, the Hot1 has been engineered with a safety lock mechanism. This feature prevents accidental activation, making it particularly suitable for households with children or pets. The faucet’s ergonomic design further enhances usability, allowing users to comfortably fill up pots or cups without any hassle.

Additionally, the InSinkErator Hot1 is easy to install and can fit seamlessly into most kitchen designs. The durable materials used in the construction of the unit ensure longevity and reliability, giving homeowners peace of mind in their investment. With minimal maintenance required, users can enjoy the convenience of instant hot water without the burden of complicated upkeep.

Overall, the InSinkErator Hot1 stands out in the market for its combination of performance, efficiency, and safety. It's an essential addition to any modern kitchen, providing instant access to hot water for a variety of tasks, and simplifying daily routines. Whether you’re a cooking enthusiast or someone looking to streamline household chores, the InSinkErator Hot1 promises to make your life easier and more enjoyable.