Plumbing and Water Supply
Drain Information
A drain/overflow assembly (sold separately) must be in- stalled on the bath, water tested, and connected to the sani- tary system of the house. After opening the carton, inspect for damage and verify that the kit is of the proper finish. In the Jacuzzi Whirlpool Bath drain/overflow kit, note that the waste flange, strainer, overflow cover and cover screws are pack- aged in a separate package within the kit to protect the trim finish. Follow the installation instructions provided with the drain/overflow kit. After the drain is fully installed, test for proper drainage. If the unit does not drain properly, rectify this condition before proceeding with the installation. Jacuzzi Whirlpool Bath is not responsible for removal and or reinstal- lation costs.
NOTE: Watertight installation of the drain is the installer's responsibility. Drain leakage is excluded from the Jacuzzi Whirlpool Bath warranty of this product.
Plumbing
Pump, jets, and suction fittings for the whirlpool system are factory plumbed in schedule 40 PVC piping.
All Jacuzzi Whirlpool Bath products are factory tested for proper operation and watertight connections prior to shipping. If leaks are detected, notify your Jacuzzi Whirlpool Bath dealer. Do not install the unit.
Water Supply
Consult local authorities for plumbing code requirements in your area.
IMPORTANT: Proper installation of the fill spout plumb- ing and compliance with local codes are the responsibil- ity of the installer. Jacuzzi Whirlpool Bath does not war- rant connections of water supply fittings and piping, fill systems, or drain/overflow systems. Nor is it responsible for damage to the bath which occurs during installation.
CAUTION: A nonflammable protective barrier must be placed between soldering work and bath unit to prevent damage to the bath.
Shower Information
Because of some baths' unique contour design, a rigid shower door cannot readily be installed. If a shower is de- sired, we recommend a
NOTE: Proper installation of a shower is the responsibil- ity of the installer. Jacuzzi Whirlpool Bath is not respon- sible for damage to the unit or for water damage which might occur due to its installation.
Anti-Siphon Valve
Optional
ENGLISH
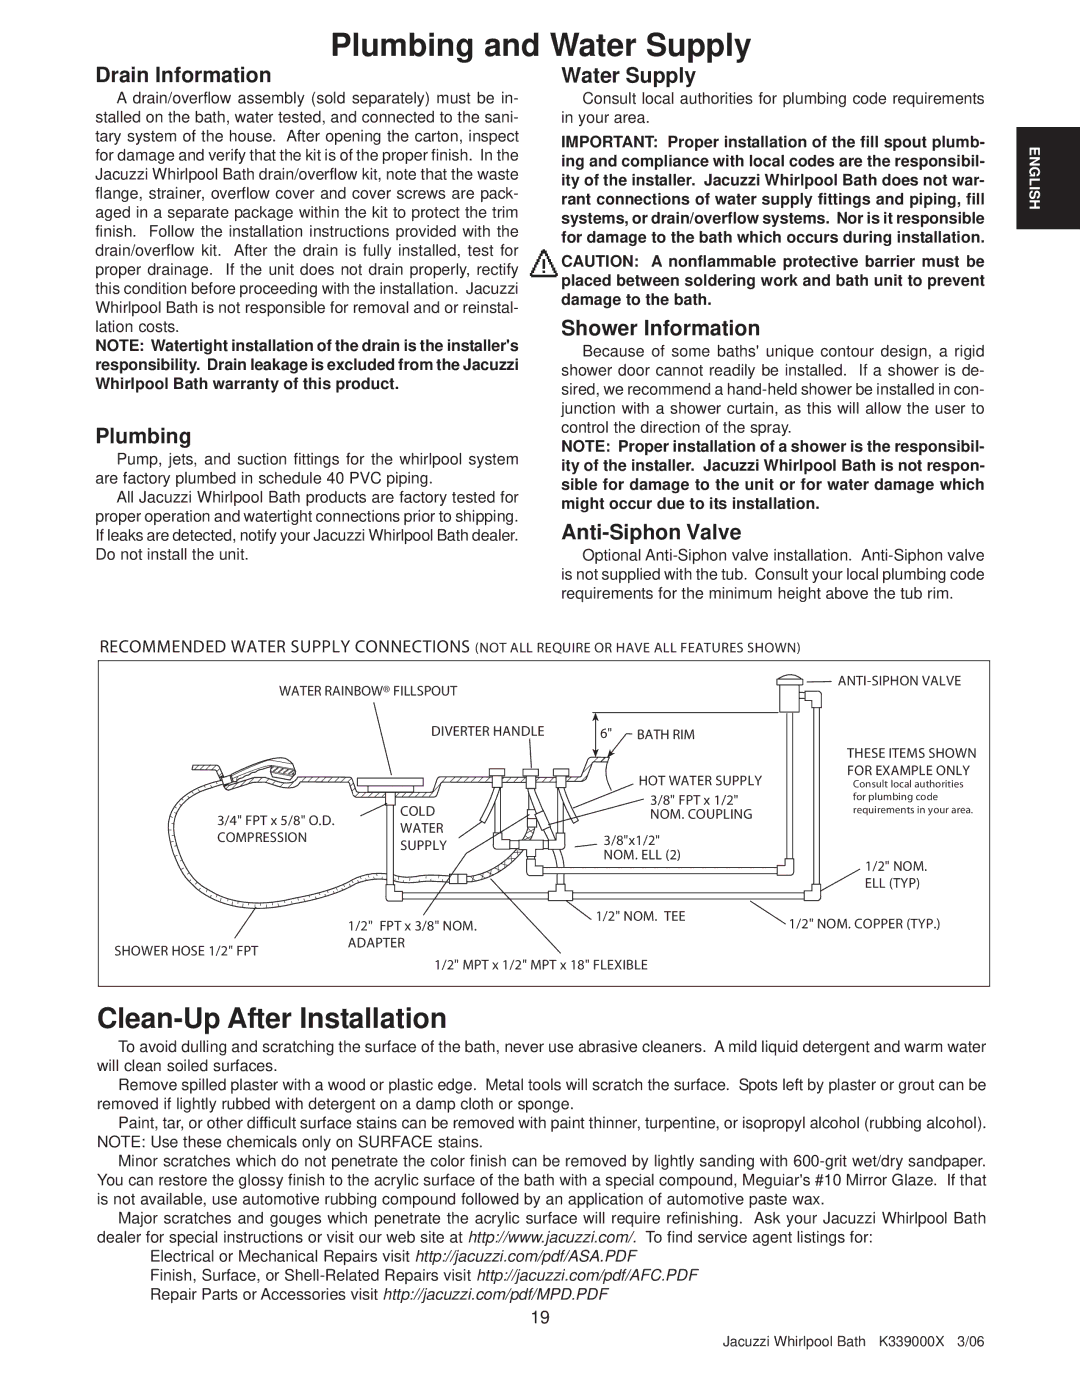
RECOMMENDED WATER SUPPLY CONNECTIONS (NOT ALL REQUIRE OR HAVE ALL FEATURES SHOWN)
WATER RAINBOW® FILLSPOUT
3/4" FPT x 5/8" O.D.
DIVERTER HANDLE
COLD
6" BATH RIM
HOT WATER SUPPLY
3/8" FPT x 1/2"
NOM. COUPLING
THESE ITEMS SHOWN FOR EXAMPLE ONLY
Consult local authorities for plumbing code requirements in your area.
COMPRESSION
WATER SUPPLY
3/8"x1/2" NOM. ELL (2)
1/2" NOM. ELL (TYP)
SHOWER HOSE 1/2" FPT
1/2" FPT x 3/8" NOM. | 1/2" NOM. TEE | 1/2" NOM. COPPER (TYP.) |
|
ADAPTER
1/2" MPT x 1/2" MPT x 18" FLEXIBLE
Clean-Up After Installation
To avoid dulling and scratching the surface of the bath, never use abrasive cleaners. A mild liquid detergent and warm water will clean soiled surfaces.
Remove spilled plaster with a wood or plastic edge. Metal tools will scratch the surface. Spots left by plaster or grout can be removed if lightly rubbed with detergent on a damp cloth or sponge.
Paint, tar, or other difficult surface stains can be removed with paint thinner, turpentine, or isopropyl alcohol (rubbing alcohol). NOTE: Use these chemicals only on SURFACE stains.
Minor scratches which do not penetrate the color finish can be removed by lightly sanding with
Major scratches and gouges which penetrate the acrylic surface will require refinishing. Ask your Jacuzzi Whirlpool Bath dealer for special instructions or visit our web site at http://www.jacuzzi.com/. To find service agent listings for:
Electrical or Mechanical Repairs visit http://jacuzzi.com/pdf/ASA.PDF
Finish, Surface, or
19
Jacuzzi Whirlpool Bath K339000X 3/06