Optional Duct Cover Installation

1.Attach the full-width duct cover to the top of the range hood with the screws provided with duct covers. The duct cover must be attached to the top of the range hood before mounting the range hood to the wall. For information on ordering the optional duct cover, see the “Accessories” section.

Complete Preparation

1.Determine and make all necessary cuts in the wall for the vent system. Install the vent system before installing the range hood. See the “Venting Requirements” section.

2.Determine the location where the power supply cable will be run through the wall.

3.Drill a 1¹⁄₄" (3.2 cm) hole at this location.

4.Pull enough power supply cable through the wall to allow for easy connection to the terminal box.

5.Install the 10" (25.4 cm) square x 10" (25.4 cm) round vent transition with damper to top of the range hood using 4 - 3.5 x 9.5 mm screws.

6.Remove terminal box cover and set aside.

7.Remove knockout from the back of the vent hood and install a UL listed or CSA approved ¹⁄₂" strain relief. See “Make Electrical Connection” section.

8.Place the range hood near its mounting position and run the power supply cable through the strain relief into terminal box (enough to make connection).

9.Tighten the strain relief screws.

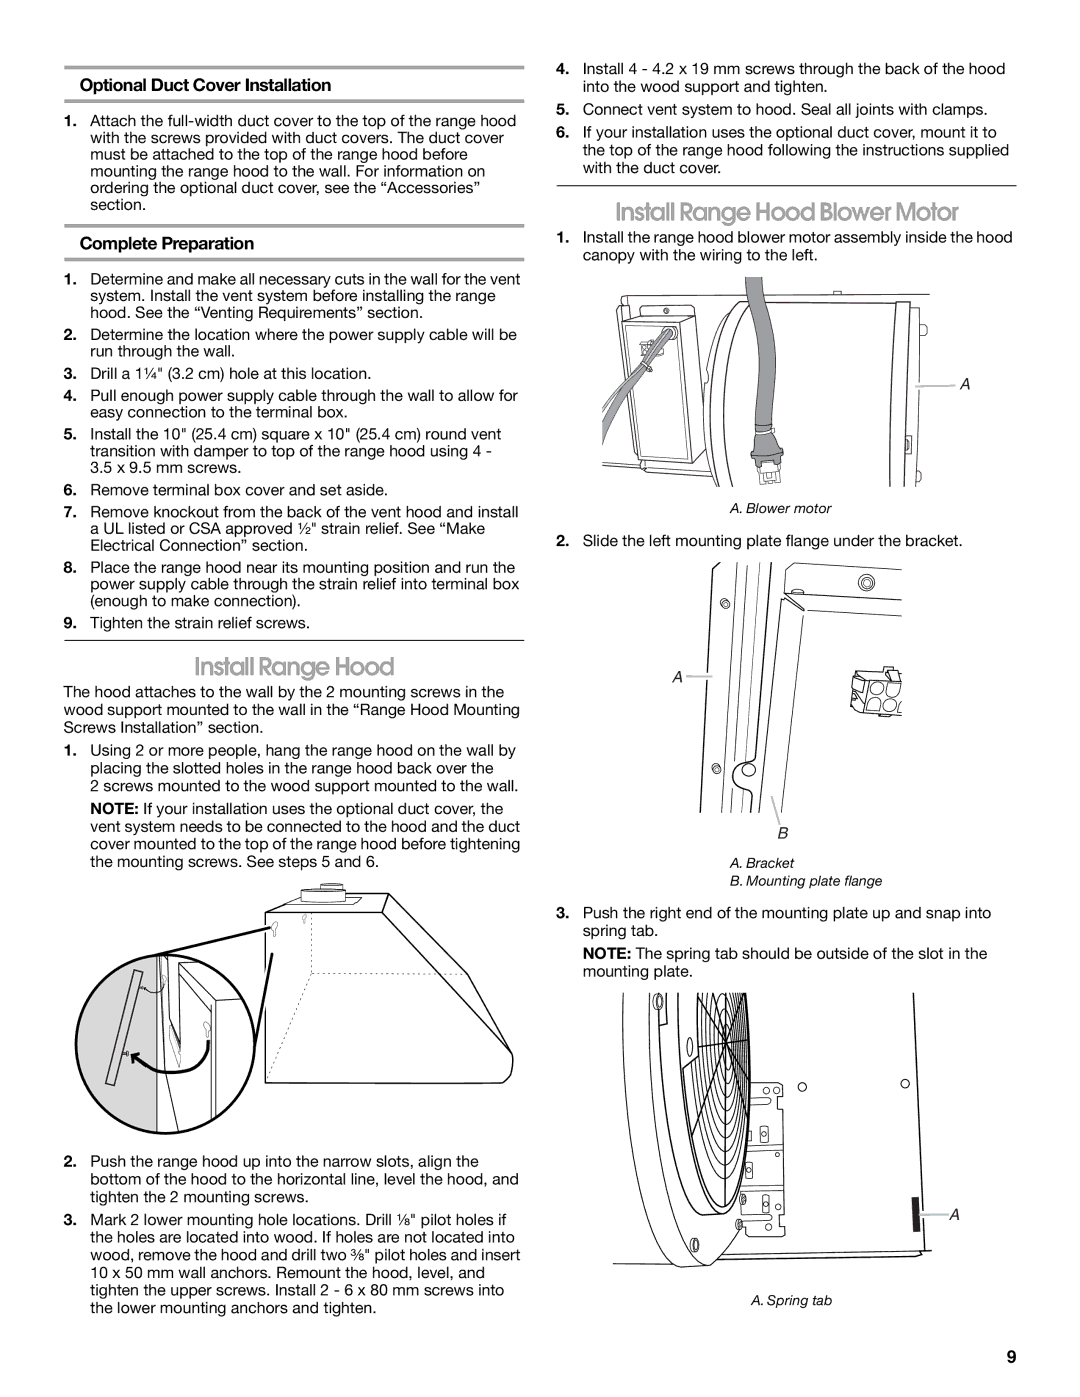
Install Range Hood

The hood attaches to the wall by the 2 mounting screws in the wood support mounted to the wall in the “Range Hood Mounting Screws Installation” section.

1.Using 2 or more people, hang the range hood on the wall by placing the slotted holes in the range hood back over the

2 screws mounted to the wood support mounted to the wall.

NOTE: If your installation uses the optional duct cover, the vent system needs to be connected to the hood and the duct cover mounted to the top of the range hood before tightening the mounting screws. See steps 5 and 6.

4.Install 4 - 4.2 x 19 mm screws through the back of the hood into the wood support and tighten.

5.Connect vent system to hood. Seal all joints with clamps.

6.If your installation uses the optional duct cover, mount it to the top of the range hood following the instructions supplied with the duct cover.

Install Range Hood Blower Motor

1.Install the range hood blower motor assembly inside the hood canopy with the wiring to the left.

A

A. Blower motor

2.Slide the left mounting plate flange under the bracket.

A

B

A.Bracket

B.Mounting plate flange

3.Push the right end of the mounting plate up and snap into spring tab.

NOTE: The spring tab should be outside of the slot in the mounting plate.

2.Push the range hood up into the narrow slots, align the bottom of the hood to the horizontal line, level the hood, and

tighten the 2 mounting screws.

A

3. Mark 2 lower mounting hole locations. Drill ¹⁄₈" pilot holes if

the holes are located into wood. If holes are not located into


wood, remove the hood and drill two ³⁄₈" pilot holes and insert


10 x 50 mm wall anchors. Remount the hood, level, and


tighten the upper screws. Install 2 - 6 x 80 mm screws into

A. Spring tab

the lower mounting anchors and tighten.


9

Page 9
Image 9
Jenn-Air LI3UNB/W10274316B Install Range Hood Blower Motor, Optional Duct Cover Installation, Complete Preparation

LI3UNB/W10274316B specifications

Jenn-Air LI3UNB/W10274316B is an innovative kitchen appliance that brings a sophisticated touch to modern cooking. Designed for discerning culinary enthusiasts, this built-in refrigerator embodies luxury, style, and advanced technology.

One of the standout features of the Jenn-Air LI3UNB is its impressive capacity. With a spacious interior, it provides ample room for all your food and beverages. Its flexible shelving and storage options allow you to configure the layout according to your needs, accommodating everything from tall bottles to small jars.

This refrigerator is equipped with advanced cooling technologies, including the Dual Evaporator system. By utilizing separate evaporators for the refrigerator and freezer compartments, it ensures optimal humidity levels and prevents odor transfer between sections. This technology maintains the freshness of food for longer periods, allowing you to shop for groceries less frequently while enjoying the quality of your ingredients.

The exterior of the LI3UNB is just as striking as its interior. With a sleek and stylish stainless-steel finish, it seamlessly integrates into any kitchen design, exuding elegance and modernity. The appliance comes with an integrated ice maker, offering the convenience of fresh ice without the need for bulky ice trays.

Control is made effortless with the intuitive digital interface, providing users with an easy way to set temperatures, activate functions, and monitor the refrigerator’s performance. The bright interior LED lighting illuminates every corner, allowing for easy visibility of stored items, even when it's packed full.

Energy efficiency is another significant attribute of the Jenn-Air LI3UNB/W10274316B. The appliance meets stringent energy standards, contributing to lower utility bills while minimizing environmental impact. Its Energy Star rating ensures that it operates efficiently without compromising on performance.

In addition to its functional features, the LI3UNB also boasts an ultra-quiet operation, making it an ideal choice for open-concept living spaces. The carefully engineered compressor and cooling system allow it to run quietly, ensuring that it doesn’t disrupt your home environment.

In summary, the Jenn-Air LI3UNB/W10274316B is more than just a refrigerator; it’s a sophisticated appliance designed to meet the needs of today’s modern kitchens. With its spacious design, advanced cooling technologies, energy efficiency, and elegant aesthetics, it stands out as a premium choice for anyone looking to enhance their culinary experience.