W10379137A
Installation Guide
Guide D’INSTALLATION
Manual DE Instalación
Table of Contents
Índice
Table DES Matières
Your safety and the safety of others are very important
Refrigerator Safety
Models
Floating Glass Design
Accessories
Door Handle Kits
Armoire-Style Door Panel Kit
French Door Models
Base Model Number JF42NXFXDW Pro-StyleStainless Design
Base Model Number JF42NXFXDW Kit Model Number JPK42FNXWSS
Base Model Number JF42NXFXDW
Installation Requirements
Tools and Parts
Oiled-Bronze Design
Parts Provided
Parts Needed
Location Requirements
Opening Dimensions
Model Width a Dimension B
Installation Type Depth C as shown above
Reverse Osmosis Water Supply
Electrical Requirements
Recommended Grounding Method
Water Pressure
Product Dimensions
French-Door Bottom-Mount Top View
Front View
Door Swing Dimensions
Cabinet and Panel Installation Options
Tipping Radius
Top View Inset
Fully Integrated Installation Requirements
Frameless Cabinetry
Cabinet Depth 24 60.9 cm Framed Cabinetry
Option 1 Open to Ceiling
Standard Installation-Wood Panel Requirements
Airflow Venting Requirements
Option 2 False Front cabinet face only
Panel Kit Installation Requirements
Standard Grille Bracket Panel Kit Installation Side View
Custom Wood Overlay Panels
Model Reveal ³⁄₈ ¹⁄₈
Custom Wood Overlay Panel Dimensions
Model Bottom-Mount Reveal ³⁄₈ ¹⁄₈
Model French Door Bottom-Mount Reveal ³⁄₈ ¹⁄₈
Install Anti-Tip Boards
Standard Installation Flush Grille Open or Closed Soffit
Unpack the Refrigerator Move the Refrigerator into House
Style 1 Shutoff Valve Connection
To Install Anti-tip Boards
Connect the Water Supply
Connect to Water Line Parts Needed
Plug in Refrigerator
Parts Supplied
Connect to Refrigerator
Move Refrigerator to Final Location
Install Side Trims
Level and Align Refrigerator
Side View
Install Refrigerator and Panels
Install Top Grille Filler standard installation only
Custom Wood Panel Models
Prepare Panels custom wood and panel kits
Predrill Panels custom wood panels only
Predrill Panels panel kits only
Drawer Panel
Remove Trim Pieces
Install Door Panels
Complete Installation
Install Drawer Panel
Install Top Grille Panel
Door Swing Adjustment
Install Handles
Door Panels Floating Glass Design
Tools Needed ³⁄₃₂ Hex key
Mounting Post
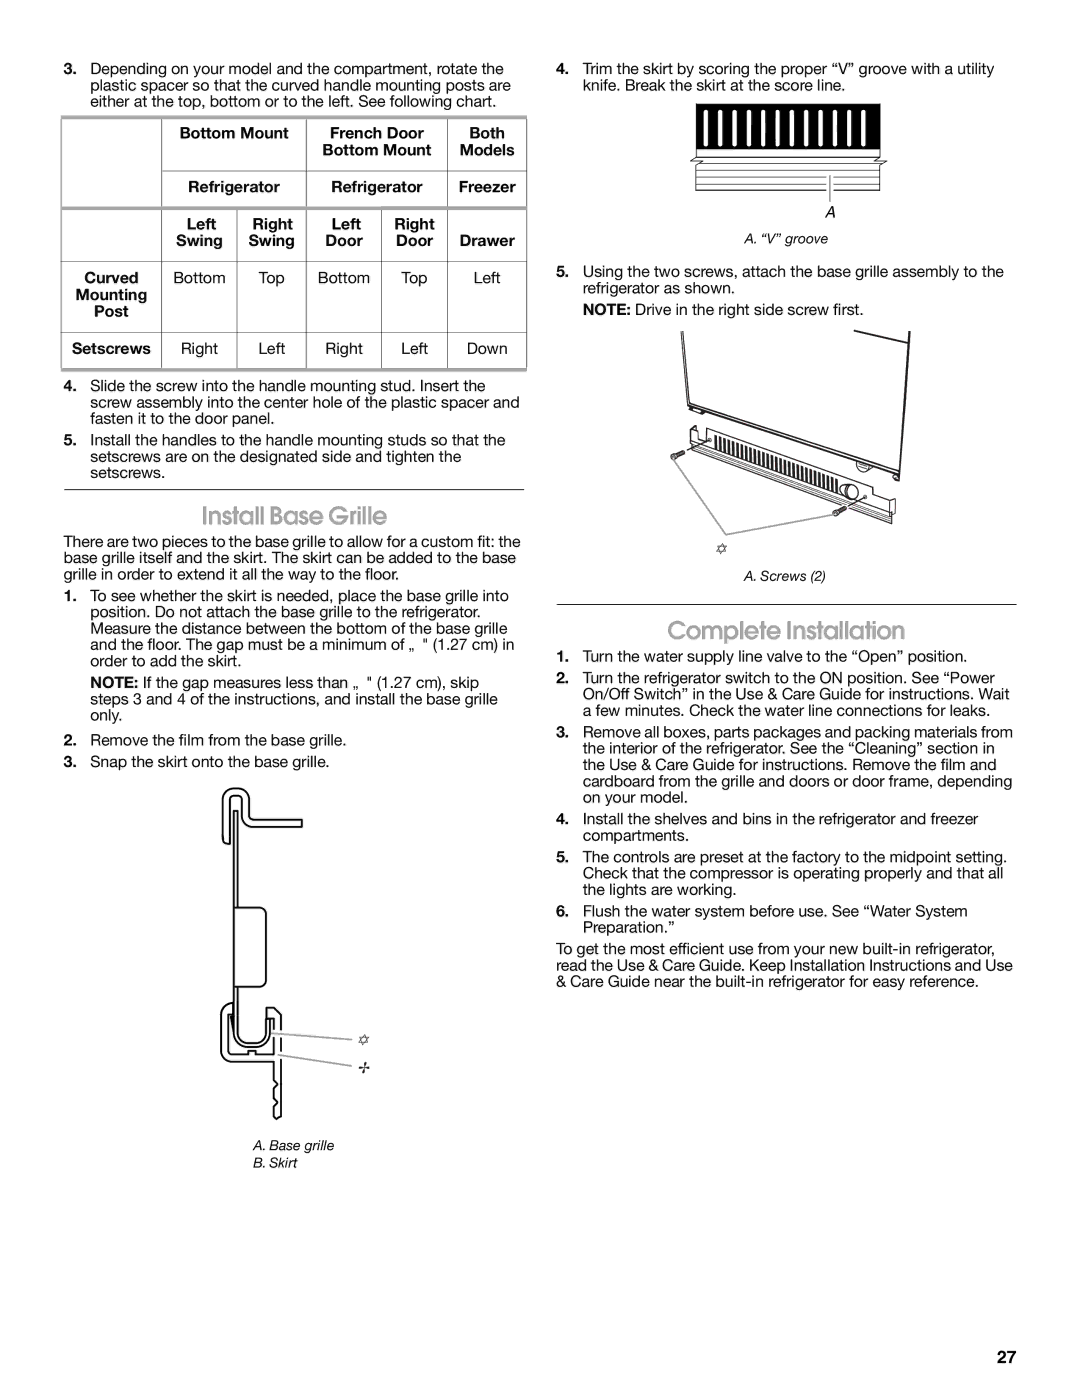
Install Base Grille
Complete Installation
Bottom
Su seguridad y la seguridad de los demás es muy importante
Seguridad DEL Refrigerador
Diseño incorporado
Modelos DE
Diseño de vidrio flotante
Accesorios
Juegos de manijas para la puerta
Juego de panel para la puerta estilo armario
Diseño incorporado
Importante
Requisitos DE Instalación
Piezas y herramientas
Diseño en bronce lubricado
Piezas Provistas
Piezas Necesarias
Dimensiones de la abertura
Requisitos de ubicación
W10222282 Rejilla
Tipo de instalación Profundidad C como se Muestra arriba
Requisitos eléctricos
Método de conexión a tierra recomendado
Modelo Ancho a Medida B Como se muestra Arriba
Requisitos del suministro de agua
Dimensiones del producto
Arco de vuelco lateral modelos de 42 106,7 cm
Arco de vuelco
Medidas de oscilación de las puertas
Arco de vuelco lateral modelos de 36 91,4 cm
Profundidad del armario 24 60,9 cm
Opciones para la instalación del armario y los paneles
Profundidad del armario 25 63,5 cm Armarios con marcos
Armarios sin marco
Requisitos para la instalación completamente incorporada
Requisitos de flujo de aire y ventilación
Opción 1 Abierto hacia el techo
Soporte estándar de rejilla
Instalación estándar Requisitos para el panel de madera
Requisitos de instalación del Juego de paneles
Instalación estándar Vista completa del producto
Paneles de madera recubiertos La medida
Modelo de 36 91,4 cm Paneles de la puerta y del cajón
Modelo Congelador en la parte inferior, de Mocheta ³⁄₈ ¹⁄₈
Modelo Mocheta ³⁄₈ ¹⁄₈
Instrucciones DE Instalación
Desempaque el refrigerador
Modelo de 42 106,7 cm Paneles de la puerta y del cajón
Cómo introducir el refrigerador En la casa
Cómo instalar los tableros antivuelco
Conexión del suministro de agua
Estilo 2 Conexión de la tubería de cobre
Piezas suministradas
Conexión al refrigerador
Cómo enchufar el refrigerador
Instalación de las molduras laterales
Nivelación y alineamiento Del refrigerador
Cómo mover el refrigerador a su Ubicación final
Instalación del refrigerador y los paneles
Vista lateral
Modelos con panel de madera a la medida
Modelos con juego de paneles
Panel de la puerta
Taladre previamente los paneles juegos de paneles solamente
Panel del cajón
Panel para la rejilla superior
Notas
Saque las piezas de la moldura
Cómo instalar los paneles de la puerta
Instalación del panel del cajón
Instalación estándar Rejilla alineada
Instalación del panel para la rejilla superior
Cómo ajustar la oscilación de las puertas
Complete la instalación
Paneles de la puerta Diseño de vidrio flotante
Instalación de las manijas
Cómo terminar la instalación
Instalación de la rejilla de la base
Votre sécurité et celle des autres est très importante
Sécurité DU Réfrigérateur
Conception intégrée
Modèles DE
Conception de verre flottant
Accessoires
Ensembles de poignées de porte
Ensemble de panneaux pour porte de style armoire
Modèles DE Porte À Double Battant DE
Outillage Requis
Exigences D’INSTALLATION
Outillage et pièces
Conception bronze huilé
W10142233 1163283
Pièces Nécessaires
Pièces Fournies
W10141645 W10141189
Exigences demplacement
Dimensions de l’ouverture d’encastrement
W10222278 Congélateur en bas W10222282 Grille
Spécifications électriques
Méthode recommandée de mise à la terre
Spécifications de l’alimentation en eau
Dimensions du produit
Rayon de basculement latéral modèles de 42 106,7 cm
Dimensions pour l’ouverture des portes
Rayon de basculement
Rayon de basculement latéral modèles de 36 91,4 cm
Profondeur de placard 24 60,9 cm
Options d’installation du placard et du panneau
Profondeur de placard 25 63,5 cm Meubles à encadrement
Meubles sans encadrement
Exigences d’une installation totalement intégrée
Exigences de circulation dair pour laération
Option 1 Ouverture vers le plafond
Support de grille standard
Installation standard Spécifications pour panneau en bois
Installation standard Vue complète du produit
Option 2 Avant décoratif façade de meuble uniquement
Panneaux de bois décoratifs Personnalisés
Spécifications pour l’installation de l’ensemble de panneaux
Dimensions des panneaux de bois décoratifs
Modèle Avec congélateur en bas Retrait ³⁄₈ ¹⁄₈
Modèle Retrait
Installation de planches antibasculement
Instructions ’INSTALLATION
Style 1 Connexion avec robinet darrêt
Installation des planches antibasculement
Raccordement à lalimentation en eau
Raccordement à la canalisation deau Pièces nécessaires
Brancher le réfrigérateur
Raccordement au réfrigérateur
Pièces fournies
Déplacement du réfrigérateur à son Emplacement définitif
Installation des garnitures latérales
Réglage de laplomb et alignement Du réfrigérateur
Installation du réfrigérateur et Des panneaux
Modèles avec panneau de bois personnalisé
Vue latérale
Modèles avec panneaux fournis
Panneau de la grille supérieure
Gabarits de perçage Ensembles avec panneaux uniquement
Panneau de porte
Panneau de tiroir
Dépose des garnitures
Installation des panneaux de porte
Installation intégrée Grille de pleine hauteur
Installation du panneau du tiroir
Installation du panneau de la grille supérieure
Installation standard Grille affleurante
Achever linstallation
Installation des poignées
Installation de la grille de la base
Panneaux de porte Conception de verre flottant
W10379137A
Achever l’installation