MCD10

Flat Surface

a.Stick the supplied double-sided tape to the bottom of the mounting bases (B) and peel off the paper backing.

b.Drill holes for the self-tapping screws (T5x12).

c.Install self-tapping screws to secure the mounting base to the surface.

d.Affix the unit to the floor by pressing in place.

Carpeted Surface

a.Pull the carpet back.

b.Stick the supplied double-sided tape to the bottom of the mounting bases (B) and peel off the paper backing.

c.Drill holes for the self-tapping screws (T5x12).

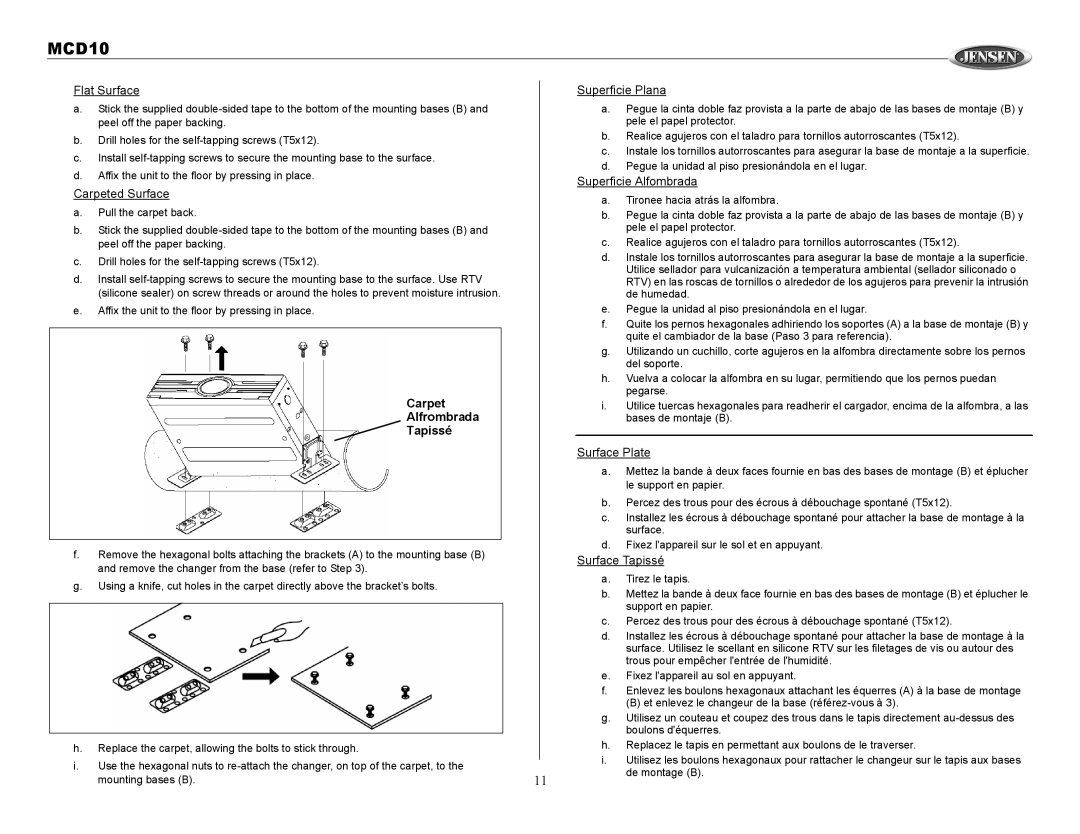
d.Install self-tapping screws to secure the mounting base to the surface. Use RTV (silicone sealer) on screw threads or around the holes to prevent moisture intrusion.

e.Affix the unit to the floor by pressing in place.

Carpet

Alfrombrada

Tapissé

f.Remove the hexagonal bolts attaching the brackets (A) to the mounting base (B) and remove the changer from the base (refer to Step 3).

g.Using a knife, cut holes in the carpet directly above the bracket’s bolts.

h.Replace the carpet, allowing the bolts to stick through.

i.Use the hexagonal nuts to re-attach the changer, on top of the carpet, to the mounting bases (B).

Superficie Plana

a.Pegue la cinta doble faz provista a la parte de abajo de las bases de montaje (B) y pele el papel protector.

b.Realice agujeros con el taladro para tornillos autorroscantes (T5x12).

c.Instale los tornillos autorroscantes para asegurar la base de montaje a la superficie.

d.Pegue la unidad al piso presionándola en el lugar.

Superficie Alfombrada

a.Tironee hacia atrás la alfombra.

b.Pegue la cinta doble faz provista a la parte de abajo de las bases de montaje (B) y pele el papel protector.

c.Realice agujeros con el taladro para tornillos autorroscantes (T5x12).

d.Instale los tornillos autorroscantes para asegurar la base de montaje a la superficie. Utilice sellador para vulcanización a temperatura ambiental (sellador siliconado o RTV) en las roscas de tornillos o alrededor de los agujeros para prevenir la intrusión de humedad.

e.Pegue la unidad al piso presionándola en el lugar.

f.Quite los pernos hexagonales adhiriendo los soportes (A) a la base de montaje (B) y quite el cambiador de la base (Paso 3 para referencia).

g.Utilizando un cuchillo, corte agujeros en la alfombra directamente sobre los pernos del soporte.

h.Vuelva a colocar la alfombra en su lugar, permitiendo que los pernos puedan pegarse.

i.Utilice tuercas hexagonales para readherir el cargador, encima de la alfombra, a las bases de montaje (B).

Surface Plate

a.Mettez la bande à deux faces fournie en bas des bases de montage (B) et éplucher le support en papier.

b.Percez des trous pour des écrous à débouchage spontané (T5x12).

c.Installez les écrous à débouchage spontané pour attacher la base de montage à la surface.

d.Fixez l'appareil sur le sol et en appuyant.

Surface Tapissé

a.Tirez le tapis.

b.Mettez la bande à deux face fournie en bas des bases de montage (B) et éplucher le support en papier.

c.Percez des trous pour des écrous à débouchage spontané (T5x12).

d.Installez les écrous à débouchage spontané pour attacher la base de montage à la surface. Utilisez le scellant en silicone RTV sur les filetages de vis ou autour des trous pour empêcher l'entrée de l'humidité.

e.Fixez l'appareil au sol en appuyant.

f.Enlevez les boulons hexagonaux attachant les équerres (A) à la base de montage

(B) et enlevez le changeur de la base (référez-vous à 3).

g.Utilisez un couteau et coupez des trous dans le tapis directement au-dessus des boulons d'équerres.

h.Replacez le tapis en permettant aux boulons de le traverser.

i.Utilisez les boulons hexagonaux pour rattacher le changeur sur le tapis aux bases

11de montage (B).

Page 11
Image 11
Jensen MCD10 owner manual

MCD10 specifications

The Jensen MCD10 is a state-of-the-art multimedia car receiver that embodies innovation and performance, catering to the demands of modern drivers. Designed for both utility and entertainment, this unit integrates a variety of features that enhance the in-car experience while ensuring optimal functionality.

One of the standout features of the Jensen MCD10 is its large touchscreen display, which boasts an intuitive user interface. The 10-inch LCD screen provides crystal-clear visuals for navigation, playback, and operating various functions. The high-resolution display enhances the viewing experience, making it easier for users to access their favorite media, adjust settings, and respond to navigation prompts without distraction.

In terms of connectivity, the MCD10 excels with its support for both Bluetooth and USB inputs. Bluetooth technology allows for hands-free calling and wireless streaming of music from smartphones or tablets, promoting a safer driving experience. The USB ports enable users to connect and charge devices while also accessing music files stored on USB drives. Additionally, the receiver is compatible with both Apple CarPlay and Android Auto, further bridging the gap between smart devices and the vehicle's infotainment system.

The multimedia capabilities of the Jensen MCD10 are comprehensive, supporting various audio and video formats, ensuring that users can enjoy their favorite content without hassle. The device includes features like a built-in DVD player, which adds an extra layer of functionality for road trips or extended journeys.

Another significant characteristic of the MCD10 is its customizable sound settings, allowing users to tailor the audio experience to their personal preferences. The integrated equalizer, along with built-in amplifier options, provides exceptional sound quality for music enthusiasts, ensuring that every note is crisp and clear.

Safety features have also been thoughtfully incorporated into the design of the Jensen MCD10. With the incorporation of a backup camera input, drivers can enhance their situational awareness when reversing, making it easier to avoid obstacles.

In conclusion, the Jensen MCD10 is a feature-rich multimedia car receiver that combines cutting-edge technology with user-friendly design. Its large touchscreen, extensive connectivity options, multimedia capabilities, customizable audio settings, and safety features make it a compelling choice for anyone looking to upgrade their in-car entertainment system while enjoying a seamless integration with their digital life.