(Fig. e)
(Fig. d)

A

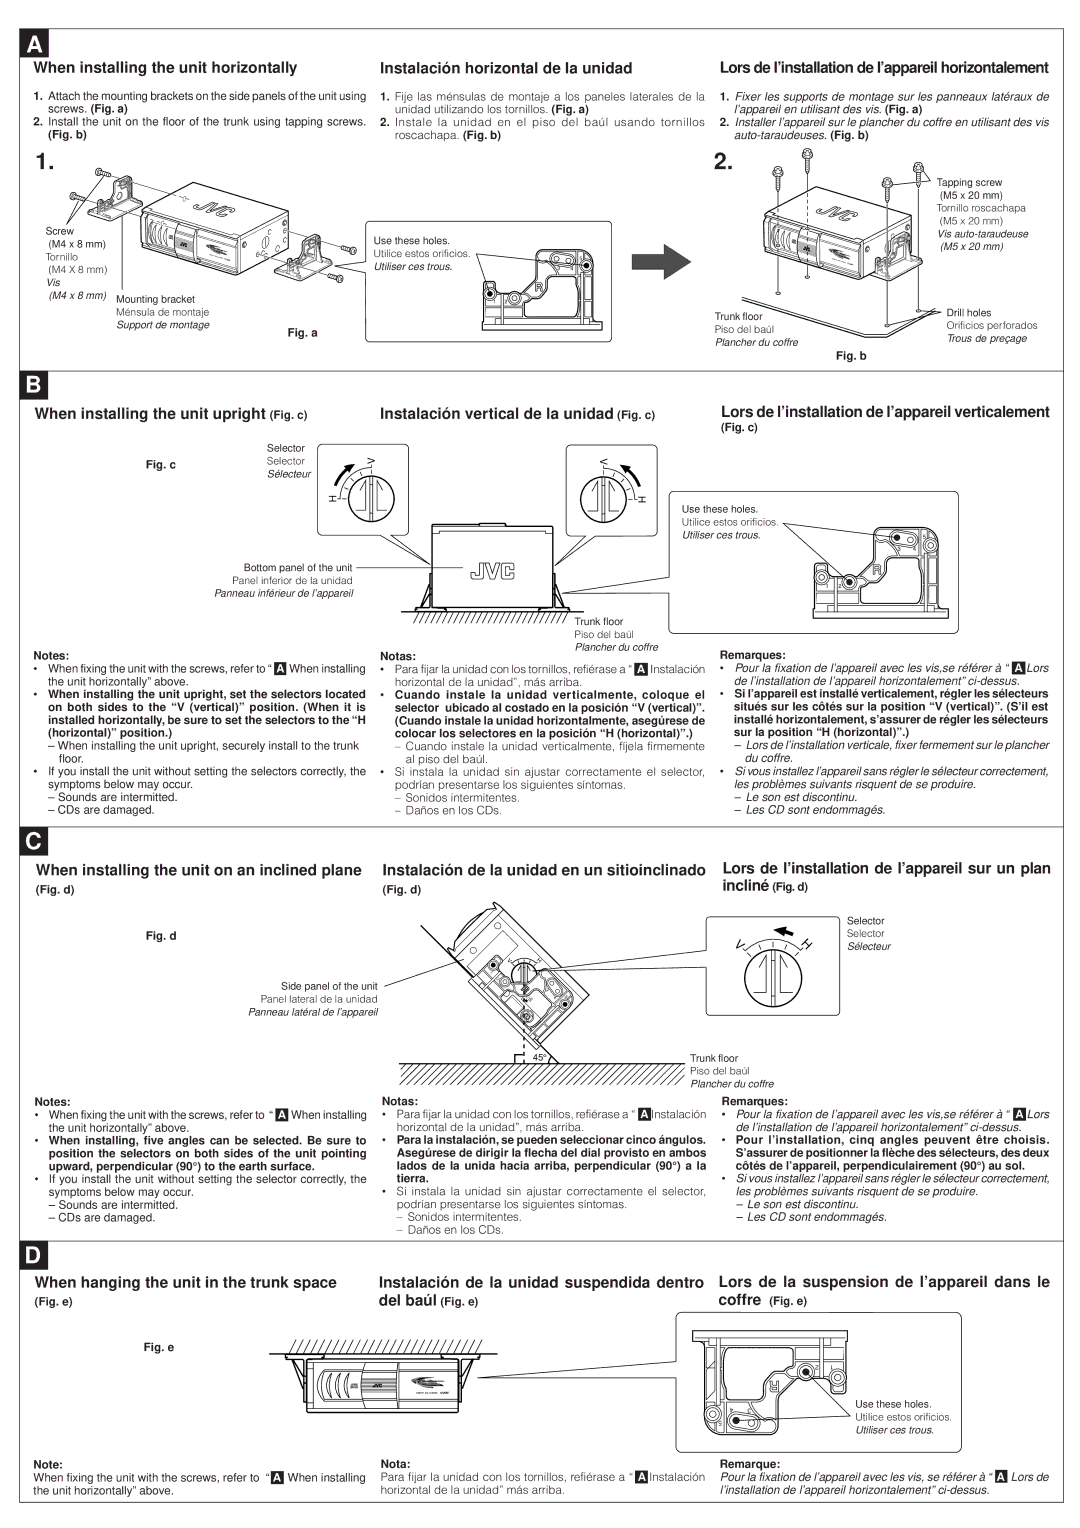
When installing the unit horizontally

1.Attach the mounting brackets on the side panels of the unit using screws. (Fig. a)

2.Install the unit on the floor of the trunk using tapping screws.

(Fig. b)

Instalación horizontal de la unidad

1.Fije las ménsulas de montaje a los paneles laterales de la unidad utilizando los tornillos. (Fig. a)

2.Instale la unidad en el piso del baúl usando tornillos roscachapa. (Fig. b)

Lors de l’installation de l’appareil horizontalement

1.Fixer les supports de montage sur les panneaux latéraux de l’appareil en utilisant des vis. (Fig. a)

2.Installer l’appareil sur le plancher du coffre en utilisant des vis auto-taraudeuses. (Fig. b)

1.

Screw


(M4 x 8 mm)


Tornillo

C


12–DISC


OMPACT

DISC C


HANGER


(M4 X 8 mm)


Vis


(M4 x 8 mm)

Mounting bracket


Ménsula de montaje


Support de montage


Use these holes.

Utilice estos orificios.

5

Utiliser ces trous.

3 4

1

2

Fig. a

2.

Trunk floor

Piso del baúl

Plancher du coffre


Tapping screw


(M5 x 20 mm)


Tornillo roscachapa


(M5 x 20 mm)


Vis auto-taraudeuse


(M5 x 20 mm)

CO


MPACT DISC

CHANGER


12–DISC


Drill holes


Orificios perforados


Trous de preçage

Fig. b

B

When installing the unit upright (Fig. c)

Selector

Fig. cSelector

Sélecteur

H

Bottom panel of the unit

Panel inferior de la unidad

Panneau inférieur de l’appareil

Instalación vertical de la unidad (Fig. c)

V

V

H

Trunk floor

Lors de l’installation de l’appareil verticalement

(Fig. c)

Use these holes.


Utilice estos orificios.


Utiliser ces trous.

5

3

4

1

2

Notes:

When fixing the unit with the screws, refer to “ A When installing the unit horizontally” above.

When installing the unit upright, set the selectors located on both sides to the “V (vertical)” position. (When it is installed horizontally, be sure to set the selectors to the “H (horizontal)” position.)

When installing the unit upright, securely install to the trunk floor.

If you install the unit without setting the selectors correctly, the symptoms below may occur.

Sounds are intermitted.

CDs are damaged.

Piso del baúl

Plancher du coffre

Notas:

Para fijar la unidad con los tornillos, refiérase a “ A Instalación horizontal de la unidad”, más arriba.

Cuando instale la unidad verticalmente, coloque el selector ubicado al costado en la posición “V (vertical)”. (Cuando instale la unidad horizontalmente, asegúrese de colocar los selectores en la posición “H (horizontal)”.)

Cuando instale la unidad verticalmente, fíjela firmemente al piso del baúl.

Si instala la unidad sin ajustar correctamente el selector, podrían presentarse los siguientes síntomas.

Sonidos intermitentes.

Daños en los CDs.

Remarques:

Pour la fixation de l’appareil avec les vis,se référer à “ A Lors de l’installation de l’appareil horizontalement” ci-dessus.

Si l’appareil est installé verticalement, régler les sélecteurs situés sur les côtés sur la position “V (vertical)”. (S’il est installé horizontalement, s’assurer de régler les sélecteurs sur la position “H (horizontal)”.)

Lors de l’installation verticale, fixer fermement sur le plancher du coffre.

Si vous installez l’appareil sans régler le sélecteur correctement, les problèmes suivants risquent de se produire.

Le son est discontinu.

Les CD sont endommagés.

C

When installing the unit on an inclined plane

Instalación de la unidad en un sitioinclinado

(Fig. d)

(Fig. d)


Fig. d


V

H

Lors de l’installation de l’appareil sur un plan incliné

Selector

Selector

V

H

Sélecteur


Side panel of the unit

Panel lateral de la unidad

Panneau latéral de l’appareil

1

2


3


NO

4

5

USE


45°

Trunk floor

Piso del baúl

Plancher du coffre

Notes:

When fixing the unit with the screws, refer to “ A When installing the unit horizontally” above.

When installing, five angles can be selected. Be sure to position the selectors on both sides of the unit pointing upward, perpendicular (90°) to the earth surface.

If you install the unit without setting the selector correctly, the symptoms below may occur.

Sounds are intermitted.

CDs are damaged.

Notas:

Para fijar la unidad con los tornillos, refiérase a “ A Instalación horizontal de la unidad”, más arriba.

Para la instalación, se pueden seleccionar cinco ángulos. Asegúrese de dirigir la flecha del dial provisto en ambos lados de la unida hacia arriba, perpendicular (90°) a la tierra.

Si instala la unidad sin ajustar correctamente el selector, podrían presentarse los siguientes síntomas.

Sonidos intermitentes.

Daños en los CDs.

Remarques:

Pour la fixation de l’appareil avec les vis,se référer à “ A Lors de l’installation de l’appareil horizontalement” ci-dessus.

Pour l’installation, cinq angles peuvent être choisis. S’assurer de positionner la flèche des sélecteurs, des deux côtés de l’appareil, perpendiculairement (90°) au sol.

Si vous installez l’appareil sans régler le sélecteur correctement, les problèmes suivants risquent de se produire.

Le son est discontinu.

Les CD sont endommagés.

D

When hanging the unit in the trunk space

Instalación de la unidad suspendida dentro

(Fig. e)

del baúl (Fig. e)

Lors de la suspension de l’appareil dans le coffre

Fig. e

COMPACT DISC CHANGER

12–DISC

2

1

Use these holes.

4

3

5

Utilice estos orificios.

Utiliser ces trous.


Note:

When fixing the unit with the screws, refer to “ A the unit horizontally” above.

Nota:

When installing Para fijar la unidad con los tornillos, refiérase a “ horizontal de la unidad” más arriba.

Remarque:

A Instalación Pour la fixation de l’appareil avec les vis, se référer à “ l’installation de l’appareil horizontalement” ci-dessus.

A

Lors de

Page 2
Image 2
JVC CH-X350 user service When installing the unit horizontally, Instalación horizontal de la unidad, Del baúl Fig. e

CH-X350 specifications

The JVC CH-X350 and CH-X300 car CD changers are remarkable examples of automotive audio technology, offering a seamless integration of functionality and sound quality. These models cater to music enthusiasts who desire both convenience and superior listening experiences while on the road.

One of the standout features of the CH-X350 and CH-X300 is their ability to store and play a large number of CDs. The CH-X350 provides a capacity of up to 12 discs, allowing users to enjoy hours of uninterrupted music. This is particularly beneficial for long road trips, where having a diverse array of music at your fingertips can enhance the journey. The CH-X300 offers a similar capacity, ensuring that drivers can always have their favorite albums readily available.

Both the CH-X350 and CH-X300 utilize advanced digital audio processing technologies to ensure that sound quality remains exceptional. JVC has incorporated high-resolution audio playback capabilities, resulting in clearer highs, defined mids, and powerful lows. Additionally, the incorporation of anti-shock protection minimizes disruptions caused by bumps in the road, allowing for smooth and continuous playback of your favorite tunes.

The user interface of these changers is designed with simplicity and ease of use in mind. The systems feature intuitive controls that make navigating through tracks and CDs straightforward. Moreover, they are compatible with a variety of audio formats, including standard CD audio and CD-R/RW discs, offering flexibility depending on the listener's preferences.

Another notable feature is the optical digital output option, which allows for a direct connection to external digital devices. This ensures that the audio quality is maintained and can be further enhanced when integrated with high-end sound systems.

In terms of installation, both models are designed to fit seamlessly into most vehicles with minimal modification required. They can be easily integrated with existing car stereos, providing an upgraded audio experience without the need for a complete system overhaul.

In conclusion, the JVC CH-X350 and CH-X300 CD changers stand out with their impressive storage capacity, superior sound quality, and user-friendly features. These devices are ideal for anyone looking to elevate their in-car audio experience, making every drive enjoyable and memorable. With JVC's dedication to quality and innovation, these models have successfully carved out a niche in the automotive audio landscape.