Filename [MV5S_08Basic TimerDub.fm]


MV5S_00.book Page 39 Wednesday, August 31, 2005 4:55 PM

Masterpage:Right+


EDITING EN 39


Disc Dubbing (From DVD To VHS)

1 For DVD deck


Load a disc you want to dub.


For VHS deck

Dubbing An Entire Disc

Load a cassette with the record safety tab intact.


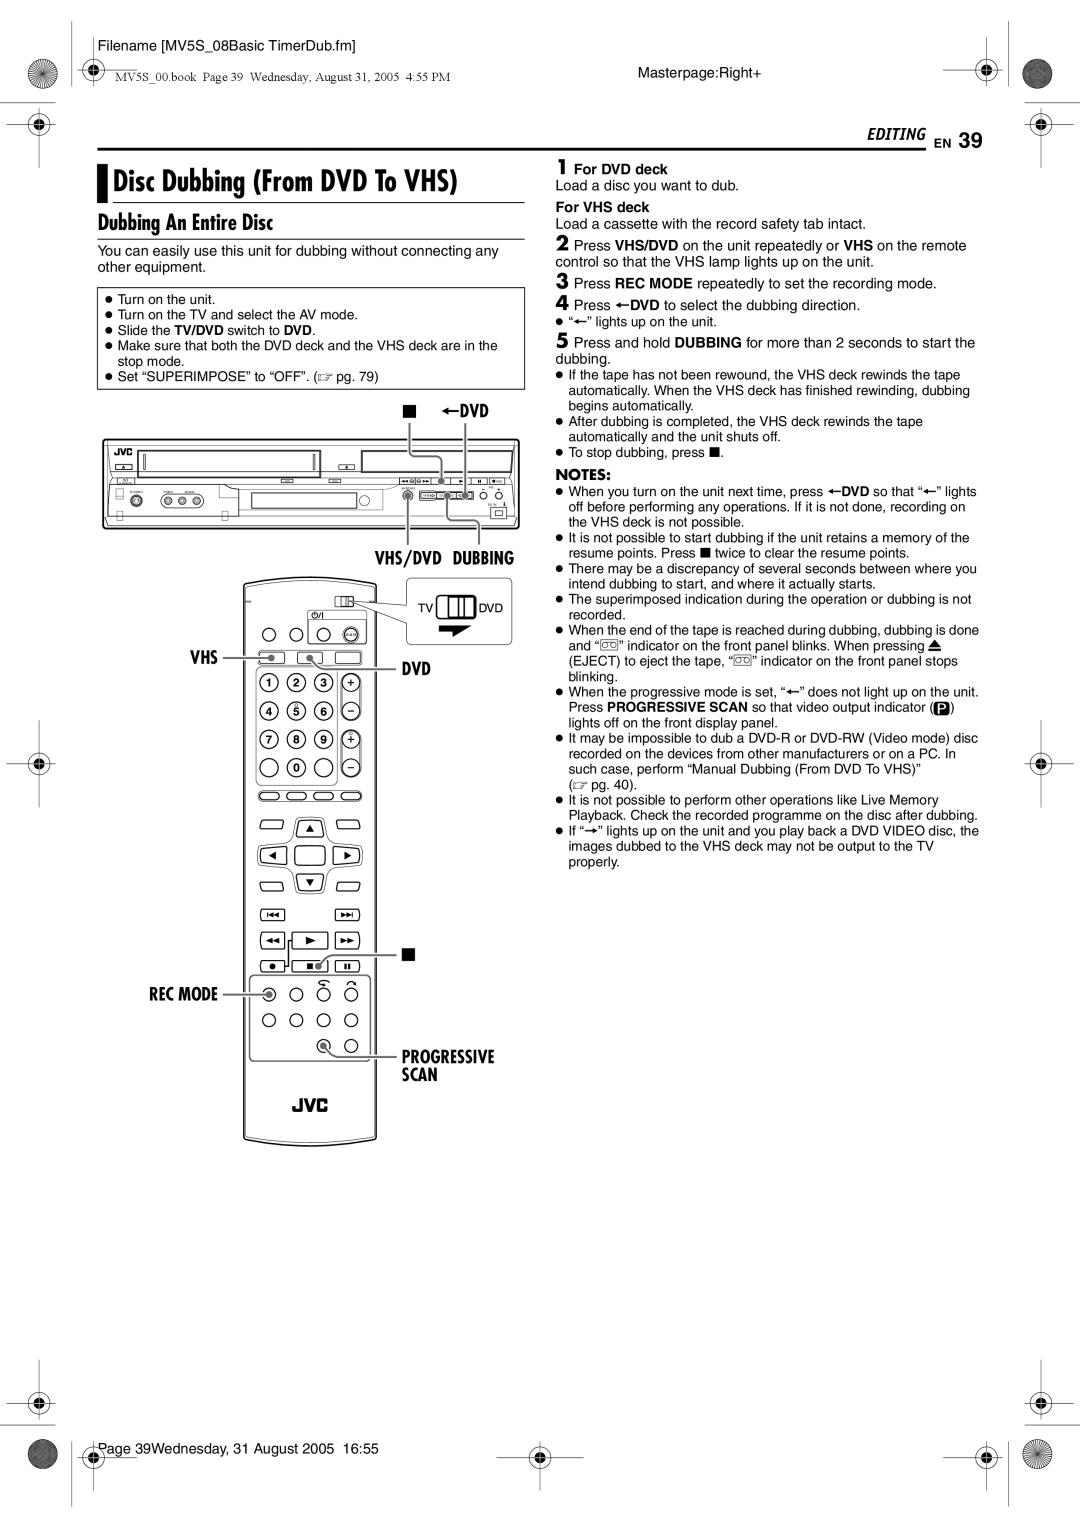
2 Press VHS/DVD on the unit repeatedly or VHS on the remote

You can easily use this unit for dubbing without connecting any

other equipment.

control so that the VHS lamp lights up on the unit.


3 Press REC MODE repeatedly to set the recording mode.


Turn on the unit.


4 Press }DVD to select the dubbing direction.


Turn on the TV and select the AV mode.


}” lights up on the unit.


Slide the TV/DVD switch to DVD.


5 Press and hold DUBBING for more than 2 seconds to start the

Make sure that both the DVD deck and the VHS deck are in the

stop mode.


dubbing.


Set “SUPERIMPOSE” to “OFF”. ( pg. 79)


If the tape has not been rewound, the VHS deck rewinds the tape


automatically. When the VHS deck has finished rewinding, dubbing


}DVD

begins automatically.


After dubbing is completed, the VHS deck rewinds the tape


automatically and the unit shuts off.


To stop dubbing, press 8.


STANDBY/ON


VHS

DVD

REC

NOTES:


VHS

DUBBING DVD

When you turn on the unit next time, press }DVD so that “}” lights


VHS/DVD

PR


S-VIDEO

VIDEO

AUDIO


off before performing any operations. If it is not done, recording on


DV IN


the VHS deck is not possible.


It is not possible to start dubbing if the unit retains a memory of the


VHS/DVD DUBBING

resume points. Press 8 twice to clear the resume points.


There may be a discrepancy of several seconds between where you


intend dubbing to start, and where it actually starts.


The superimposed indication during the operation or dubbing is not


recorded.


When the end of the tape is reached during dubbing, dubbing is done


VHS


and “[” indicator on the front panel blinks. When pressing x


DVD


(EJECT) to eject the tape, “[” indicator on the front panel stops


blinking.


When the progressive mode is set, “}” does not light up on the unit.


Press PROGRESSIVE SCAN so that video output indicator (

)


lights off on the front display panel.


It may be impossible to dub a DVD-R or DVD-RW (Video mode) disc


recorded on the devices from other manufacturers or on a PC. In


such case, perform “Manual Dubbing (From DVD To VHS)”


( pg. 40).


It is not possible to perform other operations like Live Memory


Playback. Check the recorded programme on the disc after dubbing.


If “]” lights up on the unit and you play back a DVD VIDEO disc, the


images dubbed to the VHS deck may not be output to the TV


properly.


REC MODE

PROGRESSIVE

SCAN

Page 39Wednesday, 31 August 2005 16:55

Page 39
Image 39
JVC DR-MV5BE manual Dubbing An Entire Disc, VHS/DVD Dubbing, REC Mode Progressive Scan

DR-MV5BE specifications

The JVC DR-MV5BE is a versatile and feature-rich DVD recorder and VCR combo that caters to the needs of users looking to digitize their home video collection while enjoying the convenience of a dual-format device. This innovative unit combines both DVD recording and VHS playback capabilities, making it a valuable addition to any home entertainment setup.

At the core of the JVC DR-MV5BE’s functionality is its ability to record directly onto DVD discs, offering several formats including DVD-R, DVD-RW, and DVD+R. This flexibility allows users to choose the best format suited for their recording needs, whether they prioritize compatibility with other devices or rewritable options. The device also supports various recording modes, from high-quality SP mode to extended recording modes like LP and EP, granting users control over recording time and quality.

The integrated VHS player adds to the DR-MV5BE’s appeal, allowing users to play their existing VHS tapes seamlessly. This feature is perfect for those looking to preserve old home movies, as the unit can convert VHS content to DVD format through a simple dubbing process. Additionally, the DR-MV5BE features front and rear audio/video inputs, enabling users to easily connect camcorders, gaming consoles, or other external devices for recording or playback.

In terms of connectivity, the JVC DR-MV5BE is equipped with various options. The HDMI output ensures high-definition video playback, while the standard composite outputs allow compatibility with older televisions. The presence of a USB port provides further versatility, allowing users to record or transfer content to and from USB storage devices.

The unit also boasts a user-friendly interface and remote control, simplifying the recording and playback process. With built-in features such as a programmable timer, users can schedule recordings in advance, ensuring they never miss their favorite shows or events.

Overall, the JVC DR-MV5BE is a robust device that encapsulates modern recording technology while retaining the nostalgia of VHS. Its blend of functions, alongside its user-friendly design and versatility, makes it a standout option for anyone looking to bridge the gap between analog and digital media.